
Table of Contents >> Show >> Hide
- Why You Should Replace a Broken Dryer Vent Cover ASAP
- Know Your Dryer Vent Cover Types
- Tools and Materials You’ll Need
- Step-by-Step: How to Replace an Exterior Dryer Vent Cover
- Safety, Code, and Best-Practice Tips
- Common Mistakes to Avoid When Replacing a Dryer Vent Cover
- Maintenance Tips for Your New Dryer Vent Cover
- When It’s Better to Call a Pro
- Real-World Experiences and Pro-Level Tips
- Conclusion
If your dryer vent cover is cracked, missing flaps, or hanging by one sad rusty screw, your house is basically posting a giant “Open for Business” sign to lint, rain, and curious critters.
The good news? Replacing a broken dryer vent cover is a fast, beginner-friendly DIY project that can usually be done in under an hour with basic tools.
In this guide, we’ll walk through why the vent cover matters, how to choose the right replacement, and a clear, step-by-step process to swap the old one for a new, weather-tight, code-friendly cover.
We’ll also add real-world tips and experiences at the end so your project goes smoothly the first time.
Why You Should Replace a Broken Dryer Vent Cover ASAP
That simple plastic or metal hood on the outside of your house does more than look pretty. A healthy dryer vent cover:
- Keeps pests out. Birds, mice, squirrels, and insects love warm dryer ducts. A broken or missing cover is an open invitation.
- Blocks rain and snow. Water getting into the duct can cause rust, mold, or damage to walls and insulation.
- Prevents backdrafts. A functional damper or flap helps stop cold air from flowing back into your laundry room and making your dryer work harder.
- Supports proper airflow. A damaged cover can trap lint or restrict exhaust, increasing the risk of overheating and, in worst cases, a dryer fire.
- Saves energy. A tight, well-sealed cover reduces drafts and helps your dryer operate efficiently.
If your current cover is cracked, missing louvers, permanently stuck open, or refusing to close all the way, it’s time to replace itno debating, no “maybe next year.”
Know Your Dryer Vent Cover Types
Before you run to the home center, it helps to understand the main types of exterior dryer vent covers you’ll see on the shelf:
Louvered Flap Covers
These are the classic covers with three or four horizontal flaps that open when the dryer is running and fall shut when it stops. They’re inexpensive, easy to install, and available in several colors to blend with your siding.
The trade-off: the flaps can get stuck open with lint or ice, which lets in pests and drafts if you don’t maintain them.
Hood or Damper Covers
Hood-style covers have a curved hood and a lightweight damper that opens when air pushes out. They usually offer excellent airflow and are less fussy than multi-flap designs.
They’re a great “set it and forget it” option for most homes.
Spring-Loaded or Magnetic Dampers
These covers stay tightly closed until the dryer pushes air out, then snap shut when the cycle ends.
They’re ideal if you live in a windy or very cold climate and want maximum backdraft protection. Just make sure the spring or magnet isn’t so strong that it restricts airflow from your dryer.
Pest-Resistant Cages and Guards
Metal or plastic cage covers are often added over a standard vent to keep birds and rodents from nesting.
They’re effective for pest control, but you need to be very careful about lint buildup. Anything that behaves like a “screen” can become a lint magnet and a fire risk if you don’t clean it regularly.
For most DIYers, a simple 4-inch louvered or hood-style cover made for dryer vents (no permanent screen in the airflow path) is the safest and easiest choice.
Tools and Materials You’ll Need
You don’t need a truckload of tools for this jobjust a small DIY kit. Here’s a typical list:
- New 4-inch dryer vent cover (louvered, hood, or damper style)
- Exterior-grade screws (often included with the cover)
- Drill or screwdriver
- Utility knife (for cutting old caulk)
- Exterior-grade silicone or polyurethane caulk
- Caulk gun
- Work gloves and safety glasses
- Small putty knife or scraper
- Shop vacuum or lint brush (to clean the duct)
- Metal snips (only if you need to trim a metal vent tube)
- Ladder, if the vent is located high on the wall
Always check whether your existing vent pipe is metal or plastic. Modern recommendations strongly favor rigid or semi-rigid metal ducting for safety and durability.
Step-by-Step: How to Replace an Exterior Dryer Vent Cover
Every house is a little different, but this step-by-step process covers what you’ll see in most single-family homes with a wall-mounted dryer vent.
Step 1: Prep and Stay Safe
- Turn off the dryer and, if possible, unplug it or switch off the dryer’s circuit breaker.
- Put on safety glasses and glovesthere may be sharp metal edges or debris in the duct.
- If you’re using a ladder, set it on flat, stable ground and maintain three points of contact as you climb.
Step 2: Remove the Old Vent Cover
Outside the house, locate the existing dryer vent hood. Brush away any cobwebs or lint so you can see what you’re working with.
- Use a screwdriver or drill to remove the screws that hold the vent cover to the siding or masonry.
- If the edges are sealed with old caulk or paint, carefully cut around the perimeter with a utility knife.
- Gently pull the old cover straight out. It may be attached to a short section of duct that slips into the house. Don’t yankwiggle it free to avoid damaging the interior duct.
If the cover refuses to budge, check for hidden screws or nails, or additional caulk around the top lip.
Step 3: Inspect and Clean the Duct
With the cover off, you’ll see the vent opening and a short length of duct leading into the wall.
- Use a flashlight to look for lint clumps, bird nests, or other blockages near the termination point.
- Vacuum out loose lint using a shop vac with a hose attachment, or use a dryer vent brush to gently loosen and remove buildup.
- If you find a heavy blockage, excessive lint, or signs of moisture damage, consider scheduling a professional dryer vent cleaning and inspection.
This is also a good time to peek inside from the laundry room side (if accessible) and make sure the interior duct connections are secure and metal, not flimsy plastic or foil.
Step 4: Dry-Fit the New Vent Cover
Before you add caulk, test the fit:
- Slide the new cover’s vent tube into the existing duct opening.
- Make sure it seats snugly without forcing or crushing the duct.
- Check that the mounting flange sits flat against the siding or brick with no large gaps.
If the vent tube is too long, mark the correct depth and trim the tube with metal snips (for metal) or a fine saw (for plastic). Always smooth sharp edges before reinstalling.
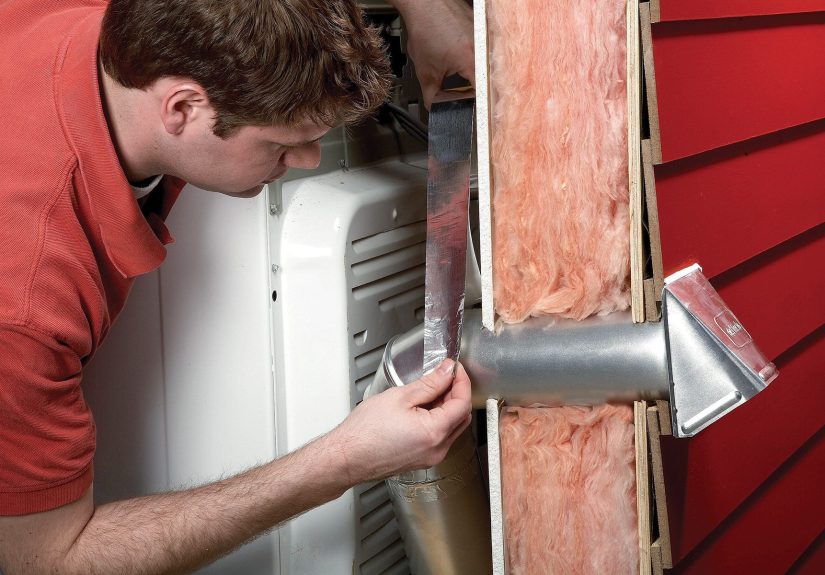
Step 5: Seal and Secure the New Cover
- Apply a continuous bead of exterior-grade caulk along the back of the vent cover’s mounting flange, especially along the top and sides for water protection.
- Slide the vent tube into the duct opening and press the flange firmly against the siding.
- Fasten the cover with the provided exterior-grade screws, driving them into solid sheathing or anchors (not just brittle siding).
- Tool a small bead of caulk along the top and sides of the cover where it meets the wall to shed water. Leave the bottom edge uncaulked or lightly sealed to allow any trapped moisture to escape.
Avoid caulking behind the vent tube itselfif you glue everything in solidly, the next replacement will be a nightmare.
Step 6: Test the Dryer and the New Cover
Head back inside, restore power to the dryer, and run it on a warm or air-fluff cycle.
- Outside, confirm that the vent flap(s) or damper opens fully when the dryer is running.
- Check for strong airflow. You should feel a steady, warm stream of air.
- When the dryer stops, the flap or damper should close on its own to seal out drafts and critters.
If the flap barely opens or seems sluggish, double-check that the vent tube isn’t pinched and that lint isn’t blocking the duct.
Safety, Code, and Best-Practice Tips
Dryer vents are one of those “small” details that fire codes and manufacturers actually care a lot about. A few key points:
- Skip the screens. Building and mechanical codes typically prohibit using screens that trap lint at the dryer vent termination. Stick with covers designed specifically for dryers, with flaps or dampers that allow lint to escape.
- Use metal ducts. Whenever possible, use rigid or semi-rigid metal ducting instead of thin plastic or foil flex ducts, which can crush easily and burn faster in a fire.
- Keep the run short and direct. Long, twisty duct runs reduce airflow and increase lint buildup. If your dryer vents halfway around the house, consider hiring a pro to reroute it.
- Clean regularly. Even with a brand-new cover, lint gradually builds up in the duct. A basic cleaning once or twice a year is cheap insurance.
- Watch your dryer’s behavior. If clothes suddenly take longer to dry, feel unusually hot, or you smell a burning odor, turn the dryer off and inspect the vent system immediately.
Common Mistakes to Avoid When Replacing a Dryer Vent Cover
Replacing the cover is simplebut there are a few traps that catch DIYers:
- Buying the wrong size. Most dryers use a 4-inch duct. Double-check the size on your existing vent or duct before purchasing a new cover.
- Choosing a non-dryer cover. Don’t grab a generic wall vent or range hood vent with built-in screens if it isn’t rated for dryer use.
- Sealing everything in place permanently. Heavy caulk behind the duct and cover might feel “extra secure,” but it makes future cleaning or replacement almost impossible.
- Ignoring the duct condition. If the metal duct inside the wall is crushed, rusty, or full of lint, simply adding a shiny new cover won’t fix the real problem.
- Skipping safety gear. Reaching into sheet metal without gloves is a fast way to give yourself a DIY battle scar.
Maintenance Tips for Your New Dryer Vent Cover
Once your new cover is in place, a little occasional maintenance will keep it working smoothly:
- Seasonal inspection. At least once a season, walk around your house and check that the vent flap opens freely and closes fully.
- Wipe away lint. Use a damp cloth or small brush to clear lint from the flap edges and hood.
- Trim vegetation. Keep plants, mulch, and snow away from the vent so nothing blocks airflow.
- Check caulk lines. Look for gaps where the cover meets the siding and touch up as needed to prevent water intrusion.
- Deep-clean the duct annually. Use a dryer vent brush kit or hire a professional to clean the entire run from dryer to exterior.
Think of the vent cover as your dryer’s “front door” to the outside. Every so often, that door needs a quick checkup.
When It’s Better to Call a Pro
Most straightforward dryer vent cover replacements are DIY-friendly. However, it’s smart to call in a pro if:
- The vent is located high on a second story or over a steep grade where ladder use is risky.
- You discover birds’ nests, major blockages, or signs of water damage in the wall.
- The duct run is long, complicated, or routed through concealed spaces you can’t easily access.
- The duct itself is damaged, disconnected, or not up to current safety guidelines.
In those cases, a handyman or dryer vent specialist can replace the cover, upgrade the ductwork, and clean the entire line in one visit.
Real-World Experiences and Pro-Level Tips
On paper, “replace dryer vent cover” sounds like a 15-minute job. In real life, it can range from “wow, that was easy” to “I did not plan on fighting a squirrel condo today.”
Here are some field-tested experiences and lessons that can save you timeand your sanity.
1. Expect More Lint Than You Think
Homeowners are often surprised by how much lint piles up right behind a broken or stuck-open cover.
When you pull the old vent off, it’s common to see a thick lint mat clinging to the edges or even forming a fuzzy plug just inside the duct.
A smart move is to keep a trash bag or bucket nearby so you can grab and toss clumps immediately.
If you’re using a ladder, tuck the bag into a belt or hang it from a rung so you’re not juggling lint with one hand and balancing with the other.
2. The “Bird Surprise” Is Real
Broken covers are prime real estate for birds looking for a cozy nesting spot. One common scenario: a homeowner pulls off the old cover and is greeted by twigs, feathers, and annoyed chirping.
If you run into this, gently remove nesting materials with gloved hands and a small scoop, then vacuum out the remaining debris.
Afterward, a pest-resistant hood or a code-compliant guard designed for dryers can help discourage future tenantsjust remember to keep it clean and free of lint.
3. Old Caulk Can Be Stubborn
On older homes, the original vent might be bedded in dried, rock-hard caulk or even multiple layers of paint.
Don’t rush this part: carefully scoring around the edges with a sharp utility knife and using a putty knife to pry helps prevent you from cracking siding or stucco.
Once the cover is off, take the extra couple of minutes to scrape away old caulk ridges and loose paint.
A clean, flat surface makes it much easier to get a neat, weather-tight seal with the new cover.
4. Double-Check the Interior Connection
Many people focus only on the outside, but the joint where the duct meets the inside of the wall or the dryer can also be a weak link.
If you can access the duct from the laundry room, gently tug to see if it’s firmly attached and secured with a clamp or foil tape (not regular cloth duct tape, which dries out and fails).
If the duct pulls loose easily or you see lots of crushed or kinked sections, you may want to replace that section while you’re already working on the exterior.
5. Wind and Gravity Are Your Friends (or Enemies)
When you test your new cover, don’t be surprised if a strong wind makes the flap jiggle or “chatter” a bit.
That’s usually normal, but if the flap blows open and stays there, you may need a design with a heavier damper or a spring-loaded option to handle your local conditions.
On the flip side, if the cover is mounted on a perfectly vertical wall and the flap seems reluctant to open, check whether the hinge is binding or if there’s extra paint or caulk catching it.
A quick trim with a utility knife or a slight hinge adjustment can solve the problem.
6. Don’t Underestimate the “Curb Appeal” Factor
While dryer vent covers are primarily about function, they’re also visible parts of your exterior.
Choosing a cover that matches your siding color or trim, and caulking it neatly, can make a small but noticeable difference in how finished your home looks.
If you’re planning exterior painting, it’s often worth installing the new vent cover first; that way, you can paint around it cleanly and avoid getting paint on a fresh plastic hood.
7. The “30-Minute Upgrade” That Pays Off
Replacing a broken dryer vent cover is one of those projects that punches above its weight.
In roughly half an hour, you improve safety, energy efficiency, and pest resistance in a part of the house most people forget exists.
You don’t need special skills, and the cost of materials is usually just the cover, a small tube of caulk, and maybe a handful of screws.
And the next time you start a load of laundry, you’ll know that the hot, moist air is exiting through a clean, properly working vent instead of fighting its way past broken plastic and a bird’s nest.
That peace of mind is worth every minute you spent on the ladder.
Conclusion
A broken dryer vent cover might look like a minor annoyance, but it affects safety, efficiency, comfort, and even the wildlife population behind your siding.
By choosing the right replacement, following a simple step-by-step process, and keeping up with a bit of routine maintenance, you can protect your home and help your dryer work at its best.
Grab your screwdriver, a tube of exterior caulk, and a new vent coverthis is one DIY project that truly deserves the title “quick win.”


