
Table of Contents >> Show >> Hide
- Why Vinyl Siding Gets Damaged
- Inspect Before You Repair
- Tools and Materials for Vinyl Siding Repair
- How to Repair Small Holes in Vinyl Siding
- How to Patch a Cracked Vinyl Siding Panel
- How to Replace a Damaged Vinyl Siding Panel
- Matching Old Vinyl Siding
- Repairing Loose Vinyl Siding
- Repairing Warped or Melted Vinyl Siding
- Caulk, Filler, or Replacement: Which Repair Is Best?
- Common Mistakes to Avoid
- When to Call a Professional
- Maintenance Tips After Repairing Vinyl Siding
- Real-World Experiences With Repairing Vinyl Siding
- Conclusion
Vinyl siding is one of those home exterior materials that quietly does its job year after year: blocking weather, boosting curb appeal, and pretending not to notice when the lawn mower launches a pebble at full speed. But even durable vinyl siding can crack, loosen, warp, fade, or develop holes. The good news? Repairing vinyl siding is often easier than homeowners expect, especially when the damage is small and the wall underneath is still dry and sound.
Whether you are dealing with a tiny nail hole, a cracked panel, a loose seam, or a section that looks like it lost a fight with a barbecue grill, this guide explains how vinyl siding repair works, what tools you need, when patching is enough, and when replacement is the smarter choice. The goal is simple: fix the problem cleanly, protect the house from moisture, and avoid turning a small repair into a weekend-long drama starring you, a ladder, and several words your neighbors should not hear.
Why Vinyl Siding Gets Damaged
Vinyl siding is made to handle rain, sunlight, wind, and seasonal temperature changes, but it is not indestructible. Most damage comes from impact, heat, poor installation, age, or movement. A thrown baseball, hail, a weed trimmer, patio furniture, or a ladder bump can leave cracks and holes. Heat from grills, reflective windows, or outdoor fire features can soften and distort panels. Improperly nailed siding may buckle because vinyl needs room to expand and contract as temperatures change.
One important thing to understand is that vinyl siding is not supposed to be nailed tightly against the wall. Panels hang from nail slots and should be able to slide slightly from side to side. If the fasteners are driven too tight, the siding can ripple, bow, or pop loose. That is why many siding repairs are not just cosmetic; they are also about restoring proper movement and drainage.
Inspect Before You Repair
Before grabbing caulk or ordering replacement panels, inspect the damaged area carefully. Look for cracks, loose locks, missing sections, warped panels, soft wall sheathing, mold stains, or signs of water entering behind the siding. Vinyl siding is designed as a protective cladding, but it is not the only water barrier. Behind it should be housewrap or another weather-resistant barrier that helps protect the structure.
If the damaged area is small and the wall behind it looks dry, a simple patch may work. If the panel is badly cracked, melted, brittle, or loose across a wide area, replacement is usually better. If you see rot, wet insulation, pests, or repeated leaks, call a qualified contractor. Siding repair is one thing; rebuilding hidden wall damage is another, and nobody wants a “surprise mushroom farm” inside the wall cavity.
Tools and Materials for Vinyl Siding Repair
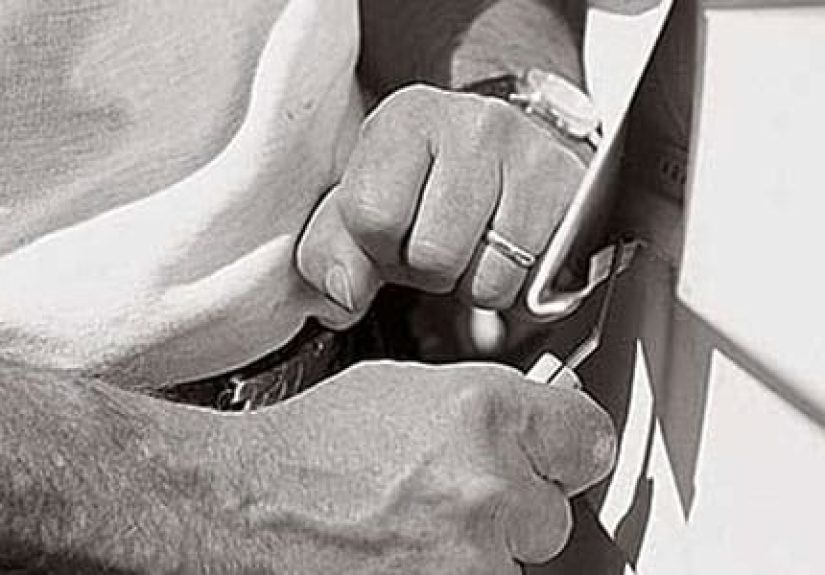
Most basic vinyl siding repairs require only a few tools. For small holes, you may need exterior-grade filler, vinyl-safe caulk, a putty knife, 220-grit sandpaper, a clean cloth, and matching exterior paint if needed. For panel replacement, you will need a vinyl siding zip tool, a utility knife, tin snips, a pry bar, galvanized roofing nails or appropriate exterior screws, a tape measure, a level, and a matching replacement panel.
The zip tool is the hero of vinyl siding repair. It slips under the lower edge of a panel and unlocks the siding seam without destroying the surrounding pieces. It is inexpensive, simple, and far better than trying to pry panels apart with a screwdriver like you are opening a stubborn can of beans.
How to Repair Small Holes in Vinyl Siding
Small holes, especially those around an inch or less, can often be patched with exterior filler or vinyl siding repair material. Start by cleaning the area with mild soap and water, then rinse and let it dry completely. If the edges around the hole are raised, gently flatten them with a scraper. Lightly sand the area so the repair material can grip the surface.
Apply the exterior filler according to the manufacturer’s instructions. For deeper holes, build the repair in thin layers instead of forcing a large blob into the opening all at once. Slightly overfill the hole, let it cure, then sand it smooth. If the color does not match, use a small amount of exterior paint that closely matches the siding. Keep expectations realistic: a patch can look very good from the sidewalk, but if you stare at it from six inches away while holding coffee and judgment, you may still notice it.
How to Patch a Cracked Vinyl Siding Panel
A narrow crack can sometimes be sealed with vinyl-safe exterior caulk, especially if it is not in a highly visible area. Clean and dry the surface first. Apply a thin bead of caulk into the crack, smooth it carefully, and wipe away excess. Choose a color-matched caulk when possible.
For a larger crack, a patch made from a scrap piece of matching vinyl siding may be stronger and better looking. Cut a patch slightly larger than the damaged area, remove the top nailing strip if needed, and test the fit. Apply exterior-grade caulk or adhesive behind the patch, press it over the crack, and secure it with painter’s tape until it cures. This works best on lower-visibility areas. On a front-facing wall, replacing the damaged panel may provide a cleaner result.
How to Replace a Damaged Vinyl Siding Panel
Replacing a vinyl siding panel is the best option for major cracks, holes, melted areas, or severe warping. First, use a zip tool to unlock the panel above the damaged one. Slide the tool under the bottom lip of the upper panel, hook the lock, and pull down while moving along the seam. Once the upper panel is loose, you can access the nails holding the damaged panel.
Remove the fasteners with a pry bar, then unlock and remove the damaged panel. Measure the opening and cut the replacement panel to size. If you are replacing only part of a panel, make sure the new piece overlaps the surrounding siding enough to shed water properly and allow movement. Slide the replacement into place, lock the bottom edge, and fasten it through the center of the nail slots.
Do not drive nails tight. Leave a tiny gap under the nail head so the panel can move. The siding should hang securely but still slide slightly left and right. After fastening, use the zip tool to relock the panel above it. Press along the seam until it snaps back into place.
Matching Old Vinyl Siding
Finding an exact match can be the hardest part of vinyl siding repair. Siding fades over time, and older product lines may be discontinued. Start by checking the garage, attic, shed, or basement for leftover panels from the original installation. If you do not have extras, remove a small sample from an inconspicuous area and bring it to a siding supplier or home improvement store.
If an exact match is impossible, consider removing a panel from a less visible wall and using it on the damaged area. Then install the closest available match in the hidden location. This “siding swap” trick is common because a slightly different shade near the back corner of the house is less noticeable than a mismatched patch beside the front door.
Repairing Loose Vinyl Siding
Loose siding often happens after high wind, poor fastening, or accidental impact. If a panel simply came unlocked, you may be able to snap it back into place with a zip tool. Hook the lower edge of the panel above, pull it down slightly, and guide the lock back over the panel below. Work slowly along the seam until it is fully connected.
If the panel repeatedly comes loose, check the nailing. Fasteners may be missing, too tight, off-center, or installed into weak sheathing. Correct the fastening issue before relocking the panel. A quick snap-back repair feels satisfying, but if the reason it failed is still there, the next windstorm may send it flapping again like a very unattractive flag.
Repairing Warped or Melted Vinyl Siding
Warped vinyl siding usually cannot be flattened permanently. Once heat distorts the shape, replacement is the most reliable fix. Common heat sources include grills placed too close to the wall, reflected sunlight from energy-efficient windows, outdoor heaters, and fire pits. Replace warped panels and then solve the heat problem, or the new siding may suffer the same fate.
Keep grills and heat-producing equipment well away from vinyl siding. If window reflection is the issue, talk with a window or siding professional about screens, films, landscaping, or other solutions that reduce concentrated heat. Repairing the panel without addressing the heat source is like mopping the floor while the faucet is still running.
Caulk, Filler, or Replacement: Which Repair Is Best?
Use caulk for tiny cracks and gaps
Color-matched exterior caulk is useful for small cracks, minor gaps, and temporary weather protection. It is not ideal for large holes or structural repairs.
Use filler for small holes
Exterior-grade filler can work well for nail holes, screw holes, and small punctures. Prep the surface carefully so the filler bonds properly.
Use a patch for medium damage
A vinyl patch can cover a larger damaged spot without replacing the whole panel. This is practical for side walls, utility areas, and places where perfect appearance is not essential.
Replace the panel for major damage
Replacement is best for melted siding, long cracks, brittle panels, storm damage, or highly visible areas where a patch would stand out.
Common Mistakes to Avoid
The biggest mistake in vinyl siding repair is fastening panels too tightly. Vinyl expands and contracts, so it must be able to move. Another common mistake is sealing drainage paths. Siding systems are designed to let incidental moisture escape, so do not caulk every seam as if you are waterproofing a submarine.
Also avoid using harsh cleaners, stiff wire brushes, or abrasive pads that can scratch and dull the surface. When cleaning before a repair, use mild soap, water, and a soft-bristled brush. If you use a pressure washer, keep the spray gentle and avoid forcing water upward behind the panels.
When to Call a Professional
Many homeowners can handle small vinyl siding repairs, but professional help is smart for large wall sections, upper-story repairs, repeated leaks, storm damage, insurance claims, or suspected rot behind the siding. A contractor can also help match discontinued siding, repair flashing problems, and make sure the weather barrier behind the panels is intact.
Call a pro if the repair requires working high on a ladder, removing trim around windows, or dealing with electrical fixtures. Saving money is great. Performing acrobatics with a pry bar on the second story is less great.
Maintenance Tips After Repairing Vinyl Siding
Once the repair is complete, inspect your siding at least once or twice a year. Look for cracks, loose seams, missing panels, damaged trim, open gaps around penetrations, and areas where landscaping rubs against the wall. Wash the siding periodically with a garden hose, mild soap, and a soft brush. Pay attention to shaded areas where mildew can appear and areas under eaves where rain does not naturally rinse away dirt.
Keep shrubs trimmed back from the siding, move grills away from walls, and avoid leaning heavy items against the house. Small habits prevent many repairs. Vinyl siding does not ask for much, but it does appreciate not being roasted, scraped, or used as a backboard for every driveway sport invented by children.
Real-World Experiences With Repairing Vinyl Siding
One common experience homeowners have is discovering that the actual repair takes less time than finding the matching siding. A homeowner may spend twenty minutes replacing a cracked panel and two days hunting through the garage for the leftover pieces from 2008. This is why it is wise to save extra siding after any installation. Label the box with the brand, color, profile, and installation date. Future you will be grateful, and future you is probably already dealing with enough.
Another practical lesson is that small holes should not be ignored. A tiny puncture from a screw, cable clip, or old fixture may seem harmless, but it can allow wind-driven rain and insects to reach the wall assembly. A quick patch with the right exterior product is inexpensive and can prevent hidden moisture issues. Homeowners who fix these small defects early usually spend less than those who wait until a panel cracks further or moisture stains appear indoors.
Many DIY repairs also teach the importance of temperature. Vinyl is more flexible in warm weather and more brittle when cold. If you try to unlock or cut vinyl siding on a freezing day, it may crack more easily. Mild weather is ideal for repair work. If a winter repair is urgent, work slowly, avoid bending the panels sharply, and consider using a temporary weatherproof patch until proper replacement can be done in better conditions.
Homeowners also learn quickly that the zip tool is worth owning. At first glance, it looks too simple to be important, but it makes removing and relocking panels much easier. Trying to repair siding without one often leads to scratched panels, broken locks, and a strong desire to blame the siding for having “an attitude.” With the right tool, the panels separate cleanly and go back together more predictably.
Color matching is another real-world challenge. Even when you find the exact brand and color, the new panel may look brighter because the old siding has faded from sun exposure. This does not always mean the match is wrong. Sometimes the best fix is to place the new piece in a less visible area and move an older matching piece to the front. Contractors use this strategy because the eye notices color differences more on large, visible walls than on tucked-away side elevations.
Finally, successful vinyl siding repair is about patience. Rushing leads to overdriven nails, crooked cuts, messy caulk, and panels that do not lock correctly. Measure twice, cut carefully, keep the panel loose enough to move, and step back to inspect the wall from normal viewing distance. The best repair is not the one that looks perfect under a magnifying glass; it is the one that protects the house, blends naturally, and lets you walk past it without thinking, “Yep, there’s my mistake.”
Conclusion
Repairing vinyl siding is a practical home maintenance skill that can save money, prevent water damage, and keep your exterior looking sharp. Small holes can often be filled, cracks can sometimes be patched, and badly damaged panels can usually be replaced with basic tools and careful technique. The most important rules are simple: clean the area first, use materials made for exterior vinyl repairs, avoid nailing panels too tightly, and replace warped or severely cracked siding instead of hiding the problem.
With a little patience and the right approach, vinyl siding repair does not have to be intimidating. Think of it as home exterior first aid: clean the wound, choose the right bandage, and do not panic unless the wall behind it looks suspicious. Your house will look better, stay better protected, and quietly forgive you for that one time the ladder slipped.
Note: This article is written for general educational and home-improvement publishing purposes. For major siding damage, hidden moisture, structural concerns, upper-story work, or repairs involving electrical fixtures, consult a qualified siding professional.


