
Table of Contents >> Show >> Hide
- Why Pallet Wood + String Art Works So Well
- Materials and Tools
- Step 1: Choose Pallet Wood You Actually Want in Your House
- Step 2: Break Down and Prep the Pallet Boards
- Step 3: Pick a Flag Design That Matches Your Patience Level
- Step 4: Stain/Paint the Background First (Trust Me on This)
- Step 5: Transfer Your Pattern and Place the Nails
- Step 6: String It Up (The Satisfying Part)
- Stars Without Losing Your Weekend
- Finishing Touches That Make It Look Store-Bought (In a Good Way)
- Troubleshooting: Fixes for the Most Common “Oops” Moments
- Design Variations to Make It Yours
- Cost, Time, and Difficulty (The Honest Version)
- Conclusion: A Flag You Can Actually Brag About
- of Real-World “Yep, That Happened” Experiences (So You’re Ready)
If you’ve ever looked at a rustic wooden flag on someone’s wall and thought, “I could totally make that,”
congratulationsyou have the exact amount of confidence required for this project. A string art flag on pallet wood
is equal parts woodworking, craft therapy, and “why do I suddenly own 400 tiny nails?” It’s also one of the best
ways to turn rough, imperfect boards into something that looks intentionally awesome.
In this guide, you’ll build a flag-style backdrop from pallet wood, then use nails and thread to add high-contrast
stripes, stars, or an outline design that pops. The vibe can be classic Americana, modern monochrome, sports-team
colors, or a custom “family flag” that quietly tells visitors, “Yes, I do DIY. Please admire respectfully.”
Why Pallet Wood + String Art Works So Well
Pallet wood already comes with built-in character: knots, grain variation, tiny dings, and that “found it, fixed it”
charm. String art adds crisp lines and texture on top of that rustic base. When you combine the two, you get a piece
that’s bold from across the room and fun up closebecause people will absolutely lean in and ask, “How did you even do that?”
(You’ll smile calmly. Inside, you’ll remember the moment your thread turned into a bird’s nest. Growth!)
Materials and Tools
Wood and prep
- Pallet wood slats (enough to create your desired flag size) or a pallet-wood panel you’ve already assembled
- Sandpaper (80/120/180 grit) or an orbital sander
- Wood glue and clamps (helpful for panel builds)
- Optional: 1×2 or 1×3 boards for a rear frame (keeps things flatter and sturdier)
Fasteners and layout
- Finish nails or wire brads (commonly 3/4″ to 1 1/4″, depending on board thickness)
- Hammer (or a brad nailer for assemblystill hammer for the string-art nails)
- Ruler/tape measure, pencil, square
- Printed template (flag outline, stars, stripes guides, or your custom pattern)
- Painters tape or spray adhesive (temporary) to hold the template
String art supplies
- Embroidery floss (great color range), cotton thread, or baker’s twine for a rustic look
- Scissors
- Tweezers (shockingly useful for pulling paper bits from around nails)
- Optional: a dab of clear-drying glue to lock knots in place
Finish and hanging
- Stain and/or paint (common: red/white/blue, or a weathered stain palette)
- Clear coat (water-based polycrylic or polyurethane)
- D-ring hangers, sawtooth hanger, or French cleat (for larger/heavier builds)
Step 1: Choose Pallet Wood You Actually Want in Your House
Pallets are great… until they’re not. Since pallets are used for shipping and storage, you want to be picky.
Look for pallets with a visible stamp that indicates heat treatment (often marked “HT”). Avoid pallets marked “MB”
(methyl bromide fumigation). If there’s no stamp, the safest move is to skip it and find a different pallet.
Also do a common-sense check: if the pallet smells like chemicals, has mystery stains, or looks like it survived
a questionable alleyway situation, don’t bring it home. Pallet wood is “reclaimed,” not “adopt every problem you see.”
Step 2: Break Down and Prep the Pallet Boards
Deconstruct without turning your pallet into splinters confetti
Use a pry bar, pallet buster, or a reciprocating saw to cut nails between slats and stringers. Cutting fasteners is
often cleaner than prying everything apart like you’re auditioning for a demolition show.
Sand like you mean it (but not into dust forever)
Start with 80 grit to knock down rough fibers, then move to 120 and finish with 180 for a touchable surface.
Pallet wood doesn’t need to feel like a baby grand piano, but it should not feel like a cactus.
Flatten your “flag blank”
If you’re assembling a panel from slats, align the boards, glue edges where appropriate, and add a simple frame on
the back (horizontal supports) to help keep everything together. This also gives you a better surface for hanging hardware.
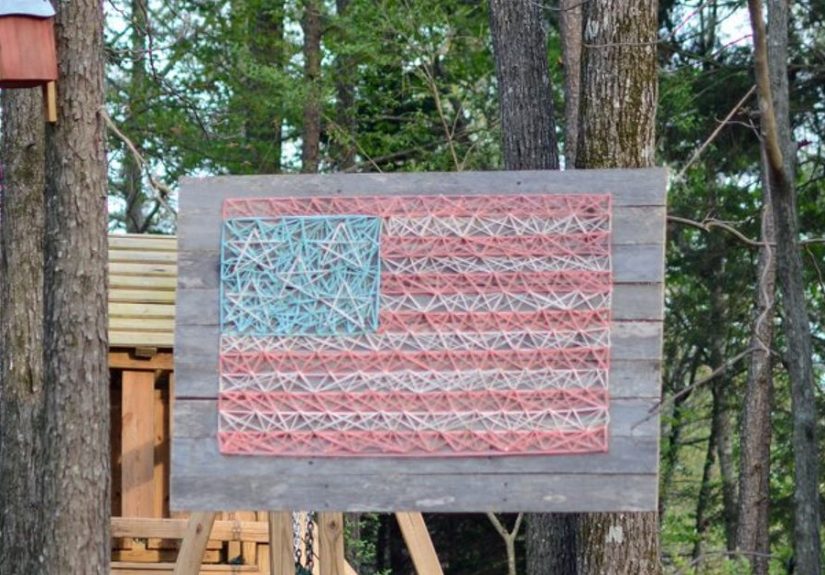
Step 3: Pick a Flag Design That Matches Your Patience Level
“Flag” can mean a lot of things here. You can go classic with the American flag (stars and stripes), create a state
flag-inspired color block, or make a simplified “flag-style” design: stripes + a canton area + a bold string-art symbol.
Your options range from “weekend project” to “I now understand medieval tapestry makers.”
Three beginner-friendly design routes
- String art stripes: Paint/stain the background first, then use thread to add crisp, raised stripe lines.
- String art stars (simplified): Use a smaller number of larger stars or a single star cluster instead of 50.
-
Outline flag + fill: Nail the outer flag shape and weave a fill pattern. This reads “flag” without requiring
microscopic star alignment.
Step 4: Stain/Paint the Background First (Trust Me on This)
It’s much easier to stain or paint the wood before the string goes on. Thread is not a fan of wet paint.
(Thread is also not a fan of being touched, moved, looked at too intensely, or existing in general. But we love it anyway.)
Simple finishing ideas
- Rustic stain stripes: Alternate light and dark stains for subtle stripes.
- Classic paint: Paint red/white stripes and a blue canton, then lightly sand for a distressed look.
- Monochrome modern: Charcoal/black stain with white string for a clean, graphic style.
Let the finish dry completely. If you’re adding a clear coat, do it now (or after nails are in, but before string).
The goal is a sealed surface that won’t shed dust into your thread later.
Step 5: Transfer Your Pattern and Place the Nails
Make (or print) a template
Print your pattern to scale and tape it onto the wood. This can be a stars-and-stripes guide, star outlines,
stripe endpoints, or a symbol you want in the canton. If your flag is large, print in tiles and tape the pages together.
Nail spacing that looks good
For most string art, nails spaced about 1/2″ to 3/4″ apart create clean edges without requiring an emotional support
beverage. Leave enough nail head exposed so the string can wrap multiple timesthink “half the nail visible,” not “nailed to the Earth’s core.”
Pro tip: outline first
If your design includes a canton border, stripe edges, or a star outline, nail those key outlines first.
An intentional outline makes the final piece look sharper, even if your weaving gets a little “free-spirited.”
Once nails are in, carefully tear away the paper template. Use tweezers to grab stuck bits around nails.
This is the moment you’ll understand why craft people hoard tweezers like tiny dragons.
Step 6: String It Up (The Satisfying Part)
Start and tie off
Tie a knot around a starting nail (double-knot if you can). Trim the tail close. If you want extra security,
add a tiny dot of clear-drying glue on the knot.
Build a clean outline
Wrap the string around each nail along the outline at least once. This creates a stable “frame” so your design keeps its shape.
Then begin crisscrossing from nail to nail to fill in.
Fill patterns that look intentional
- Classic crisscross fill: Random-looking lines that build density (the “trust the process” method).
- Angle fill: Keep your wraps mostly in one direction for a modern, graphic vibe.
- Stripe emphasis: Weave along stripe boundaries to make raised stripe lines stand out.
Keep tension consistentsnug, not guitar-string tight. If the thread is too loose, it sags. Too tight, it snaps.
Your goal is “confident handshake,” not “arm-wrestling match.”
Stars Without Losing Your Weekend
Stars are the part where ambitious projects go to humble people. If you want a traditional feel without placing nails
for 50 tiny stars, try one of these smarter approaches:
Shortcut options
- Painted or stenciled stars + string stripes: Paint stars in the canton, then use string to add bold stripe texture.
- Fewer, larger stars: Use 5–13 larger stars as a stylized nod to the flag theme.
- Single statement star: One big star in white string over a dark canton looks dramatic and modern.
If you do string-art stars, consider outlining each star first (a full loop around nail heads), then fill.
It’s slower, but it reads as crisp and intentional instead of “abstract snowflake situation.”
Finishing Touches That Make It Look Store-Bought (In a Good Way)
Seal it
If you haven’t already, apply a clear coat to protect the wood. Avoid soaking the string with heavy wet coats.
Light coats are your friend. If you’re worried, tape off string-heavy areas and seal the wood before weaving.
Add hanging hardware
For smaller pieces, a sawtooth hanger works. For larger flags (especially pallet wood), use D-rings with wire
or a French cleat for stability. Pallet wood is charming, but it can be heavier than your optimism predicted.
Optional upgrades
- Burned edges: Lightly torch edges for contrast (only if your wood is safe and fully dry).
- Framed border: Add a simple frame around the front for a clean finish.
- Backer board: Add a thin plywood backing to keep nails and knots tidy from behind.
Troubleshooting: Fixes for the Most Common “Oops” Moments
My string keeps slipping off nails
Make sure nail heads are exposed enough for wrapping. Add an outline pass that wraps each nail once before filling.
You can also gently tap nails a bit deeper so the head sits closer to the wood (still leave room to wrap).
My thread snapped
Ease up on tension, and don’t yank across sharp nail edges. Tie off at the nearest nail and continueno one will see
the “thread splice,” and if they do, tell them it’s “mixed media realism.”
My pallet wood warped
Add a rear frame/supports to the back, and store the piece flat while drying. Sealing both front and back can also help
reduce moisture changes over time.
Design Variations to Make It Yours
- Farmhouse neutral flag: Whitewashed wood, black thread, minimal stars.
- State pride twist: Use string art to outline your state shape in the canton.
- Military or first responder tribute: Subtle stripe accents with one bold color line or emblem (tastefully done).
- Team colors: Same layout, different colorshang it in a game room and watch people immediately ask where you bought it.
Cost, Time, and Difficulty (The Honest Version)
Cost: Often budget-friendly if you already have tools. Nails and embroidery floss are inexpensive,
and pallet wood can be free or cheap. Paint/stain and clear coat are the main extras.
Time: Prep and finishing can take longer than the stringing. Expect a solid afternoon for a small piece,
or a weekend for a larger flag with detailed stars.
Difficulty: Beginner-friendly if you choose a simplified star plan. The “hard” part is patience,
not complexity.
Conclusion: A Flag You Can Actually Brag About
A string art flag on pallet wood is one of those projects that looks impressive, uses simple materials,
and teaches you a few genuinely useful skills along the waylike how to eyeball nail spacing, how to keep thread tension steady,
and how to accept that perfection is overrated when your wall decor has texture and personality.
Go classic with stars and stripes, or go custom with colors and symbols that mean something to you. Either way,
when someone asks where you bought it, you get to say the magic words: “Oh, I made it.”
(Pause for applause. Optional dramatic bow.)
of Real-World “Yep, That Happened” Experiences (So You’re Ready)
Here’s the part nobody puts on the glossy Pinterest photo: making a string art flag on pallet wood is a tiny adventure.
Not a scary onemore like a sitcom episode where you learn things and occasionally mutter, “Interesting choice, thread.”
If you’re about to start, these common experiences will feel very familiar, very quickly.
First, the pallet itself. People often expect a pallet to come apart like a polite piece of furniture. It does not.
Pallets are held together like they’re guarding state secrets. The most common “aha” moment is realizing that prying every
nail out can split boards and bruise your pride. Cutting fasteners and working slowly usually saves both wood and sanity.
And yesat some point you will discover one nail that refuses to leave. That nail lives there now. It pays rent.
Next comes sanding, where optimism meets dust. Pallet wood can look rustic and charming, but it also likes to produce
splinters with the confidence of a cactus. Many makers start sanding thinking it’ll take ten minutes, then emerge later
like, “I have learned the true meaning of grit.” The good news is you don’t need perfectionjust a surface that won’t
snag thread or hands. Once the boards feel “touchable,” you’re golden.
Then there’s layout. People often worry they’re “not artistic,” but the real trick is consistency: even-ish nail spacing,
straight-ish lines, and a template that doesn’t slide around mid-hammer. The classic experience here is tapping in a
gorgeous row of nails… then realizing the template was slightly crooked. If that happens, remember: rustic decor forgives
a lot. Also, humans rarely measure walls with lasers; they just say, “Nice!” and keep walking.
When you start stringing, you’ll hit the most universal string-art emotion: “This looks terrible.” That’s normal.
Early weaving looks like a chaotic spider audition. Then, gradually, it transforms. The lines thicken, the shape appears,
and suddenly your brain goes, “Ohhhh, I get it.” This is why outlining first helpsit gives your eyes something to trust
while the fill builds up.
Another common moment: thread snapping. It happens when tension gets too aggressive or you catch a sharp angle.
The fix is surprisingly painlesstie off at a nearby nail and keep going. Once you layer more wraps, that “break” disappears.
Most people also discover their personal thread preference here: embroidery floss for clean lines, twine for bold rustic,
or cotton thread for a balanced middle ground.
Finally, the reveal. The best experience is stepping back after the last knot, seeing the texture and contrast, and realizing
you made something that looks legitimately finished. It’s the kind of project that upgrades a room instantlybecause it’s not
just decor, it’s a story: reclaimed wood, hands-on work, and a few comedic detours you’ll laugh about later. And when someone
asks, “Did you really make that?” you get to say, “Yep,” with the calm confidence of a person who has conquered both pallets
and string.


