
Table of Contents >> Show >> Hide
- Before You Import: Prepare Your Excel Contact List
- Method 1: Import Contacts from Excel to Classic Outlook for Windows
- Method 2: Import Excel Contacts Using Outlook on the Web or Outlook.com
- Method 3: Use an Outlook-Friendly CSV Template for Messy Excel Files
- Common Problems When Importing Contacts from Excel to Outlook
- Practical Example: Importing a Small Client List
- Best Practices for a Smooth Outlook Contact Import
- Which Import Method Should You Choose?
- Experience Notes: What Actually Matters When Importing Contacts to Outlook from Excel
- Conclusion
Moving contacts from Excel to Outlook sounds like one of those “simple” tech tasks that somehow eats an entire afternoon, three cups of coffee, and your remaining patience. The good news? It does not have to. Whether you are organizing a sales list, migrating from an old email system, cleaning up a business address book, or finally turning that mysterious spreadsheet named “contacts-final-final-REAL.xlsx” into something useful, Outlook gives you several practical ways to bring Excel contact data into your address book.
The key thing to understand is that Outlook does not usually import a regular Excel workbook directly. Instead, the safest method is to convert your Excel contact list into a CSV file, then import that CSV into Outlook. CSV stands for comma-separated values, which is just a plain-text format that helps different apps understand spreadsheet data. Think of it as the universal translator between Excel and Outlook, minus the dramatic sci-fi soundtrack.
In this guide, you will learn three easy ways to import contacts to Outlook from Excel: using classic Outlook for Windows, using Outlook on the web or Outlook.com, and using a cleaner template-based method when your spreadsheet is messy. You will also get practical troubleshooting tips, field-mapping advice, and real-world experience notes to help avoid common mistakes.
Before You Import: Prepare Your Excel Contact List
Before opening Outlook, spend a few minutes cleaning your Excel file. This is the boring part, yes, but it is also the part that prevents your boss, clients, friends, or newsletter subscribers from appearing in Outlook as “Phone Number Smith” or “Company Email.”
Use Clear Column Headings
Outlook imports contacts more smoothly when the first row of your spreadsheet contains recognizable headings. Good examples include:
- First Name
- Last Name
- Email Address
- Mobile Phone
- Business Phone
- Company
- Job Title
- Street Address
- City
- State
- ZIP Code
- Country
- Notes
Avoid vague headings like “Info,” “Data 1,” “Contact Thing,” or “Stuff.” Outlook is useful, but it is not a mind reader. Clear headings make it easier to map Excel columns to Outlook contact fields later.
Keep One Contact Per Row
Each row should represent one person or organization. For example, if you have three email addresses for one person, either choose the primary one or place the extra addresses in separate columns such as “Email 2” and “Email 3.” Do not stack multiple people into one row. Outlook will not enjoy solving that puzzle, and neither will you.
Save a Backup Copy First
Before changing anything, save a backup of your original Excel file. Then create a working copy for cleanup and conversion. If something goes wrong, you can return to the untouched version instead of trying to reconstruct your contact list from memory, old emails, and mild panic.
Convert the Excel File to CSV
Once your spreadsheet is ready, save it as a CSV file. In Excel, open the worksheet that contains your contact list, choose File, select Save As, choose a folder, and select CSV (Comma delimited) or a similar CSV option as the file type. If Excel warns you that CSV does not support multiple sheets, that is normal. A CSV file saves the active sheet only, so make sure the correct worksheet is open before saving.
This simple conversion is the foundation of most Outlook contact imports. If your spreadsheet has several tabs, separate formulas, filters, or fancy formatting, Outlook does not need any of that. It only needs clean rows, clear columns, and contact data it can match to its own address book fields.
Method 1: Import Contacts from Excel to Classic Outlook for Windows
This is the most common method for users who have the desktop version of Outlook, including Outlook for Microsoft 365, Outlook 2024, Outlook 2021, Outlook 2019, and Outlook 2016. Classic Outlook includes an Import and Export Wizard that can bring in your CSV file and place the contacts into your Outlook Contacts folder.
Step 1: Open the Import and Export Wizard
Launch classic Outlook on your Windows computer. At the top-left of the ribbon, click File. Then choose Open & Export and select Import/Export. This opens the Import and Export Wizard, which sounds more magical than it looks, but it does the job.
Step 2: Choose the Right Import Option
In the wizard, choose Import from another program or file, then click Next. On the next screen, choose Comma Separated Values. This tells Outlook that your contact list is coming from a CSV file.
Step 3: Select Your CSV File
Click Browse and find the CSV file you saved from Excel. Outlook may ask how you want to handle duplicates. The options usually include replacing duplicates, allowing duplicates, or not importing duplicate items.
If you are importing an updated version of an existing contact list, choose carefully. Replacing duplicates can update records but may overwrite information already in Outlook. Allowing duplicates is safer if you want to review everything later, but it can create a messy address book. If you are unsure, import into a temporary contacts folder first so you can inspect the results before merging them into your main Contacts folder.
Step 4: Pick the Contacts Folder
Outlook will ask where to import the contacts. Select your Contacts folder. If you use multiple accounts in Outlook, make sure you choose the contacts folder associated with the correct mailbox. This matters because importing into the wrong account can make it look like the import failed, even though your contacts are simply hiding in another mailbox like shy digital hermits.
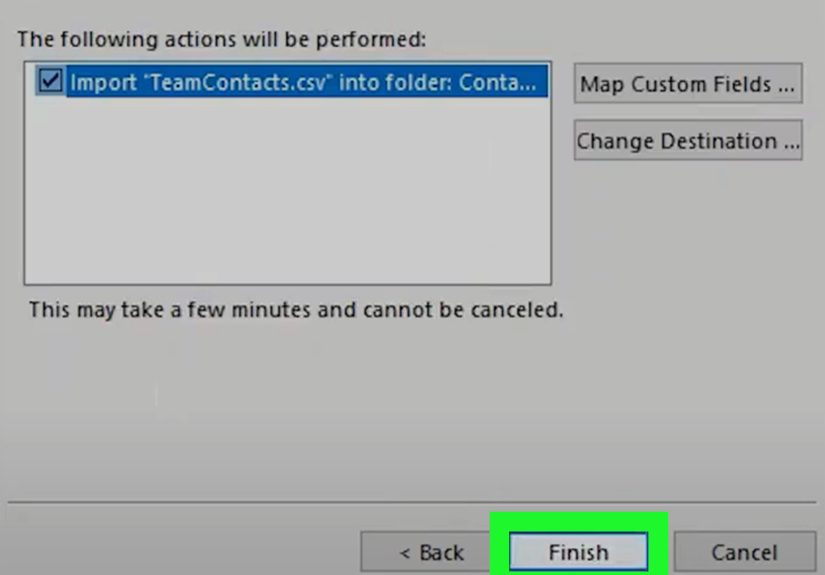
Step 5: Map Custom Fields
This is the most important part of the process. Click Map Custom Fields. Outlook will show your CSV column headings on one side and Outlook’s contact fields on the other. If Outlook recognizes your headings, some fields may map automatically. If not, drag each Excel column to the correct Outlook field.
For example, drag “First Name” to Outlook’s First Name field, “Last Name” to Last Name, “Email Address” to E-mail Address, and “Mobile Phone” to Mobile Phone. If your spreadsheet uses headings like “Client Email” or “Cell,” you may need to map them manually.
Step 6: Finish the Import
After mapping fields, click OK, then choose Finish. Outlook will import your contacts. The time required depends on the size of your CSV file. A small personal list may finish almost instantly, while a large business database may take longer.
Best For
This method is best for users who work mostly in classic Outlook on Windows and need the most control over field mapping. It is especially useful for business contacts, client lists, vendor databases, and organized spreadsheets with several columns.
Method 2: Import Excel Contacts Using Outlook on the Web or Outlook.com
If you use the new Outlook, Outlook on the web, or Outlook.com, importing contacts usually happens through the People area rather than the desktop Import and Export Wizard. This method is convenient because it works in a browser and syncs contacts through your Microsoft account or Microsoft 365 mailbox.
Step 1: Prepare the CSV File
Just like the desktop method, begin by saving your Excel contact list as a CSV file. Keep the headings simple and make sure email addresses are in a clean column. If possible, use common field names such as First Name, Last Name, Email Address, Company, and Phone.
Step 2: Open People in Outlook
Sign in to Outlook on the web or Outlook.com. Go to the People section. Depending on your Outlook layout, you may find People in the left navigation bar, the app launcher, or the apps menu.
Step 3: Use Manage Contacts
Look for Manage contacts or a similar option. Choose Import contacts. Then select Browse, choose your CSV file, and start the import. Outlook may show a preview of the contact data before importing.
Step 4: Check the Preview
If the preview looks good, continue. If the text looks scrambled, symbols appear in names, or columns seem broken, cancel the import and fix the CSV file first. Encoding issues can cause special characters to display incorrectly, especially in names, addresses, or international contact lists. Saving the CSV in UTF-8 format often solves this problem.
Step 5: Confirm the Import
After the import finishes, search for a few contacts to confirm they arrived correctly. Check names, email addresses, phone numbers, and company fields. If the data appears in the wrong fields, revise the CSV headings and try again.
Best For
This method is best for Outlook.com users, Microsoft 365 users who prefer the browser, and people using the new Outlook interface. It is also useful if you want your contacts available across web, desktop, and mobile versions of Outlook through account sync.
Method 3: Use an Outlook-Friendly CSV Template for Messy Excel Files
Sometimes the problem is not Outlook. Sometimes the problem is the spreadsheet. If your Excel file came from a CRM export, an old database, a form submission tool, a shared office file, or a colleague who believes column headings are optional, a template-based method can save you from import chaos.
Why a Template Helps
An Outlook-friendly CSV template uses column headings that Outlook is more likely to understand. Instead of forcing Outlook to guess what “Main Contact,” “Mail,” “Work Tel,” or “Rep Notes” means, you organize the spreadsheet around standard contact fields. This reduces mapping errors and makes future imports easier.
Step 1: Create a Clean Contact Template
Open a new Excel workbook and create column headings such as:
- First Name
- Middle Name
- Last Name
- E-mail Address
- Business Phone
- Mobile Phone
- Company
- Job Title
- Business Street
- Business City
- Business State
- Business Postal Code
- Business Country/Region
- Notes
You do not need to use every field. Only include what matters for your contact list. For a small personal list, first name, last name, email address, and phone number may be enough. For a business database, company, job title, and address fields may be essential.
Step 2: Copy Data Carefully
Copy your existing contact data into the matching columns. This is where you fix inconsistencies. For example, do not mix mobile and office numbers in one column unless you truly do not care where the numbers land in Outlook. Separate first and last names if possible. Remove blank rows, repeated headers, merged cells, and strange formatting.
Step 3: Standardize the Data
Before saving as CSV, scan the list for common problems. Check that email addresses contain “@” symbols, phone numbers are not accidentally stored in scientific notation, and ZIP codes have not lost leading zeros. Excel is helpful, but it has a mischievous habit of reformatting data when you least expect it.
Step 4: Save as CSV and Import
Save the cleaned template as a CSV file, then import it using either classic Outlook or Outlook on the web. Because the headings are cleaner, Outlook has a better chance of matching the fields correctly. Even if you still need to map fields manually, the process will be faster and less confusing.
Best For
This method is best for large, messy, or business-critical imports. It is also ideal if you plan to update Outlook contacts regularly from Excel because you can reuse the same template every time.
Common Problems When Importing Contacts from Excel to Outlook
Even when you follow the steps correctly, contact imports can misbehave. Fortunately, most problems have simple fixes.
Problem 1: Contacts Import with Missing Information
If names import but phone numbers or companies are missing, the issue is usually field mapping. Reopen the CSV in Excel and confirm the data exists in the file. Then repeat the import and use Map Custom Fields to connect each column to the correct Outlook field.
Problem 2: All Data Appears in One Column
This can happen when the CSV delimiter is not recognized correctly. In some regions, Excel may separate values with semicolons instead of commas. If Outlook sees one giant column instead of several columns, recreate the CSV using comma-separated formatting or open the file in a text editor to inspect the separator.
Problem 3: Special Characters Look Wrong
If names or addresses contain accented characters and they appear broken after import, save the CSV using UTF-8 encoding. This is especially important for international contact lists, multilingual customer databases, and names with special characters.
Problem 4: Duplicate Contacts Appear
Duplicates usually happen when you allow duplicate items during import or when the same person appears in the spreadsheet more than once. Before importing, use Excel’s duplicate tools to check repeated email addresses. After importing, use Outlook’s contact management options to clean up duplicates if needed.
Problem 5: Contacts Go to the Wrong Account
If you use multiple mailboxes in Outlook, imported contacts may land in a different Contacts folder than expected. Always confirm the destination folder during import. After importing, check the People or Contacts area for each account before assuming the import failed.
Practical Example: Importing a Small Client List
Imagine you have an Excel file with 250 client contacts. The file includes first name, last name, email, phone, company, and notes. Your goal is to import them into Outlook so you can email clients, schedule meetings, and keep their details searchable.
First, you clean the spreadsheet. You rename “Mail” to “Email Address,” “Cell” to “Mobile Phone,” and “Biz” to “Company.” Then you remove blank rows and check for duplicate email addresses. Next, you save the worksheet as a CSV file.
If you use classic Outlook, you open File, choose Open & Export, select Import/Export, choose Import from another program or file, select Comma Separated Values, and browse to the CSV. Then you pick your Contacts folder and map the fields. If you use Outlook on the web, you go to People, choose Manage contacts, select Import contacts, upload the CSV, preview the data, and import.
After the import, you search for five random clients and check whether names, emails, companies, and phone numbers appear correctly. If they do, you are done. If not, you fix the CSV and import again. This quick review can save hours of cleanup later.
Best Practices for a Smooth Outlook Contact Import
The easiest import is the one you prepare for. Keep your Excel file simple, structured, and predictable. Avoid merged cells, hidden columns, blank rows in the middle of the list, and decorative formatting. Outlook does not care if your spreadsheet has alternating row colors or a header in 18-point bold. It cares whether “Email Address” contains email addresses.
Use one worksheet for the import. Save only the active sheet as CSV. Keep a copy of the original Excel workbook in case you need to make changes later. If the list is important, test with ten contacts first. Importing a sample lets you catch mapping problems before you unleash 8,000 contacts into Outlook like a confetti cannon filled with business cards.
For business users, consider creating a dedicated contacts folder before importing. For example, you might create a folder named “Imported Leads – May 2026.” This makes it easier to review the imported contacts, delete them if something goes wrong, or move them into your main contacts folder once verified.
Also, document your column structure. If your team imports contacts regularly, a standard Excel template prevents everyone from inventing new column names. One person’s “Mobile” is another person’s “Cell Phone,” and another person’s “Text Me Maybe.” Standardization keeps Outlook imports predictable.
Which Import Method Should You Choose?
If you use classic Outlook for Windows and want maximum control, choose Method 1. The desktop Import and Export Wizard gives you strong field-mapping options and is excellent for detailed business contact lists.
If you use Outlook.com, Outlook on the web, or the new Outlook experience, choose Method 2. It is simple, browser-based, and convenient for contacts that need to sync across devices.
If your Excel file is messy, old, exported from another system, or business-critical, choose Method 3 first. Clean the data in a template, save it as CSV, and then import it. This extra preparation makes the actual Outlook import much easier.
Experience Notes: What Actually Matters When Importing Contacts to Outlook from Excel
After working with contact imports in real office scenarios, one lesson becomes clear very quickly: the import button is not the hard part. The spreadsheet is the hard part. A clean CSV file can import beautifully in minutes. A messy spreadsheet can turn a simple task into an archaeological dig through old columns, mystery abbreviations, and phone numbers that somehow became “4.08E+09.”
The first practical experience worth mentioning is to always test before importing the full list. Take 10 or 20 contacts from your Excel file, save them as a small CSV, and import that sample into Outlook. Then inspect the results. Are the email addresses in the email field? Did company names land where they should? Are phone numbers readable? Did notes import correctly? This tiny test can reveal problems before they multiply. It is much easier to delete 10 bad contacts than to clean up 10,000.
The second experience is that field mapping deserves your full attention. Many users click through the wizard too quickly, assuming Outlook will understand everything automatically. Sometimes it does. Sometimes it confidently places data in the wrong fields, like a helpful intern on their first day. If your spreadsheet uses standard headings, mapping is easier. But if your columns say “Client,” “Rep,” “Main #,” or “Contact Email,” Outlook may need your help. Spending two minutes on Map Custom Fields can save two hours of manual edits.
The third experience is to be careful with duplicate contacts. In business environments, spreadsheets often come from several sources: CRM exports, event registration lists, newsletter subscribers, and old employee files. The same person may appear three times with slightly different information. Before importing, sort by email address and use Excel’s duplicate tools. Email address is usually the best unique identifier because names can vary. “Robert Johnson,” “Bob Johnson,” and “R. Johnson” may all be the same person, but Outlook will not always know that.
The fourth experience is to protect formatting-sensitive data. ZIP codes, international phone numbers, and IDs can change when Excel tries to be clever. For example, a ZIP code that starts with zero may lose that leading zero. A long phone number may appear in scientific notation. To avoid this, format those columns as text before saving the CSV, then reopen the file briefly to confirm the data still looks correct.
The fifth experience is that large imports should be organized into folders. Instead of importing thousands of contacts straight into your main Contacts folder, create a new folder for the import. This gives you a safety zone. You can review, search, sort, and delete the imported contacts without disturbing your existing address book. Once you are confident the data is correct, you can move or merge the contacts as needed.
Finally, keep your cleaned Excel template after the import. Many people delete the working file once Outlook looks correct, but that template can be useful later. If you need to update contacts, onboard a new team member, rebuild a contact list, or troubleshoot a sync issue, the cleaned spreadsheet becomes your reliable backup. Outlook is great for using contacts every day, but Excel is still excellent for reviewing, sorting, filtering, and cleaning contact data in bulk.
Conclusion
Importing contacts to Outlook from Excel is simple once you understand the basic rule: clean the spreadsheet, save it as a CSV file, then import it through the right Outlook interface. Classic Outlook gives you the most control through the Import and Export Wizard. Outlook on the web offers a fast browser-based import option. A template-based method is best when your Excel file needs cleanup before Outlook can understand it.
The smartest approach is to prepare before you import. Use clear headings, keep one contact per row, check for duplicates, protect important formatting, and test with a small sample first. Do that, and the process becomes less like wrestling with software and more like giving your contact list a new, well-organized home.
Note: This article is written for web publishing and focuses on practical, current Outlook contact-import workflows. Interface labels may vary slightly depending on Outlook version, account type, and whether you use classic Outlook, new Outlook, Outlook on the web, or Outlook.com.


