
Table of Contents >> Show >> Hide
- Before You Start: Tools, Terms, and the Big Idea
- Method 1: Construct a Parallel Line by Copying an Angle
- Method 2: Construct a Parallel Line Using a Rhombus
- Method 3: Construct a Parallel Line Using Two Perpendicular Lines
- Which Method Is Best?
- Common Mistakes to Avoid
- Specific Example: Constructing a Parallel Through Point P
- Why Parallel Line Construction Matters
- Experience Notes: What It Feels Like to Learn This Construction
- Conclusion
Note: This article synthesizes standard geometry construction principles from reputable educational references, including established compass-and-straightedge methods used in American geometry classrooms.
Constructing a line parallel to a given line through a given point sounds like the kind of math instruction that politely walks into the room wearing a bow tie. But the idea is surprisingly practical, elegant, and even a little satisfying once the compass starts behaving. In geometry, a construction is not just a sketch. It is a precise drawing made with allowed tools, usually a compass and an unmarked straightedge. No protractor. No measuring ruler. No “close enough because my pencil is tired.”
The goal is simple: you are given a line, usually called line l, and a point P not on that line. Your task is to draw exactly one line through P that never intersects the original line, no matter how far both lines are extended. In Euclidean geometry, that line exists and is unique. The fun part is proving it with clean construction moves rather than guessing by eye.
This guide explains three reliable ways to construct a parallel line through a point: the angle-copy method, the rhombus method, and the double-perpendicular method. Each one uses a different geometric idea, so you are not just memorizing steps. You are learning why the construction works, which is where geometry stops being a worksheet and starts acting like a tiny logic machine.
Before You Start: Tools, Terms, and the Big Idea
For a formal construction, you need a compass and a straightedge. A compass copies distances and draws arcs or circles. A straightedge draws a line through two known points. If your straightedge has measurement marks, pretend they are invisible. In classic geometry construction, the straightedge is not a ruler; it is just a well-behaved pencil guide.
A parallel line is a line in the same plane as another line that never intersects it. Two parallel lines also maintain the same direction. When a third line crosses them, it creates angle pairs such as corresponding angles and alternate interior angles. These angle relationships are the secret engine behind many parallel-line constructions.
If the given point is already on the original line, the only line through that point parallel to the original line is the original line itself. Most construction problems, including this one, assume the point is not on the given line. That makes the task meaningful: you must build a new line through the point that matches the direction of the original.
Method 1: Construct a Parallel Line by Copying an Angle
The angle-copy method is one of the most common ways to construct a line parallel to a given line through a given point. It relies on a familiar theorem: if two lines cut by a transversal have congruent corresponding angles, then the two lines are parallel. In plain English, if you copy the same angle in the right position, the new line must run in the same direction as the original.
When to Use This Method
Use the angle-copy method when you want a construction that directly connects to angle relationships. It is excellent for students learning why corresponding angles prove lines parallel. It also works well on paper because the steps are logical and easy to explain in a proof.
Step-by-Step Construction
- Start with the given line l and the given point P not on the line.
- Choose any point A on line l.
- Use the straightedge to draw a line through A and P. This line is your transversal.
- At point A, use the compass to draw an arc that crosses both the original line and the transversal. Label the intersections B and C.
- Without changing the compass width, place the compass point on P and draw a similar arc crossing the transversal. Label the intersection on the transversal D.
- Set the compass width to the distance between B and C. This copies the width of the original angle.
- Place the compass point on D and mark the point where the copied distance intersects the arc around P. Label that point E.
- Use the straightedge to draw line PE. This is the desired line through P parallel to line l.
Why This Works
The construction copies the angle made by the original line and the transversal at point A. The copied angle is placed at point P using the same transversal. Since the corresponding angles are congruent, the line through P must be parallel to the original line. You are not estimating the slope or eyeballing the direction. You are building equality of angles, and the parallel line follows from that equality.
This method is especially useful when a teacher asks for both a construction and a justification. You can say, “The copied angle is congruent to the original angle, so the corresponding angles are congruent. Therefore, the two lines are parallel.” That is a neat proof, and it does not require dramatic hand waving.
Method 2: Construct a Parallel Line Using a Rhombus
The rhombus method is a beautiful shortcut because it uses equal distances instead of copying an angle. A rhombus is a quadrilateral with all four sides congruent. One of its key properties is that opposite sides are parallel. If you can construct a rhombus with one side lying on the given line and the opposite side passing through the given point, you have constructed the required parallel line.
When to Use This Method
Use the rhombus method when you want a construction that keeps the compass width mostly unchanged. It is efficient, elegant, and popular with people who enjoy geometry constructions that feel like a magic trick but are actually just good logic wearing a cape.
Step-by-Step Construction
- Start with line l and point P not on the line.
- Choose a point A on the given line.
- Set the compass width to the distance AP.
- With the compass point on A, draw an arc that intersects line l at another point. Label this point B. Now AB is congruent to AP.
- Without changing the compass width, place the compass point on P and draw an arc above or below the original line, depending on where the fourth vertex should be.
- Still using the same compass width, place the compass point on B and draw another arc that intersects the arc from P. Label the intersection Q.
- Use the straightedge to draw line PQ.
Why This Works
The points A, B, Q, and P form a rhombus because all four sides are constructed to be congruent: AP, AB, BQ, and PQ. In a rhombus, opposite sides are parallel. Since AB lies on the original line, the opposite side PQ must be parallel to that original line.
The rhombus method is wonderful because the proof is visual. Once the rhombus appears, the parallel line is not a mystery. It is simply the opposite side of a figure whose opposite sides must run in the same direction. The method also reinforces several geometry ideas at once: congruent segments, circles as distance markers, quadrilateral properties, and parallel sides.
Method 3: Construct a Parallel Line Using Two Perpendicular Lines
The double-perpendicular method uses a classic fact: two lines perpendicular to the same line are parallel to each other. Instead of copying an angle or building a rhombus, you first construct a perpendicular line from the point to the given line. Then you construct another perpendicular line through the given point to that first perpendicular. The second line is parallel to the original line.
When to Use This Method
Use the double-perpendicular method when you already know how to construct perpendicular lines confidently. It is especially helpful in classroom settings where students have just learned perpendicular constructions and need to combine previous skills into a new result.
Step-by-Step Construction
- Begin with line l and point P not on the line.
- Construct a line through P perpendicular to line l. Call this new line m.
- At point P, construct a line perpendicular to line m.
- The new line through P is parallel to the original line l.
A Practical Way to Build the First Perpendicular
To construct the perpendicular from point P to line l, place the compass point on P and draw an arc that crosses line l at two points. Label those points A and B. Then draw arcs of equal radius from A and B so that they intersect on the side opposite P. Draw a line through P and that intersection point. This line is perpendicular to l.
Next, construct a perpendicular to this new line at P. The resulting line through P is parallel to the original line because both the original line and the final line are perpendicular to the same intermediate line.
Why This Works
If line m is perpendicular to line l, it forms a right angle with l. If the final line through P is also perpendicular to line m, it forms the same kind of right angle with m. In a plane, two lines perpendicular to the same line are parallel. That means the final line through P must be parallel to l.
Which Method Is Best?
The best method depends on your goal. If you need a construction that clearly demonstrates angle relationships, use the angle-copy method. If you want a smooth compass-based construction with a satisfying shape, use the rhombus method. If your lesson focuses on perpendicular lines and building complex constructions from simpler ones, use the double-perpendicular method.
For beginners, the angle-copy method is often the most straightforward to explain because it connects directly to corresponding angles. For speed, the rhombus method may feel cleaner once you understand the setup. For proof practice, the double-perpendicular method is excellent because it links perpendicular and parallel relationships in one tidy chain of reasoning.
Common Mistakes to Avoid
Changing the Compass Width Too Soon
Many construction errors happen because the compass width changes at the wrong moment. When copying an angle or building a rhombus, certain arcs must be drawn with exactly the same compass setting. If that setting slips, the construction may look close but fail mathematically.
Using the Ruler Marks
A marked ruler may be convenient, but formal geometry construction does not allow measuring lengths with ruler marks. The compass is the tool for transferring distances. The straightedge only draws lines through constructed points.
Drawing a Line That Only Looks Parallel
Geometry is not impressed by “it looks right.” A parallel construction must be justified by a theorem, such as congruent corresponding angles, opposite sides of a rhombus, or two lines perpendicular to the same line. The proof is what turns a drawing into a construction.
Choosing Awkward Points
In the angle-copy and rhombus methods, your chosen point on the original line affects how roomy the construction feels. If your arcs collide with labels, edges of the paper, or other construction marks, choose a different point or redraw with more space. Geometry rewards neatness more than most people expect.
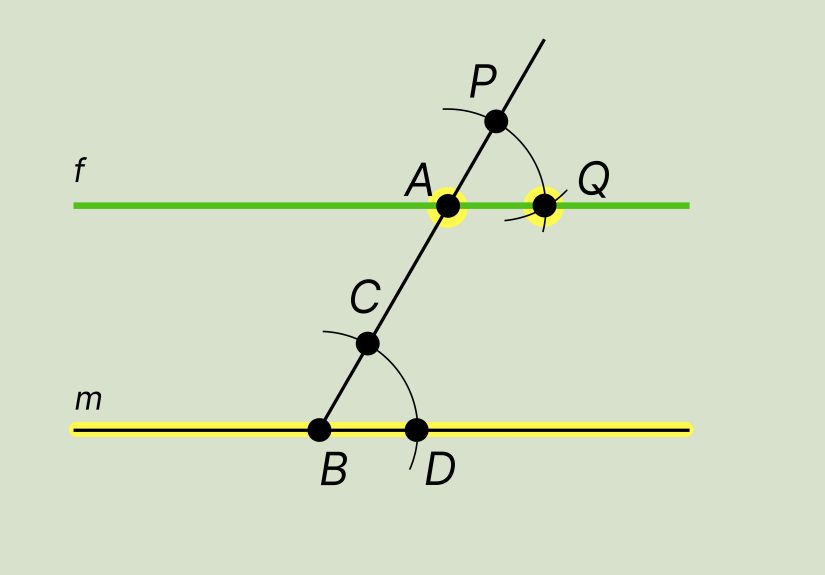
Specific Example: Constructing a Parallel Through Point P
Imagine a horizontal line across your paper and a point P above it. To use the angle-copy method, pick a point A on the horizontal line and draw a slanted transversal from A to P. Copy the angle formed at A onto point P. When you draw the ray through the copied angle point, it will run horizontally, matching the original line. The result is a line through P that stays the same distance from the original line forever.
Using the double-perpendicular method, you would first construct a vertical line from P down to the horizontal line. Then you would construct a line through P perpendicular to that vertical line. Since a line perpendicular to a vertical line is horizontal, the final line through P is parallel to the original horizontal line. This is why the method feels so natural on grid paper, even though it does not require a grid.
Why Parallel Line Construction Matters
Constructing a parallel line is more than a geometry exercise. It builds the habit of reasoning from known facts. Architects, engineers, designers, carpenters, and technical illustrators all rely on parallel relationships. Even when they use modern software, the underlying logic is the same: a line is not parallel because it seems friendly to another line; it is parallel because its direction and relationships are controlled.
In school geometry, this construction also supports later topics such as parallelograms, rectangles, coordinate geometry, transformations, slope, and proofs. When students learn to construct a parallel line through a point, they are really learning how to connect visual action with mathematical certainty.
Experience Notes: What It Feels Like to Learn This Construction
The first time many students try to construct a line parallel to a given line through a given point, they discover a surprising truth: the compass is both a mathematical instrument and a tiny patience test. You set the width carefully, lean in with confidence, and then the pencil leg skids like it has somewhere better to be. That is normal. Good constructions rarely begin as perfect drawings. They begin as controlled attempts.
One useful experience is to practice the angle-copy method on a large sheet of paper. Bigger drawings make the relationships easier to see. Draw the original line boldly, place the point comfortably above it, and choose a transversal that is clearly slanted. If the transversal is too steep or too short, the arcs can become crowded. A roomy setup makes the construction feel less like surgery and more like drawing with a plan.
Another helpful habit is labeling every important point. Students sometimes skip labels because they think labels are decorative. They are not. Labels are the construction’s GPS. Once points A, B, C, D, and E are marked, the steps become much easier to follow and explain. Without labels, the page can quickly turn into a spaghetti dinner of arcs.
The rhombus method often becomes a favorite after a few tries because it feels efficient. The moment the fourth vertex appears, the parallel line almost announces itself. However, this method also teaches a valuable lesson: the point you choose on the given line matters. Choose a point too close to the given point, and the rhombus may become cramped. Choose one too far away, and your arcs may wander off the page like tourists without a map. A moderate distance usually works best.
The double-perpendicular method is especially satisfying for students who like step-by-step logic. First, make a perpendicular. Then make another perpendicular. Done. The reasoning is clean: if two lines are perpendicular to the same line, they are parallel. This method also helps students see constructions as building blocks. You do not need a new magic trick for every problem. Sometimes you combine two familiar tricks and get a new result.
In real classroom experience, the biggest breakthrough usually happens when students stop asking, “Does it look parallel?” and start asking, “What proves it is parallel?” That shift is the heart of geometry. A neat drawing is nice, but a justified drawing is powerful. Once students understand that arcs preserve distances and copied angles preserve angle measures, constructions become less mysterious.
For best results, use a sharp pencil, keep compass pressure light, and avoid erasing construction arcs too early. Those arcs are not messy leftovers; they are evidence. They show how the final line was created. A clean final answer is good, but visible construction marks tell the mathematical story. And in geometry, the story matters.
Conclusion
Learning three ways to construct a line parallel to a given line through a given point gives you more than three drawing recipes. It gives you three ways to think. The angle-copy method uses congruent corresponding angles. The rhombus method uses equal sides and opposite parallel sides. The double-perpendicular method uses the relationship between perpendicular and parallel lines. Each method reaches the same result, but each one strengthens a different part of your geometry toolkit.
If you are studying for a test, practicing constructions, or teaching the topic, do not rush straight to the final line. Pay attention to the reason behind each arc and line segment. Geometry becomes much easier when every mark has a purpose. And yes, your compass may still wobble occasionally. That is fine. Even Euclid probably had rough drafts.


