
Table of Contents >> Show >> Hide
- First Things First: Know Your Garage Door Opener Type
- Safety Prep Before You Start Pushing Buttons
- How To Program a Garage Door Remote (Rolling-Code Openers)
- How To Program a Garage Door Remote (Dip-Switch Openers)
- How To Program a Wireless Garage Door Keypad
- Programming Built-In Car Controls (HomeLink & Similar Systems)
- Smart Garage Door Openers and Apps
- Common Garage Door Programming Problems (and Fixes)
- Garage Door Security Tips When Reprogramming
- When To Call a Professional
- Real-Life Experiences: What We Learned From Programming Our Garage Doors
If your garage door remote has finally given up, your keypad forgot who you are,
or your new car is giving you the “pair me!” eyes, welcome. Programming a
garage door opener sounds like something only a professional in a logoed truck
should attempt, but it’s actually an easy DIY win – very much in the spirit of
a classic Young House Love project. A ladder, a few button presses, and you
can go from “why won’t this thing open?” to “look what I did!” in under ten
minutes.
In this guide, we’ll walk through how to program your garage door remotes,
wireless keypads, and even built-in car buttons. We’ll cover older
dip-switch style openers and newer rolling-code systems, plus
troubleshooting tips and real-life lessons from the school of “I pressed the
wrong button and locked everyone out.”
First Things First: Know Your Garage Door Opener Type
Before you start pressing random buttons like you’re trying to launch a
spaceship, take a minute to figure out what kind of garage door opener you
have. This determines how you’ll program everything.
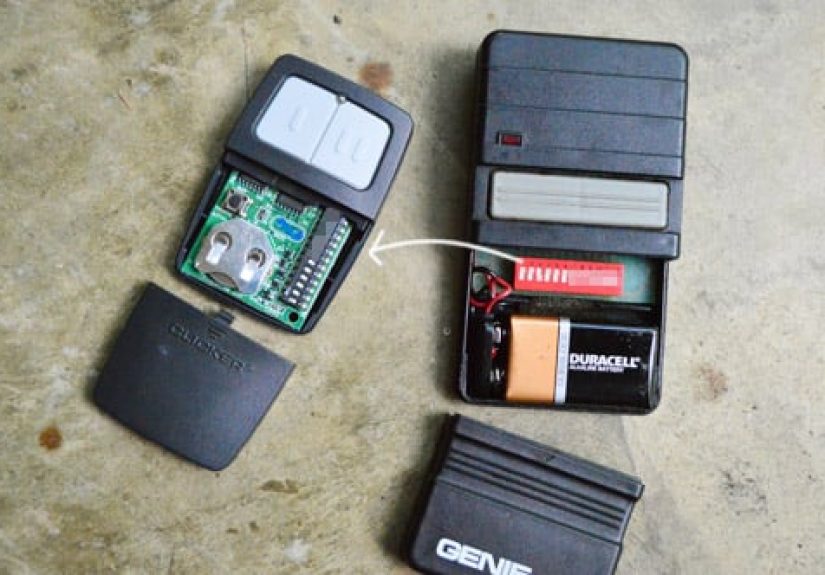
1. Dip-switch (old-school) openers
If your opener or remote is on the older side, you may find a little row of
tiny toggle switches inside the motor housing and inside the remote. These
are called dip switches. Each switch can be “up” or “down,”
creating a unique code pattern. To program a new remote, you match the
pattern inside the remote to the one inside the opener. It’s like a tiny,
extremely boring QR code made of plastic.
If you open an old remote and see those little switches, congratulations:
you’re dealing with a dip-switch system. Programming is just about matching
that pattern exactly between opener and remote.
2. Rolling-code (modern) openers
Most newer openers from brands like LiftMaster, Chamberlain, Genie, and
Overhead Door use a rolling code system. Instead of using a
fixed pattern of switches, they change the digital code each time you press
the remote. This makes it much harder for anyone to “copy” your signal.
Rolling-code openers are usually programmed using a
“Learn” or “Program” button on the
motor housing. You put the opener into learning mode, then press the button
on the remote so the opener and remote can “shake hands” and agree to be
best friends.
Safety Prep Before You Start Pushing Buttons
- Make sure the garage door area is clear of people, pets, bikes, and boxes.
- Use a sturdy ladder and don’t lean way off to one side while reaching the opener.
- Have your remotes and keypad handy so you can work within the 20–30 second programming window most openers give you.
- Keep the manual nearby if you have it – brand-specific quirks are usually noted there.
Once you’re set up and safe, it’s time for the fun part: actually programming
your garage doors.
How To Program a Garage Door Remote (Rolling-Code Openers)
Exact steps vary by brand, but most rolling-code remotes follow a very
similar pattern. Here’s the basic approach that works for many modern
openers:
Step 1: Locate the Learn/Program button
Climb your ladder and look at the garage door opener motor – the big box
attached to the ceiling. On the back or side, you’ll usually find a small
button labeled “Learn,” “Set,” or “Program.” It may be
behind a light cover or next to the hanging antenna wire. The button is often
color-coded (yellow, purple, red/orange, or green).
Step 2: Put the opener into learning mode
Press and release the Learn/Program button. You’ll typically see an LED start
blinking or hear a soft click. That means the opener is listening for a new
remote signal. You usually have about 20–30 seconds before it times out, so
don’t wander off to answer a text.
Step 3: Press the button on your remote
Within that 20–30 second window, press and hold the button on the remote
that you want to use to open the door. Hold it for a second or two, then
release. Many openers confirm success by:
- Flashing the garage light
- Making a clicking sound
- Changing the blinking pattern of the Learn LED
If nothing happens, repeat the process – sometimes the timing is a bit
fussy. If the door cycles (opens or closes) while you’re doing this, that’s
actually good news: it usually means the remote is now programmed.
Step 4: Test and label
Step off the ladder (carefully) and stand back. Press the programmed button
on the remote. The garage door should move. If you have multiple doors,
program a separate button for each one, repeating the Learn-and-press
process for each opener. Then label your remote buttons with a tiny sticker
or marker – future you will thank you when you can’t remember which button
is for which door.
How To Program a Garage Door Remote (Dip-Switch Openers)
Dip-switch openers don’t use a Learn button – they use matching switch
patterns instead. Here’s what to do:
Step 1: Find the dip switches in the opener
On the motor unit, remove the cover where the wiring and electronics live.
You should see a small row of tiny switches, each set either up or down (and
sometimes middle). This is your “code.”
Step 2: Open your new remote
Remove the battery cover from the new remote. Inside, you should see a
matching row of dip switches.
Step 3: Match the pattern exactly
With a small screwdriver or pen tip, flip the switches in the remote so they
match the exact up/down pattern inside the opener. Double-check them – one
switch out of place is enough to break the connection.
Step 4: Test the remote
Put the battery cover back on and press the button. The door should move
instantly. If it doesn’t, recheck your switch positions or clean the contacts
inside the remote in case they’re corroded from age.
How To Program a Wireless Garage Door Keypad
A wireless keypad is the little numeric pad mounted outside your garage that
lets you open the door with a PIN code. Super handy when you’re out for a
walk and don’t want to pocket your bulky key ring… or when your teenager
loses yet another remote.
Step 1: Clear old codes (if needed)
If you’ve moved into a new house or just want to reset everything, start by
clearing old codes. Many openers let you erase all programmed remotes and
keypads by holding the Learn button for about 6–10 seconds until the LED
turns off or the light blinks in a specific pattern. This wipes the opener’s
memory so you can start fresh. Just remember you’ll have to reprogram your
remotes afterward.
Step 2: Put the opener into Learn mode
Just like programming a remote, press and release the Learn/Program button
on the motor. The opener is now waiting for a keypad code.
Step 3: Enter your new PIN on the keypad
Go to the keypad and enter a 4-digit PIN that’s:
- Easy for you to remember
- Not obvious to strangers (avoid 1234, 0000, birth year, or house number)
After entering the PIN, press the button indicated in your keypad’s manual –
often it’s “Enter,” “#,” or “0”. The opener should respond
with a light flash or a click to confirm the keypad is programmed.
Step 4: Test the keypad
Close the garage door, then walk up and enter your new PIN. The door should
move after you press Enter. If it doesn’t:
- Check that the keypad has fresh batteries.
- Make sure you’re within range and the keypad isn’t blocked by metal siding.
- Repeat the Learn + PIN sequence – the timing may have been off.
Programming Built-In Car Controls (HomeLink & Similar Systems)
Many newer vehicles come with built-in buttons on the visor, overhead
console, or mirror that can control your garage door. These systems (often
called HomeLink or Car2U) act like a remote, but they need to be programmed.
Step 1: Clear the car’s built-in buttons (if used)
If your car already has codes stored, you’ll usually clear them by pressing
and holding two of the buttons simultaneously until the indicator light
flashes quickly. Check your owner’s manual for the exact combo.
Step 2: Pair the car to your handheld remote
Many systems first learn from your existing garage remote:
- Turn the ignition to “On” (engine can be off).
- Hold the car’s button you want to program.
- While holding that, hold the button on your handheld remote a few inches away.
- When the indicator light changes from slow blink to fast blink, the car has learned the remote.
Step 3: Sync the car to the opener (rolling-code systems)
For rolling-code openers, you usually need a second step:
- Press and release the Learn button on the opener motor.
- Within 30 seconds, go to the car and press the programmed car button 2–3 times.
- When the door responds, you’re done.
Check your car’s manual for brand-specific details – some require different
timing or an extra confirmation step.
Smart Garage Door Openers and Apps
If you’ve upgraded to a smart opener, you may do most of your “programming”
through an app instead of a ladder and a blinking LED. Many modern openers
let you:
- Open/close the door from your phone
- Check if the door is open from anywhere (no more “did I close it?” panic)
- Set schedules or get alerts when the door is used
- Share temporary access with guests or contractors
The general steps are:
- Download the manufacturer’s app.
- Create an account and connect your opener to Wi-Fi (often using a QR code or serial number).
- Follow the in-app prompts to add remotes, keypads, or family member accounts.
The app basically replaces the Learn button dance – but your old remotes and
keypads should still work once the opener is online.
Common Garage Door Programming Problems (and Fixes)
Problem 1: The remote programmed yesterday, but today it won’t work
Likely culprits:
- Weak battery in the remote (swap it – it’s the cheapest fix).
- Interference from nearby devices, LED lights, or metal objects.
- Memory cleared accidentally if someone held the Learn button too long.
Try a new battery first. If other remotes also stopped working, you may need
to reprogram everything from scratch because the opener’s memory was wiped.
Problem 2: Keypad works only when you stand very close
This usually points to:
- Low keypad batteries
- Metal siding, brick, or stucco blocking the signal
- A keypad that’s mounted too far from the opener’s antenna
Change the batteries and, if possible, move the keypad slightly to improve
line-of-sight to the opener. Also check that the opener’s antenna wire is
hanging straight down and not tucked up or broken.
Problem 3: The door starts to close, then reverses
This is usually not a programming issue – it’s a safety sensor problem.
Check the photo eyes on either side of the door:
- Are they aligned and pointing at each other?
- Are the lenses dirty or blocked by cobwebs, leaves, or a box?
- Is one of the indicator lights off or blinking?
Gently clean and realign them, then try again. If the door still reverses,
call a pro – it may be a bigger mechanical issue.
Garage Door Security Tips When Reprogramming
- Always change the keypad code when you move into a new home.
- Erase all old remotes if you’ve lost one or had a break-in.
- Avoid obvious PINs like 1234, 0000, or your birthday.
- Don’t share your PIN casually – treat it like a house key.
- If you use smart access, give guests temporary access instead of your main login.
Your garage is often the largest and easiest entry point into your home, so
tightening up how your door is programmed is a simple but important security
upgrade.
When To Call a Professional
Programming remotes and keypads is a very DIY-friendly job. But you should
absolutely bring in the pros if:
- The door is crooked, noisy, or jerky when it moves.
- The springs or cables look damaged or broken.
- The opener hums but the door doesn’t move.
- You smell something electrical or see scorch marks near the opener.
Springs and high-tension parts can be genuinely dangerous. Save your DIY
energy for paint colors, storage systems, or cute garage makeovers and let
someone with the right tools and training handle the heavy mechanical fixes.
Real-Life Experiences: What We Learned From Programming Our Garage Doors
Like many “simple” house projects, programming garage doors tends to teach
you a few lessons along the way. Here are some experience-based tips and
stories that might sound suspiciously familiar once you’re standing on that
ladder.
1. The Great “I Held the Button Too Long” Incident
One surprisingly common mistake: someone presses and holds the Learn button
for too long, thinking “long press = better press.” In reality, that long
press often wipes all remotes and keypads from the opener’s memory.
The end result? You hop off the ladder feeling accomplished, then your
partner calls from the driveway because their remote no longer works. We’ve
been there. The fix is simply to re-add each remote and keypad one by one.
The lesson: tap the Learn button, don’t cuddle with it.
2. The Mystery of the Weak Remote
Another classic scenario: the remote only works if you practically touch it
to the garage door. It’s tempting to assume that the opener or remote is
dying, but nine times out of ten, it’s the battery. Even brand-new remotes
sometimes ship with batteries that spent a long time in a warehouse. Swapping
in a fresh coin cell often turns a “broken” remote into a perfectly healthy
one.
We’ve also seen remotes struggle because the opener’s antenna was folded up
or zip-tied out of the way during some other project. Just letting that thin
wire hang straight down can dramatically improve performance.
3. The “Wrong Door” Confusion
If you have a two- or three-car garage, you’ll quickly learn how confusing
multiple doors and multiple buttons can be. It’s not unusual to spend an
afternoon carefully programming remotes, only to realize later that button 1
opens the third bay, button 2 opens the first, and button 3 does absolutely
nothing.
The fix is easy: pick a consistent button mapping (for example, left button
= left door, center = middle, right = right), then program each opener to
match that plan. Slap tiny labels on the remote if needed. It’s a small
detail that makes daily use feel much more intuitive.
4. Keypad Codes and Teenagers
If you share your keypad PIN with kids, they’ll use it – a lot. That’s the
point! But it also means the code is more likely to be overheard or repeated
to friends. Several homeowners only realized their keypad codes were widely
known when neighbor kids started casually letting themselves into the garage
to grab sports equipment.
A simple habit is to change your keypad PIN once or twice a year – or any
time you feel like “too many people know it.” You can also create a temporary
code for guests or dog-walkers if your keypad supports multiple PINs. That
way, you can delete the guest code later without disrupting your family’s
everyday code.
5. Smart Openers Save Arguments
One unexpected benefit of smart garage openers: they save a lot of “did you
leave the door open again?” conversations. Being able to glance at an app
and close the door from bed or from the grocery store is an anxiety reducer
and an argument preventer.
After upgrading, many folks report using their garage more like a main
entrance – especially when grocery runs or kid pickups are involved. Once
you’ve programmed your remotes, keypad, and app, you can come and go in
whatever way is most convenient without worrying about keys at all.
6. The DIY Confidence Boost
Finally, programming your own garage door opener is one of those small,
satisfying homeowner wins. The steps are short, the tools are minimal, and
the payoff is huge: you’ve literally automated a door the size of a car. For
many people, it’s a gateway project that builds confidence for bigger DIY
adventures – painting the garage doors, organizing the space, or even doing
a full Young House Love–style makeover.
So grab your ladder, your remote, and your sense of humor. With a few button
presses and a little patience, you’ll have your garage doors listening to
you again – and this time you’ll actually know how you did it.


