
Table of Contents >> Show >> Hide
- Why a Wood Backsplash Works So Well
- Choose the Right Type of Wood First
- Put Wood in the Right Places
- Seal It Like You Mean It
- Installation Tips That Prevent Headaches
- Design Tips for a Better-Looking Kitchen
- How to Clean and Maintain a Wood Backsplash
- Mistakes to Avoid
- Experiences: What Living With a Wood Backsplash Actually Feels Like
- Final Thoughts
Note: Clean HTML body content only, ready for web publishing.
A wood backsplash is the design equivalent of showing up to a black-tie event in great boots: unexpected, warm, and much more interesting than doing what everybody else did. In a kitchen full of stone, metal, glass, and tile, wood brings relief. It softens the room, adds grain and texture, and makes even a brand-new kitchen feel like it has lived a little. That said, wood is not magic. It is not invincible. And it absolutely will not thrive if you slap raw boards behind a sink and hope for the best.
The good news is that a wood backsplash can look stunning and hold up beautifully when you make smart choices. The better news is that you do not need a celebrity designer, a trust fund, or an emotional support tape measure to pull it off. You need the right material, the right finish, the right placement, and a little respect for the fact that kitchens are splash zones with snacks.
Why a Wood Backsplash Works So Well
There is a reason homeowners and designers keep circling back to wood backsplashes. They add warmth fast. They pair beautifully with white cabinets, painted cabinets, natural stone counters, butcher block, black hardware, and even more contemporary kitchens that need a little soul. Wood also works across styles. It can read cottage, farmhouse, coastal, Scandinavian, rustic, transitional, or modern depending on the profile, stain, and finish.
Another big advantage is personality. Tile can be gorgeous, but wood has a natural variation that feels more relaxed and less showroom-perfect. Knots, grain movement, saw marks, and tonal shifts make the surface feel alive. When that is done well, the backsplash stops being a background player and starts giving the entire kitchen a point of view.
Wood can also be budget-friendly. Beadboard, shiplap, tongue-and-groove planks, and veneered panels often cost less than premium tile or slab stone, and many options are approachable for a DIY-minded homeowner. If your dream kitchen budget is currently “aggressively optimistic,” that matters.
Choose the Right Type of Wood First
Think panels and planks before thick solid boards
When people hear “wood backsplash,” they sometimes picture thick planks ripped from a barn and heroically nailed to the wall. It sounds romantic. It can also be fussy. For most kitchens, lighter wall-friendly materials make more sense. Beadboard, tongue-and-groove planks, shiplap, plywood-faced panels, and high-quality veneer panels are often easier to install and easier to keep stable over time.
Veneered or engineered options are especially smart if you want the look of wood without inviting quite so much expansion and contraction drama. Wood moves with changes in humidity. It always has. It always will. Choosing stable materials helps reduce the chance of gaps, swelling, or warped edges later.
Match the wood species and finish to the room
If your kitchen already has wood cabinets, wood floors, or a butcher block counter, do not guess your way through the finish. Study the undertones. Some woods read golden, some lean red, some go gray-brown, and some sit in that glorious neutral zone where they seem to get along with everyone. Bring cabinet doors, flooring samples, or countertop samples when choosing stain. Wood-on-wood can be beautiful, but only when the tones are having a conversation instead of an argument.
For a lighter, breezier look, choose pale natural finishes or softly painted beadboard. For a richer mood, medium walnut-like or smoked finishes can make the kitchen feel tailored and cozy. In a small kitchen, a dark wood backsplash can still work, but it usually looks best when balanced with lighter counters, open shelving, or bright walls.
Put Wood in the Right Places
Best zones for wood
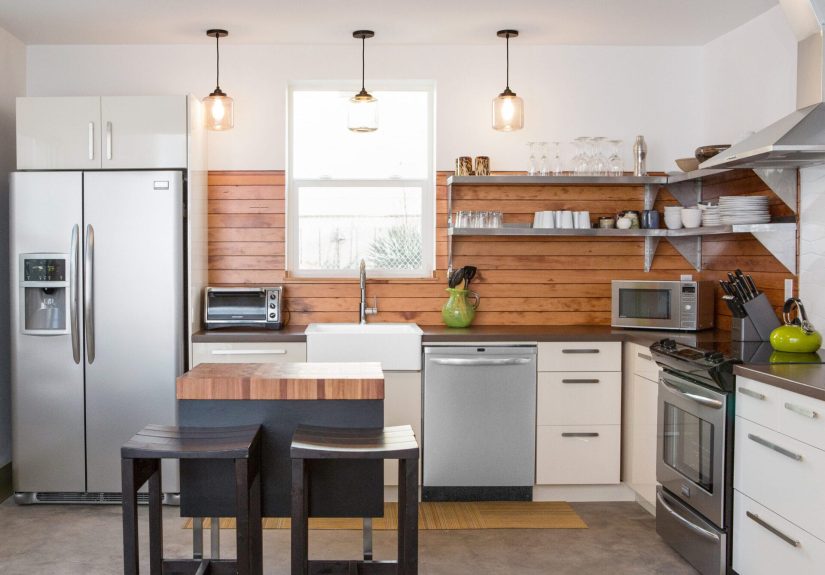
Wood backsplashes perform best where they get visual attention without taking the full force of daily chaos. A coffee bar wall, a pantry nook, the backsplash behind prep counters, or a full wall in a butler’s pantry can all be ideal locations. Vertical shiplap or beadboard can also look fantastic on a backsplash wall with open shelves, especially when you want texture without a loud pattern.
Places that need extra caution
The sink wall and the range wall are the two places where wood needs a strategy, not blind optimism. Around sinks, the issue is regular water exposure. Behind ranges, the problem is not only heat, but also grease, steam, and frequent cleaning. That does not mean wood is impossible in these areas. It means you should be selective.
A very practical solution is a mixed-material backsplash. Use sealed wood on the surrounding walls, then switch to tile, metal, or stone directly behind the stove where heat and cleanup demands are highest. This approach looks intentional, protects the wall, and saves your future self from scrubbing tomato sauce off a grain pattern while whispering regrets into a sponge. It is also wise to check local code requirements, especially around gas burners and nearby flammable materials.
Seal It Like You Mean It
If there is one rule that separates a gorgeous wood backsplash from a cautionary tale, this is it: seal the wood properly. Not casually. Not eventually. Not after the first spaghetti incident. Before installation, every exposed surface should be protected, including edges and cutouts whenever possible.
Pick the finish based on performance, not just looks
Penetrating oils can enrich the grain and create a beautiful natural look, but film-building finishes generally provide stronger protection against water, household wear, and kitchen mess. Polyurethane and varnish are common choices when durability matters. Water-based finishes stay clearer and resist yellowing, while oil-based finishes can add warmth and often offer excellent moisture resistance. Several light, even coats usually perform better than one thick, gloopy coat that dries like a bad decision.
If you want a softer hand-rubbed look, you can still use oils, but understand the trade-off: they often require more frequent upkeep. A backsplash is vertical, so it does not take the abuse of a countertop, but it still lives in a room full of steam, splatter, and airborne grease. Treat it like a kitchen surface, not decorative trim.
Do not forget caulk and seams
The joint where the backsplash meets the countertop is not the place for wishful thinking. Seal that seam well so water does not sneak behind the boards. Around windows, outlets, and corners, tidy finishing details matter just as much as the boards themselves. A beautiful wood backsplash can be undone by one sloppy edge that lets moisture creep in and start causing trouble behind the scenes.
Installation Tips That Prevent Headaches
Most successful wood backsplash installs follow the same boring but important steps. The wall should be clean, dry, and smooth. If the area is prone to moisture, add protection where appropriate before the wood goes up. Mark level lines. Dry-fit everything before committing. Cut carefully around outlets and corners. Then install with the right adhesive, nails, or fastening method for your wall and material.
If you are using planks or boards, keep spacing consistent and plan your layout before the first piece goes on the wall. Starting neatly around focal points such as a window, a hood, or a centered shelf makes the final result look deliberate. Finishing touches matter too. Outlet extenders, clean trim details, and color-matched hardware can make a modest backsplash look custom.
One more tip that saves people from muttering into their toolboxes: finish your sample boards first. Do not judge stain from a tiny paper swatch or from a species of wood you are not actually using. Test the real finish on the real material under your real kitchen lighting. Wood changes character in daylight, under warm LEDs, and next to countertops. Your “perfect honey oak” can turn into “why is this orange?” alarmingly fast.
Design Tips for a Better-Looking Kitchen
Go vertical for height and a cleaner feel
Vertical shiplap or beadboard can make a kitchen feel taller and a little more tailored. It also tends to collect less dust in the grooves than traditional horizontal boards. If your kitchen is compact, vertical lines are a smart visual trick that adds texture without making the room feel chopped up.
Use full-height wood for drama
A countertop-to-ceiling wood backsplash can be incredibly effective, especially in a pantry wall, breakfast nook zone, or kitchen with open shelving. Full-height installation gives the room a more finished architectural feel. It works best when the wood tone supports the rest of the palette rather than fighting it.
Mix wood with other materials
Some of the most successful kitchens do not use wood everywhere. They pair it with tile, stone, or painted surfaces. A wood backsplash beside a marble range insert, a painted beadboard backsplash with wood shelves, or a natural shiplap wall next to a tiled cooking zone can look layered and thoughtful. Mixing materials also helps the kitchen feel collected over time rather than assembled from a single catalog page.
Keep the style timeless
Wood already brings a strong personality, so avoid piling on too many competing statements. If the grain is bold, keep the countertop and hardware more restrained. If the backsplash is painted white, then maybe the shelves, lighting, or island can carry more character. The goal is warmth, not visual traffic.
How to Clean and Maintain a Wood Backsplash
Maintenance is not difficult, but it is real. Wipe splashes promptly, especially around the sink and cooktop. Use a soft cloth and a mild cleaner. Skip anything too abrasive. Wood is charming, but it does not enjoy being attacked with harsh scrubbers like it owes you money.
Dust can build up in grooves, especially on horizontal shiplap or beadboard. A vacuum brush attachment or soft detailing brush helps keep those lines crisp. Over time, inspect the finish. If water stops beading, if the sheen looks worn, or if the surface begins to feel thirsty, it may be time for a maintenance coat depending on the finish you used.
The upside is that wear on wood often looks more natural than damage on glossy tile or laminate. Small signs of age can add charm. The trick is knowing the difference between “pleasant patina” and “hello, that seam is failing.”
Mistakes to Avoid
- Installing unfinished wood in a splash-heavy zone.
- Using wood right behind a stove without considering heat, grease, and code clearance.
- Ignoring undertones and ending up with clashing wood finishes.
- Skipping sample boards and hoping stain behaves itself.
- Forgetting to seal cut edges, seams, and vulnerable joints.
- Choosing a deeply grooved profile in a kitchen where easy cleaning matters most.
- Following a trend too literally instead of matching the backsplash to the architecture of the home.
Experiences: What Living With a Wood Backsplash Actually Feels Like
People who love their wood backsplashes rarely talk about them like a technical product. They talk about them like a mood. The kitchen feels warmer. The room feels less sterile. Morning coffee somehow feels more expensive, even when it absolutely is not. That is the sneaky magic of wood. It changes the emotional temperature of the room without demanding center stage every second of the day.
In real homes, the best experiences usually come from backsplashes that were chosen with restraint. A homeowner adds painted beadboard in a small cottage kitchen and suddenly the room feels brighter, taller, and more custom. Another uses natural vertical planks in a pantry zone, and that once-forgettable wall starts looking like a deliberate design moment. Someone else pairs wood with a tile insert behind the range and gets the warmth they wanted without turning cleanup into a part-time job. The pattern is clear: the happiest results come from using wood where it can shine and protecting it where the kitchen gets wild.
There is also something deeply satisfying about the way wood ages. Tile often looks exactly the same for years, which can be a plus. Wood changes subtly. Light shifts it. Cleaning softens it. Time gives it a more settled look. In the right kitchen, that evolution is not a flaw. It is part of the appeal. The backsplash starts to feel integrated with daily life rather than frozen in showroom mode.
Of course, real-life experience also includes the occasional lesson. Some homeowners discover that raw or lightly sealed wood around the sink gets tired fast. Others realize that heavily grooved horizontal boards are adorable until they start collecting dust and kitchen film like tiny decorative shelves. A few learn that dark stain looked dramatic in theory but swallowed the light in a small room. These are not failures so much as reminders that wood needs practical planning. Beauty helps sell the idea, but performance is what makes people keep loving it three years later.
One of the most common positive surprises is how flexible wood can be stylistically. A wood backsplash is not locked into one design identity forever. Change the wall color, the hardware, the open shelving, or even just the styling on the counters, and the backsplash can read more modern, more rustic, or more coastal without being replaced. That kind of design flexibility is a gift, especially in kitchens that evolve slowly over time.
Another experience people mention is the tactile quality. Even when you are not touching it constantly, you feel the difference visually. Kitchens have a lot of hard surfaces, and wood breaks that up. It creates balance. It helps stainless steel feel less cold, stone feel less formal, and white cabinetry feel less flat. It is the element that often keeps a remodeled kitchen from looking too precious to actually cook in.
So what is it really like to live with a wood backsplash? In the best cases, it feels grounded, cozy, and quietly upscale. It asks for a little maintenance, a little thought, and a little maturity in material choices. In return, it gives the kitchen texture, charm, and a lived-in beauty that many trendier surfaces spend their whole careers trying to fake. That is a pretty good trade.
Final Thoughts
Wood backsplashes are not the default choice, and that is exactly why they are so appealing. They can make a kitchen feel more personal, more layered, and more welcoming than a safer option ever could. The key is to respect the material. Choose a stable product, use it in the right areas, seal it thoroughly, and design it in a way that supports the rest of the room. Do that, and a wood backsplash will not feel like a risky experiment. It will feel like the smartest decision in the whole kitchen.


