
Table of Contents >> Show >> Hide
- Before you start: the goal (and the two rules)
- Step 1: Choose the right truck size (and plan your loading “runway”)
- Step 2: Gather the “truck packing kit” (pads, straps, and the stuff you’ll regret not having)
- Step 3: Stage by zone: “Heavy,” “Light,” “Fragile,” and “Last In / First Out”
- Step 4: Prep furniture and appliances so they load cleanly (and don’t explode into parts)
- Step 5: Build your first wall: load the heaviest items low and toward the front
- Step 6: Stand tall items upright and pad them like you’re sending them to a polite boxing match
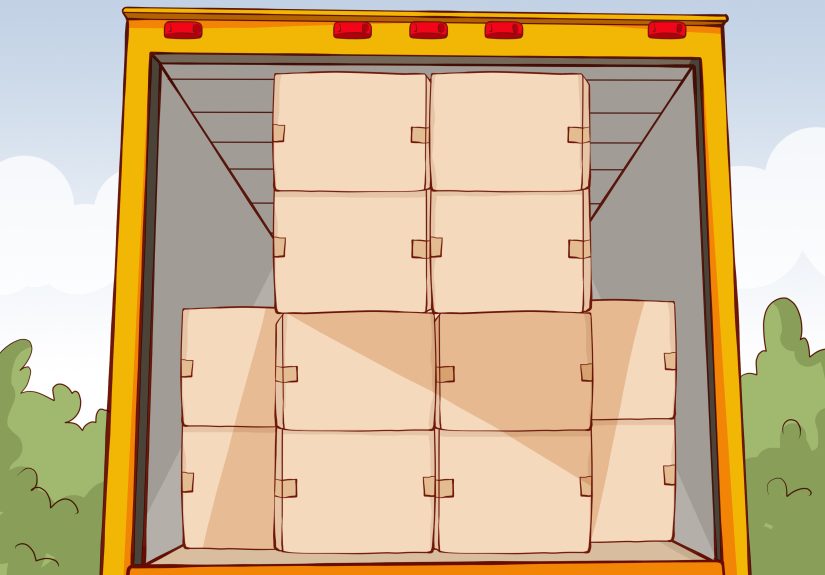
- Step 7: Pack in “tiers” (sections), not one giant pile
- Step 8: Stack boxes smart: heavy boxes low, light boxes high, and fill gaps on purpose
- Step 9: Strap, brace, and “shake-test” each section before moving on
- Step 10: Load “last in, first out” items near the backand keep essentials with you
- Common mistakes that make a move harder (and how to avoid them)
- Quick “pro-style” loading order (one screen version)
- Real-world experiences: what people learn after packing a truck (the hard way)
- Conclusion
Packing a moving truck looks easy until you’re standing there with a sofa, a lamp that refuses to fit anywhere, and 47 boxes labeled
“KITCHEN (??)” in your own handwriting. The good news: this isn’t magic. It’s physics, planning, and a tiny bit of “human Tetris.”
Below are 10 practical steps (with real-world examples) to load a rental truck so your stuff arrives in one pieceand your drive doesn’t
feel like you’re steering a shopping cart with one wobbly wheel.
Before you start: the goal (and the two rules)
The goal is simple: keep heavy items low and forward, balance weight left-to-right, and prevent shifting.
If your load shifts, boxes crush, doors pop, and the truck can handle unpredictablyespecially when braking or turning.
Two rules to tattoo on your moving-day brain:
- Heavy first, light last. (And heavy stays low.)
- Nothing moves. If it can slide, it willusually right after you merge onto the highway.
Step 1: Choose the right truck size (and plan your loading “runway”)
If your truck is too small, you’ll end up playing “angle math” with furniture at 10 p.m. If it’s slightly bigger, you buy yourself
space for safer stacking and better weight distribution. Also: you need a clear path from your home to the rampno bikes, hoses, or
surprise garden gnomes underfoot.
Example
If your biggest items include a sectional, a king mattress, and a washer/dryer, don’t gamble on a “maybe it fits.” Size up so you can
build stable rows and still use tie-down points.
Step 2: Gather the “truck packing kit” (pads, straps, and the stuff you’ll regret not having)
You can technically pack a truck with just boxes and optimism. But the pros rely on a few basics:
moving blankets/pads, ratchet straps (or strong rope), stretch wrap, a dolly/hand truck,
and gloves. Add a box cutter, tape, markers, and a small tool bag for quick disassembly.
Quick checklist
- Furniture pads/blankets (for wood, leather, and anything scratchable)
- 2–6 ratchet straps (more if you have tall stacks)
- Stretch wrap (great for drawers and bundling awkward pieces)
- Dolly/hand truck + furniture sliders
- Painter’s tape + zip bags for hardware (label them!)
Step 3: Stage by zone: “Heavy,” “Light,” “Fragile,” and “Last In / First Out”
Don’t carry items to the truck one-by-one in random order. Instead, stage your home in categories so loading is smooth:
heavy furniture/appliances, medium furniture, heavy boxes, light boxes, and
fragile + essentials.
Label boxes with the room and a simple weight tag: HEAVY / MEDIUM / LIGHT. It sounds extrauntil you’re deciding what can go on
top of what without crushing your air fryer (or your heirloom dishes).
Step 4: Prep furniture and appliances so they load cleanly (and don’t explode into parts)
Disassemble what you can: table legs, bed frames, headboards, shelving units. Tape screws/bolts into labeled bags and attach them to the
item (painter’s tape is your friend). Remove drawers from dressers if it makes them lighter or helps prevent slide-outs.
Wrap wood pieces with pads/blankets and secure with stretch wrap or straps. For appliances, secure doors (tape or appliance strap) and
protect corners. Empty and dry washers if possible, and keep hoses/cords taped to the back so they don’t snag.
Example
Wrap a coffee table in a moving blanket, then stretch wrap the entire thing like it’s heading to the “Furniture Spa.” You’ll prevent
scratches and also create a grippier surface so it doesn’t slide.
Step 5: Build your first wall: load the heaviest items low and toward the front
Start with the big, heavy, awkward pieces: appliances, safes (if you hate yourself), large dressers, and the bulkiest furniture.
Place them on the floor and toward the front of the truck (near the cab) to help stability. Distribute weight evenly
between driver and passenger sides.
Think of this as your “foundation.” If your foundation is wobbly, everything above it becomes a moving hazard.
Example layout
Put the refrigerator and washer/dryer on the floor at the front, with padding between. If you have multiple appliances, arrange them so
weight is balanced side-to-sidenot all on one wall.
Step 6: Stand tall items upright and pad them like you’re sending them to a polite boxing match
Mattresses, headboards, sofas, and tall cabinets often load best upright (when safe), especially along the truck’s walls. Use pads
between items so wood doesn’t grind against wood during bumps. Keep the heaviest edges on the floor and avoid stacking anything heavy
against fragile surfaces like glass cabinet doors.
If you’re loading a sofa, protect arms and corners, then place it along a side wall to help create a stable “lane” down the truck.
Step 7: Pack in “tiers” (sections), not one giant pile
A common pro trick is to load the truck in sectionslike building a layered wall from floor to ceilingthen securing each section before
moving to the next. This prevents the dreaded mid-drive avalanche.
Try working in quarters or “zones”: build a tight section, strap it, then build the next. Your future self (the one braking behind a
sudden stoplight) will thank you.
Step 8: Stack boxes smart: heavy boxes low, light boxes high, and fill gaps on purpose
Boxes are your brickwork. Heavy boxes (books, tools, small kitchen appliances) belong on the bottom. Lighter boxes (linens, pillows,
stuffed animals that somehow multiplied) go on top. Fill gaps with soft items like blankets, towels, or couch cushions to reduce shifting.
For fragile kitchen boxes, pack plates vertically (like records), cushion empty space, and clearly mark “FRAGILE.” Then place those boxes
higher and tighternever as the bottom layer under a box of dumbbells.
Example
If you have a row of medium boxes and a weird gap near the wall, slide in a folded comforter or a pillow bag. It’s safer than leaving
an empty pocket where boxes can slide during turns.
Step 9: Strap, brace, and “shake-test” each section before moving on
Use the truck’s tie-down points (rails, rings, or E-track) to secure the load. Strap tall items and any section where boxes could shift
forward or topple. If you used pads, straps also help hold them in place.
After you finish a tier/zone, do a quick test: push gently on the stack. If it wobbles, it’s not done. Add a strap, shift a box,
or wedge with soft fillers.
Step 10: Load “last in, first out” items near the backand keep essentials with you
Items you’ll need immediately at arrivaltool kit, box cutter, bedding, shower curtain, basic kitchen kit, medications, chargers, and a
change of clothesshould be easy to access. Put these near the back of the truck (or in your car). Also keep small valuables with you
rather than buried in the truck.
Arrival example
Put your “Open First” bin right inside the truck door: paper towels, trash bags, soap, basic tools, and phone chargers. When you arrive,
you won’t have to unpack half the truck just to find a screwdriver.
Common mistakes that make a move harder (and how to avoid them)
-
Overloading one side: If all your heavy stuff hugs one wall, the truck can feel unbalanced. Mirror heavy pieces across
both sides when possible. - Leaving “air pockets”: Gaps invite shifting. Fill them with soft goods or smaller boxes.
- Skipping straps: A perfect stack can still slide forward when you brake. Strap key sections.
- Random box weights: Keep heavy items in smaller boxes and don’t create top-heavy monsters that are hard to carry safely.
- Fragiles in the danger zone: Don’t put breakables where heavy items can lean, fall, or crush.
Quick “pro-style” loading order (one screen version)
- Front floor: appliances + heaviest furniture (balanced left/right)
- Along walls: mattresses/sofas/headboards (padded, upright when safe)
- Build tiers: heavy boxes on bottom, medium boxes mid, light boxes top
- Fill gaps with soft items; keep flat items protected and upright
- Strap each zone; load essentials last near the door
Real-world experiences: what people learn after packing a truck (the hard way)
Let’s talk about the part of moving guides that rarely gets enough attention: the “I can’t believe we did that” stories. Not because
embarrassment is fun (it is), but because those moments teach the fastest lessons.
Story #1: The Book Box That Achieved Black Hole Density. Almost everyone has packed a box with books and thought,
“This is fine.” Then they try to lift it and discover they’ve created a compact star. The fix is simple: books go in small boxes, not
big ones. The bonus lesson is even better: when boxes are reasonably weighted, you can stack them confidently, build clean tiers, and
avoid injuries. Your back is part of the moving crew. Treat it like it’s unionized.
Story #2: The Drawer That Tried to Escape at 45 MPH. Dressers look like perfect “don’t pack this” furnitureuntil a drawer
slides out mid-move and starts punching the inside of the truck like it’s trying to signal for help. People solve this in different ways:
remove drawers and load them separately, or keep them inside and secure the whole dresser with stretch wrap (and sometimes a strap).
Either way, the lesson is the same: anything that can swing open, slide out, or flop around will eventually do exactly that.
Story #3: The One Strap That Saved the Entire Move. There’s a moment after you finish loading when you want to close the
door, wipe your hands, and declare victory. Then someone says, “Should we strap this?” and everyone pretends not to hear. The people who
add “just one more strap” often end up with the calmest drive and the neatest unload. A single strap across a tier can prevent a domino
effect where one box shifts, then another, then suddenly your lamp is wearing your winter coats like a costume.
Story #4: The ‘First Night’ Box That Was Packed… Somewhere. The most common arrival mistake is burying essentials.
After a long drive, nobody wants to hunt for towels, soap, or a phone charger. Seasoned DIY movers pack an “Open First” bin and keep it
right by the truck dooror in the car. It’s not fancy. It’s survival. Think: toilet paper, a basic tool kit, a shower curtain, snacks,
water, and the one mug you’ll want in the morning when your kitchen looks like a cardboard-based art installation.
Story #5: The Moment You Realize Packing Is Driving Prep. People often treat loading as a storage problem (“How do we fit
everything?”). But it’s also a driving problem: weight distribution affects braking, turning, and how stable the truck feels.
Once you’ve driven a truck that’s tail-heavy or unevenly loaded, you never forget it. That’s why the “boring” rulesheavy forward and low,
balanced side-to-side, strapped sectionsend up being the difference between a smooth trip and white-knuckle highway poetry.
If you take nothing else from these stories, take this: you don’t need to pack perfectly. You just need to pack intentionally.
Intentional packing saves your stuff, your time, and your sanitythree things you’ll be short on by about Step 7.


