
Table of Contents >> Show >> Hide
- Why Stenciled Floors Work So Well in a Kitchen
- Before You Start: Know What Makes This Project Succeed
- How to Pull Off a Quick Kitchen Update With Stenciled Floors
- Design Ideas That Make Stenciled Floors Look Custom
- Mistakes to Avoid
- How Stenciled Floors Hold Up in Real Life
- When This Is the Right Updateand When It Isn’t
- The Bottom Line
- Experiences Related to “A Quick Kitchen Update With Stenciled Floors”
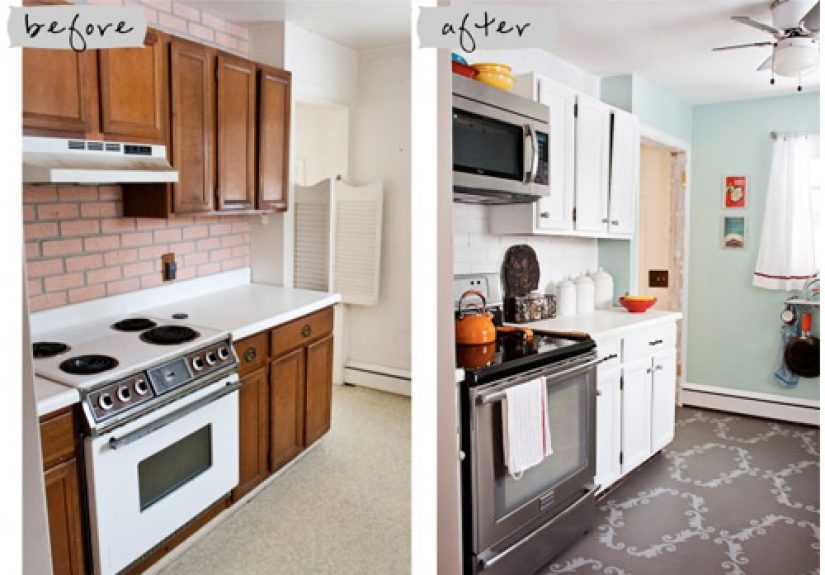
If your kitchen is giving “I’ve seen things” energy but your budget is giving “please be serious,” stenciled floors might be the hero move. They are one of those rare updates that can change the entire mood of a kitchen without demolition, dust storms, or the emotional roller coaster of choosing grout. A painted and stenciled floor can make a tired kitchen feel brighter, cleaner, more custom, and a whole lot more intentional.
That is the magic of this project: the floor is a massive visual surface, so when you change it, the whole room suddenly looks like it got its life together. Cabinets seem fresher. Walls look more coordinated. Even that slightly chaotic junk drawer somehow feels less offensive. A quick kitchen update with stenciled floors is not just about paint. It is about turning the room’s foundation into a design feature.
The best part is that this kind of makeover works especially well when the existing floor is structurally sound but visually blah. Maybe the tile is dated. Maybe the vinyl is dull. Maybe the color says “builder-grade beige” in the most depressing dialect possible. If the surface is in decent shape, a stencil can create the look of patterned tile, checkerboard, cottage charm, or a faux vintage floor at a much lower cost than replacement.
Why Stenciled Floors Work So Well in a Kitchen
Kitchens are practical rooms, but that does not mean they have to be boring. In fact, the kitchen is one of the best places to try a bold floor because the room already contains so many hardworking surfaces. Counters, cabinets, appliances, open shelves, and lighting all compete for attention. A stenciled floor brings those elements together and tells the room what its personality is.
A quick kitchen update with stenciled floors also delivers something every homeowner loves: visual drama on a modest budget. Instead of ripping out tile or replacing old flooring, you are working with what you already have. That means less mess, less downtime, and fewer moments of standing in the middle of the room asking why home improvement always smells faintly like regret.
Design-wise, stenciling can lean in several directions. A soft, faded pattern creates cottage style. A crisp black-and-white motif feels graphic and classic. A checkerboard layout brings in retro charm. A trellis or Moroccan-inspired stencil adds movement and a custom, collected look. You can go subtle, bold, old-world, modern farmhouse, or somewhere in the delicious middle where Pinterest and practicality shake hands.
Before You Start: Know What Makes This Project Succeed
Start with the right kind of floor
This project works best when the existing floor is cleanable, paintable, and still in solid condition. In plain English, that means no major cracking, loose tiles, severe water damage, or mystery soft spots that make the floor feel like it is auditioning for a trampoline commercial. Paint can improve appearance, but it cannot fix structural problems.
Be honest about durability
Stenciled floors are a budget-friendly refresh, not a magic spell. They can look fantastic, but they also live in a high-traffic, spill-prone room. That means prep matters, product choice matters, curing time matters, and maintenance matters. If you go in expecting a forever finish with zero upkeep, the floor will humble you. Quickly. Politely, perhaps, but firmly.
Choose a pattern that suits your kitchen
The smartest stencil projects feel connected to the rest of the room. If your cabinets are shaker-style and the space has a cozy, collected look, a soft geometric or floral pattern may feel right at home. If your kitchen is sleek and modern, a clean lattice or checkerboard design might make more sense. A busy kitchen with dramatic counters and backsplash usually benefits from a simpler floor pattern. A quieter kitchen can handle more movement below.
Pick colors that age gracefully
Floor colors should do two jobs at once: look beautiful and forgive real life. Mid-tones, soft grays, warm whites, muted greens, charcoal, greige, and black-and-white combinations all tend to work well because they pair with many cabinet colors and hide everyday crumbs better than bright white alone. A kitchen floor does not need to scream. It just needs to quietly look expensive while surviving pasta night.
How to Pull Off a Quick Kitchen Update With Stenciled Floors
1. Clean like you mean it
This is the least glamorous step and the one most likely to decide whether your project succeeds. Kitchens collect grease, dust, cooking residue, and a suspicious layer of life. Sweep, vacuum, scrub, and degrease thoroughly. Pay special attention to corners, grout lines, and the perimeter of the room. A stencil cannot hide grime, and paint does not bond well to “lightly sticky.”
2. Repair small flaws and tape the room
Fill minor chips if appropriate for your floor type, make sure everything is dry, and tape off baseboards, cabinets, appliances, and transitions. This is also the moment to plan your layout. Dry-fit the stencil and determine how the pattern will land at the edges. A little planning here saves a lot of theatrical sighing later.
3. Prime for adhesion
If you want a finish that actually sticks, do not skip primer. A quality bonding primer helps paint grip slick surfaces such as tile and some finished floors. It also creates a more even base for your color coats. Think of primer as the dependable friend in this project. It is not flashy, but it shows up and keeps everything from falling apart.
4. Roll on the base coat
Once the primer is fully dry, apply your base color in thin, even coats. This is where patience earns its paycheck. Thin coats look smoother, dry more evenly, and are less likely to peel than one thick coat applied in a fit of optimism. Let the base cure long enough before you bring in the stencil. “Dry to the touch” is not the same thing as ready for action.
5. Stencil with less paint than you think you need
This is the secret sauce. Most stencil mistakes happen because too much paint is loaded onto the brush or roller. Use a small amount, offload excess, and build color gradually. Secure the stencil well, line it up carefully, and work methodically across the floor. Start in the least noticeable area if you are nervous. Everyone deserves a practice zone.
If your floor is divided into tiles, center the stencil within each tile for a clean faux-encaustic effect. If the surface is continuous, map out your repeats so the spacing feels balanced across the room. Around edges, toe kicks, and awkward corners, a small artist’s brush becomes your best friend. Or at least your least annoying coworker.
6. Seal and let it cure
Once the pattern is complete and fully dry, apply a protective topcoat recommended for your floor type. This adds durability and makes everyday cleaning easier. Then comes the hard part: leaving it alone. Not “walk on it a little.” Not “just stepping in with socks.” Cure time matters because paint needs time to harden and bond, not just look dry.
Design Ideas That Make Stenciled Floors Look Custom
Classic checkerboard
If you want timeless style with a side of vintage diner charm, checkerboard is hard to beat. It works beautifully in kitchens because it is graphic without being chaotic. Black and white is the obvious classic, but soft taupe and cream, sage and ivory, or charcoal and warm white can feel more lived-in and less theatrical.
Faux encaustic tile
This is the pattern family that makes people squint and ask, “Wait, is that real tile?” A repeating stencil with floral or geometric detail can mimic the look of cement tile without the cost, weight, or commitment. It is especially effective in older kitchens that need a little character but do not need a full renovation.
Cottage-style faded pattern
For a softer look, choose muted colors and a low-contrast stencil. The result can feel charming, layered, and slightly worn in the best possible way. This approach works especially well with wood countertops, open shelving, beadboard details, and kitchens that aim for warmth over perfection.
Dark floor, lighter kitchen
If your cabinets, walls, or counters are light, a darker painted floor can anchor the room and make everything above it pop. This is a great move in kitchens that feel washed out or flat. A dark stencil pattern can also help disguise dirt and foot traffic better than a very pale finish.
Mistakes to Avoid
The first big mistake is rushing prep. The second is using too much paint on the stencil. The third is ignoring cure time because you want your kitchen back. These are the holy trinity of floor-paint regret.
Another common issue is choosing a pattern that is too busy for the size of the room. In a tiny kitchen, a dense, high-contrast pattern can make the space feel visually crowded. On the other hand, a spacious kitchen often benefits from a bolder repeat. Match the scale of the stencil to the scale of the room, and the project instantly looks more professional.
Do not overlook practical details either. Put protective pads under chairs. Use a mat near the sink if your household splashes like a competitive sport. Wipe up spills instead of letting them sit. Treat the floor with a little respect, and it will reward you by not peeling in protest.
How Stenciled Floors Hold Up in Real Life
A quick kitchen update with stenciled floors can hold up surprisingly well when the floor is properly cleaned, primed, painted, sealed, and allowed to cure. That said, this is still a finish you live with, not just photograph. High-traffic paths may show wear first. Rolling stools, pet claws, chair legs, and constant moisture near the sink are the usual troublemakers.
The good news is that a painted floor is easier to touch up than many people expect. Keep a small amount of base color and stencil color on hand. If a worn area appears later, you can often clean it, touch it up, and reseal the section. In that sense, stenciled floors are not just a design choice. They are also a mindset: lower cost, higher charm, and a willingness to maintain something creative.
That trade-off is often worth it in kitchens that need a style boost now, not three tax refunds from now. If the alternative is staring at a sad, outdated floor for another five years, a stencil project can feel downright liberating.
When This Is the Right Updateand When It Isn’t
This project is right for homeowners who want a budget-conscious kitchen makeover, enjoy hands-on DIY, and are comfortable with the idea of maintenance. It is excellent for older homes, cottage kitchens, transitional spaces, and rooms where you want maximum style impact without replacing cabinets or countertops.
It may not be the best choice if your floor is badly damaged, your kitchen sees extremely heavy wear, or you want a completely maintenance-free surface. In those cases, replacement flooring or another upgrade path may make more sense. There is no shame in knowing when paint is a clever shortcut and when it is just delaying the inevitable.
The Bottom Line
A quick kitchen update with stenciled floors works because it transforms the room at eye level and underfoot at the same time. It is affordable, highly customizable, and visually dramatic in a way few weekend projects can match. Done well, it creates the impression of a much larger renovation. Done poorly, it creates a cautionary tale and a sudden interest in area rugs.
But when you respect the processclean thoroughly, prime properly, paint lightly, stencil carefully, seal generously, and cure patientlythe result can be wildly satisfying. Your kitchen still has the same walls, the same cabinets, maybe even the same slightly bossy refrigerator. Yet the room feels new. That is the beauty of a floor makeover: the whole kitchen changes, even when almost nothing else does.
Experiences Related to “A Quick Kitchen Update With Stenciled Floors”
One of the most interesting things about living with a stenciled kitchen floor is how quickly it changes your relationship with the room. People often begin the project because the kitchen feels dull, dated, or disconnected from the rest of the house. Once the floor is finished, the same cabinets and walls suddenly look more intentional. Homeowners frequently describe that moment as the biggest surprise of the makeover. They expected the floor to look better, but they did not expect the whole kitchen to feel styled.
Another common experience is that the project teaches patience in a very specific, paint-scented way. The early stages can feel slow because cleaning, taping, priming, and waiting do not provide instant gratification. Then the stencil goes down and the room starts changing tile by tile, and suddenly the project becomes addictive. Many people say the first few repeats are nerve-racking, the middle stretch feels almost meditative, and the final section near the doorway becomes a strange mix of triumph and back pain.
There is also a strong emotional payoff to doing a visible update without spending cabinet-replacement money. A stenciled floor often becomes the project that makes people feel brave enough to tackle other cosmetic improvements later. After all, once you have painted a kitchen floor and survived, swapping a light fixture feels almost adorable.
Living with the floor day to day usually brings a few practical lessons. Patterns with a little contrast tend to hide crumbs better than expected. Extremely light finishes show everything from flour dust to pet hair. Darker or mid-tone patterns are often more forgiving in a real kitchen where people actually cook, snack, spill, and occasionally drop an entire onion. Homeowners also learn quickly that chair pads, sink mats, and quick wipe-downs are not optional extras. They are part of the maintenance deal.
Many people end up appreciating the imperfections, too. Unlike factory-made flooring, a stenciled floor has a hand-done character. Tiny variations in paint depth or alignment can make the surface feel more charming, not less. That is especially true in cottage, farmhouse, vintage-inspired, or eclectic kitchens where a little softness adds warmth. In modern spaces, cleaner lines and crisper contrast tend to feel more polished.
Perhaps the most repeated experience is this: guests notice the floor. They notice it immediately. They assume it was tile, or they ask where it was sourced, or they stare at it with the kind of suspicious respect usually reserved for people who make their own pie crust. And that reaction is a big part of why the project remains so appealing. It looks custom, feels creative, and tells a story about the home. Not a “we demolished everything and lived in dust for six months” story, but a smarter one: we used what we had, made it beautiful, and kept our sanity mostly intact.
Note: This is body-only HTML in English, formatted for easy copy-and-paste publishing.


