
Table of Contents >> Show >> Hide
- What “Reference Mic” Really Means (And What It Doesn’t)
- The Affordable DIY Strategy: Start With a Great Capsule
- Pick Your Power Path: Plug-In Power vs. Phantom Power
- A Practical Build You Can Actually Finish This Weekend
- How to Make It “Reference” on a Real Budget: Calibration and Consistency
- Testing Your DIY Reference Mic (Without Needing a Lab Coat)
- Common DIY Pitfalls (A Short List of Ways to Accidentally Invent a Wind Instrument)
- Cost Breakdown: What “Affordable” Looks Like
- “Should I Just Buy One?” (A Fair Question With a Fair Answer)
- Conclusion: A DIY Mic That Tells the Truth (Or at Least the Same Truth Consistently)
- Real-World Experiences: What It’s Like to Build and Use a DIY Reference Mic (About )
“Reference mic” sounds like something you need to buy in a climate-controlled room while wearing white gloves and whispering “traceability.” In reality, most of us just want a microphone that tells the truth (or at least tells the same truth every time) when we measure speakers, room acoustics, or DIY audio projects.
Here’s the good news: you can build a genuinely useful, measurement-friendly microphone for a fraction of the price of a lab-grade reference mic. Here’s the honest news: if you want it to be actually “reference,” you’ll still care about calibration, repeatability, and a couple of details that are about as glamorous as… heat-shrink tubing.
This guide walks you through a practical DIY build that’s affordable, sturdy, and compatible with typical audio interfaces. We’ll cover capsule choices, powering (phantom vs. plug-in), a simple build approach, and how to make your results trustworthy instead of “trust me bro, the graph looked smooth.”
What “Reference Mic” Really Means (And What It Doesn’t)
A measurement/reference microphone is usually:
- Omnidirectional, so it “hears” evenly from all directions instead of coloring the sound based on aim.
- Small-diaphragm, which helps extend high-frequency accuracy and reduces weird off-axis behavior.
- Built for flat frequency response (or at least a response that can be corrected with a calibration file).
- Consistent, meaning you can repeat a measurement next week and not wonder if your mic had an emotional journey overnight.
What it usually doesn’t mean: “perfect.” Even commercial measurement mics vary unit-to-unit. That’s why you’ll often see calibration graphs or downloadable calibration files. The DIY version can be very goodespecially for room EQ, speaker tuning, and comparative testingif you treat calibration as part of the project, not a bonus side quest you skip because solder fumes made you sleepy.
The Affordable DIY Strategy: Start With a Great Capsule
Most budget measurement microphones (and a lot of surprisingly serious DIY builds) lean on an electret condenser capsule. An electret capsule includes a tiny internal FET buffer that needs a small amount of power (bias). You supply that power either through “plug-in power” (common on portable gear) or by adapting standard 48V phantom power (common on interfaces and mixers).
Capsule Options That Make Sense
- Primo-style omni electrets (e.g., EM272 family): Popular with builders because they’re compact, quiet, and consistent enough to calibrate well. Great for measurements and also surprisingly capable for ambience/field-style recording when built cleanly.
- Classic Panasonic electrets (WM-61A era): Famous in measurement DIY history. If you encounter them, know that many builders used simple mods and careful biasing to squeeze excellent performance out of them.
- “Measurement mic” capsules pulled from cheap mics: Tempting, but risky. You don’t want a capsule that was tuned to flatter someone’s voice. Your goal is a mic that’s boring on purpose.
If you’re trying to keep this build affordable and useful, put your money and attention into the capsule and the wiring/shielding. A fancy metal tube won’t fix a noisy capsule or a hum factory.
Pick Your Power Path: Plug-In Power vs. Phantom Power
Electret capsules need a bias supply for the built-in FET. In many consumer devices, that bias is provided as “plug-in power” (a low DC voltage through a resistor). In pro audio, microphones typically use phantom power (often 48V) over XLR. Measurement mics commonly support phantom power ranges like 15V–48V.
Option A: Plug-In Power (Fast, Cheap, Short-Cable Friendly)
If you’re building a mic mainly for quick measurements with a handheld recorder, a laptop mic-in that provides bias, or a dedicated plug-in-power adapter, this is the simplest route. The tradeoff: unbalanced wiring is more prone to noise over long runs, and some mic inputs vary widely in how they provide bias. It can be fantastic for short runs, test rigs, and portable setups.
Option B: Phantom Power (Most Universal for Interfaces)
If you want to plug into a standard audio interface or mixer with XLR and phantom power, build for phantom. This gives you robust cable runs, better noise immunity, and compatibility with the gear people already use for measurement software workflows.
Practical note: phantom power is low-current, but it can still pop loudly when hot-plugging. Turn phantom off before plugging/unplugging and save your speakers (and your dignity).
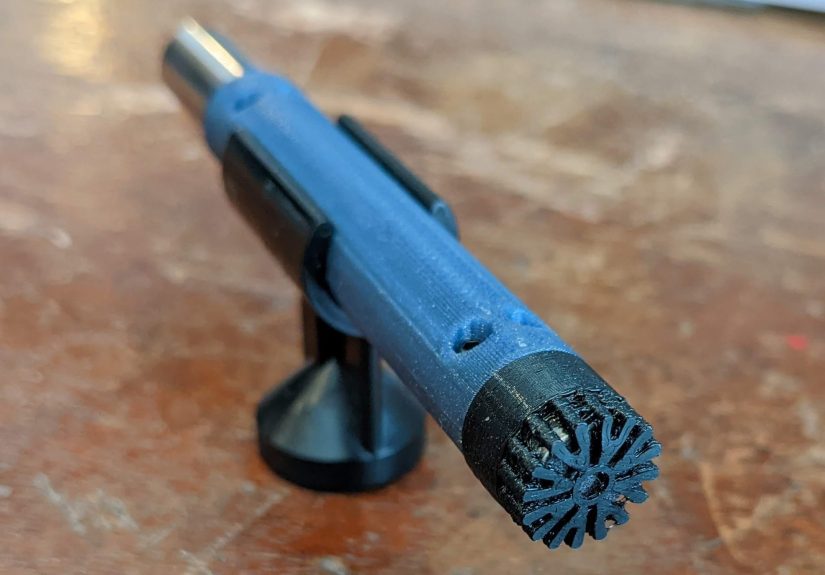
A Practical Build You Can Actually Finish This Weekend
There are many “ultimate” circuits you can build, including active balanced impedance converters and boutique front ends. But the goal here is a reliable, affordable reference-style micnot a PhD thesis in a tube.
Recommended Build Concept
Build a phantom-powered XLR mic using:
- One omni electret capsule mounted at the tip of a slim tube.
- A simple phantom-to-electret bias network (resistors + capacitors) inside the XLR body or mic body.
- Shielded wiring and a mechanically stable mount so handling and cable movement don’t become “bonus measurement data.”
Parts List (Budget-Friendly, Not Junk-Drawer Chaos)
- Omni electret capsule (Primo-style recommended)
- Metal tube body (slim aluminum/brass tube or repurposed mic body)
- XLR connector (quality matters; this is where strain relief lives)
- Resistors + capacitors for biasing/coupling (small values, low noise, stable)
- Shielded cable (short internal run) + heat shrink + epoxy/hot glue (for mechanical stability)
- Fine mesh or grille to protect the capsule (avoid thick foam right at the tip if you care about HF accuracy)
- Basic tools: soldering iron, small side cutters, multimeter, drill (if fabricating a body)
Step-by-Step Assembly (The “Don’t Overthink It” Edition)
- Plan your physical layout. Keep the capsule at the end of the tube, flush or slightly proud. Deep recesses and weird cavities near the capsule can create small resonances.
- Prep the body. Deburr the tube, add a tiny internal support (a snug insert, a printed spacer, or a carefully shaped plug) so the capsule sits straight and stable.
- Wire the capsule carefully. Keep leads short. Use heat shrink to prevent shorts. If the capsule body is conductive, ensure it won’t accidentally contact signal points.
- Add the bias/coupling network. The basic idea is: phantom power is delivered through the XLR line, your circuit derives a safe bias for the electret’s FET, and capacitors couple the audio while blocking DC. Keep parts tidy; messy layouts invite hum.
- Connect to the XLR. Standard practice: pin 1 is shield/ground, pins 2 and 3 carry the balanced audio. Follow reputable pin conventions and keep shielding intact.
- Mechanical reinforcement. A dab of epoxy/hot glue (applied thoughtfully) can prevent the “my wire broke after three measurements” tragedy. Don’t bury the capsule face in gluethis is a microphone, not a fossil.
- Continuity and sanity checks. Before applying phantom power, use a multimeter to confirm there are no shorts between pins and that your wiring matches your plan.
How to Make It “Reference” on a Real Budget: Calibration and Consistency
Here’s the secret: your build becomes a reference mic when it’s calibrated and used consistently. Even a decent commercial measurement mic benefits from an individual calibration file because tiny variances matterespecially above a few kHz.
Calibration Paths (Pick the One That Matches Your Reality)
- Best-budget “good enough”: Use your DIY mic for comparative measurements (before/after, left/right, EQ changes). Even without perfect calibration, it can be extremely useful as long as it’s consistent.
- Better: Compare against a known calibrated mic (a USB measurement mic with an individual calibration file is a common benchmark). You can measure the same signal and derive a correction curve for your DIY mic.
- Best: Send your mic (and the preamp/interface you’ll use) to a calibration service that can generate a mic calibration file tied to a traceable reference. This is how you climb from “DIY measurement mic” toward “reference mic I can defend in public.”
Using Calibration Files in Measurement Software
Many room and speaker measurement workflows let you load a microphone calibration file so your graphs reflect reality more than microphone personality. The key is simple: once you have a cal file, keep your signal chain the samesame interface gain approach, same mic orientation, same placement habits. Your future self will thank you when your measurements line up instead of arguing like siblings.
Testing Your DIY Reference Mic (Without Needing a Lab Coat)
Quick Functional Tests
- Noise check: With phantom on and the mic in a quiet room, listen for hiss, hum, buzz, or RF chirps.
- Tap test: Lightly tap the body and cable. Excessive thumps mean mechanical coupling or loose parts.
- Level check: Speak at a normal distancedo you get a healthy signal without insane gain?
Measurement Reality Checks
- Consistency sweep: Measure the same speaker twice, moving nothing. Your plots should match closely. If they don’t, your setup (or your mic’s mechanical stability) needs work.
- Orientation sanity: Omni measurement mics are often used at 0° (pointing at the source) or 90° (pointing at the ceiling). Decide how you’ll measure and stick to it so your comparisons remain meaningful.
Common DIY Pitfalls (A Short List of Ways to Accidentally Invent a Wind Instrument)
1) Recessing the Capsule Too Deep
Putting the capsule down a narrow tube can create cavity resonances and high-frequency weirdness. Keep it near the tip and avoid creating a tiny “echo chamber.”
2) Treating Shielding Like a Suggestion
A measurement mic is often used with long XLR runs near computers, power strips, and audio interfaces. Shielding and good grounding are not optional if you want clean data.
3) Forgetting the Preamp Is Part of the System
The microphone capsule might be great, but if your interface preamp is noisy at the gain you need, your “reference” mic will faithfully reference… hiss. A quiet interface with phantom power is a quality-of-life upgrade for any measurement workflow.
4) Chasing Perfection Instead of Repeatability
Repeatability is the superpower. If your DIY mic gives the same response every time, you can EQ, compare, and improve systems confidentlyeven if you later refine calibration.
Cost Breakdown: What “Affordable” Looks Like
A realistic DIY build can land in the “treat-yourself lunch” price range, depending on what you already own:
- Capsule: modest cost, but don’t cheap out here
- XLR + housing: moderate cost if bought new; cheaper if repurposed
- Small components: inexpensive
- Tools/supplies: often already owned; if not, they’re reusable for future builds
If you compare that to buying a measurement microphone plus accessories, DIY can be a solid valueespecially if you enjoy building and want a mic you can repair or modify.
“Should I Just Buy One?” (A Fair Question With a Fair Answer)
If your #1 goal is to start measuring immediately with minimal fuss, a calibrated USB measurement microphone is hard to beat. Many come with individual calibration files and plug-and-play convenience. If you already have an interface with phantom power, an analog measurement mic is also a simple option.
So why build? Because building lets you:
- Spend less (especially if you have parts/tools)
- Customize your form factor (slim body, specific length, specific connector)
- Understand your measurement chain (which makes you better at interpreting results)
- Repair and iterate instead of replacing
Conclusion: A DIY Mic That Tells the Truth (Or at Least the Same Truth Consistently)
An affordable reference mic you build yourself is absolutely within reachif you focus on the fundamentals: a solid omni electret capsule, clean powering (phantom or plug-in), careful shielding, and a calibration strategy that matches your goals. You don’t need a lab budget to make meaningful measurements. You need a mic that behaves, a setup you can repeat, and the patience to fix the one tiny wiring mistake that will inevitably make you question every life choice you’ve ever made.
Real-World Experiences: What It’s Like to Build and Use a DIY Reference Mic (About )
The first “experience” most people have with a DIY reference mic is not the triumphant sweep curve. It’s the moment you realize you have turned a perfectly good Saturday into a treasure hunt for the one resistor that rolled off the desk sometime around lunch and is now living behind a bookshelf with a family of dust bunnies. This is normal. Consider it your initiation.
Once the parts are finally on the table, the build feels surprisingly satisfying. You’re not assembling a mysterious black boxyou’re building a tool with a clear job: capture sound honestly enough that your measurements are worth acting on. The capsule goes in, the wiring gets trimmed shorter than you think it needs to be, and you start to appreciate that “mechanical stability” is just a fancy way of saying, “Please don’t let the cable yank the solder joint loose.”
The first power-up is the emotional roller coaster. If you built for phantom power, you’ll probably do the cautious routine: phantom off, plug in, volume down, phantom on, slowly raise gain, and listen like you’re defusing a movie bomb. When it works, it’s delightfully anticlimacticyour reward is clean audio and the sudden urge to measure everything you own, including the inside of your refrigerator (which, disappointingly, has terrible low-frequency damping).
The first measurement session teaches humility. You set up the mic carefully, run a sweep, and the graph shows a dramatic dip at 120 Hz. Your brain immediately blames the mic. Then you move the mic six inches, re-measure, and the dip turns into a peak. Congratulations: you’ve met the room. That’s the point where the DIY mic starts to feel like a superpowerbecause it reveals problems you can fix, like placement, reflections, and modal behavior, instead of leaving you guessing.
Another common experience is learning the difference between “accurate” and “actionable.” Even without a perfect calibration file, a consistent mic can guide real improvements. You tweak speaker toe-in, re-measure, and see a smoother treble region. You add a rug, and the mid/high reflections calm down. You adjust subwoofer phase and watch the crossover region snap into alignment. In those moments, it doesn’t matter that your mic isn’t a $1,000 lab instrumentwhat matters is that the changes you make show up clearly and repeatably.
And theninevitablythere’s the “oops” moment. Someone discovers pin 2 and pin 3 got swapped, or the capsule was mounted slightly recessed, or a blob of adhesive is closer to the capsule face than intended. The nice part about DIY is that these mistakes aren’t the end of the story. You revise, you re-test, you learn. The mic becomes a little better each time, and so do you. By the end, you don’t just own a measurement micyou understand your measurement chain, which is the real upgrade.


