
Table of Contents >> Show >> Hide
- What You’ll Find in This Guide
- Before You Start: The Non-Negotiables That Make the “After” Possible
- Before-and-After Inspiration: 9 Totally Amazing Mobile Home Makeovers
- 1) The “Curb Appeal Rescue”: From tired siding to “Wait, that’s a mobile home?”
- 2) The “Open-Feel Living Room”: From dark paneling to bright and breathable
- 3) The “Kitchen Face-Lift”: From dated cabinets to “I can actually cook here”
- 4) The “Bathroom Glow-Up”: From cramped and tired to clean and spa-ish
- 5) The “Flooring Transformation”: From squishy carpet to durable, modern surfaces
- 6) The “Built-In Storage Trick”: From clutter magnets to smart organization
- 7) The “Energy Comfort Upgrade”: From drafty to cozy (without turning into a furnace)
- 8) The “Porch + Outdoor Room”: From “just steps” to a real front-of-house hangout
- 9) The “Full Personality Refresh”: From generic to “this is so us”
- High-Impact Upgrades That Work Especially Well in Mobile Homes
- Common Mobile Home Makeover Mistakes (And How to Avoid Them)
- Extra: of “Real-World” Makeover Lessons People Learn the Hard Way
- Wrap-Up: Your Best “After” Is a Home That Looks Good and Lives Better
Mobile homes (and their newer, better-behaved cousin: manufactured homes) are the ultimate “before” photos.
Not because they’re doomedbecause they’re ready. Ready for better light. Better flow. Better storage.
Better everything. If you’ve ever walked into a vintage single-wide with sponge-painted walls, oak cabinets,
and carpet that looks like it survived three birthday parties and a small flood… congratulations. You’re standing in opportunity.
The magic of a great makeover isn’t “making it look expensive.” It’s making it look intentional: clean lines,
smarter layout, durable finishes, and upgrades that actually improve comfort (hello, insulation) instead of
just adding decorative throw pillows to a problem.
Before You Start: The Non-Negotiables That Make the “After” Possible
A mobile home makeover can be as simple as paint and lightingor as dramatic as a full gut renovation.
But before you start choosing backsplash tile like it’s a personality test, make sure the bones (and the belly)
can support your glow-up.
1) Know what you’re working on: mobile vs. manufactured
In everyday conversation, people say “mobile home” for everything. Officially, many homes built after mid-1976
are “manufactured homes,” built to federal HUD standards. That matters because it affects labeling, some repair
practices, and how lenders and insurers may treat the property.
2) Safety + compliance: lead paint, electrical, and permits
If your home (or portions of it) were built before 1978, treat paint disturbance like it’s not a casual hobby.
Lead dust is a serious hazardespecially during sanding, demolition, and window work. If you’re hiring help,
make sure contractors follow lead-safe practices where required. If you’re DIYing, use containment, HEPA cleanup,
and smart testing habits.
Also: mobile homes have quirksfloor cavities can carry ducts, plumbing can be tight, and electrical updates
should be done correctly. If you’re moving walls, changing window/door sizes, or doing major systems work,
check local permit requirements. The goal is a makeover that looks great and doesn’t create a “before” photo for your insurance adjuster.
3) The “comfort upgrades” that pay you back daily
A gorgeous living room means less if the floor feels like an ice rink in January. Mobile homes often benefit
hugely from air sealing, duct improvements, and insulation upgradesespecially belly insulation, skirting insulation,
and roof/ceiling improvements. When you reduce drafts and stabilize temperatures, everything else (paint, flooring,
furniture) feels more luxurious because the home behaves better.
4) A fast planning checklist
- Inspect first: roof condition, water intrusion, soft subfloors, plumbing leaks, duct issues.
- Set a “must-fix” budget: reserve money for surprises (because surprises love older homes).
- Choose durable finishes: moisture-resistant flooring, washable paint, hardware that isn’t flimsy.
- Plan for weight + movement: materials should tolerate seasonal shifts and transport-era framing realities.
- Phase your project: weatherproof + mechanicals first, then surfaces, then styling.
Before-and-After Inspiration: 9 Totally Amazing Mobile Home Makeovers
The transformations below are inspired by the kind of jaw-dropping “before and after” stories people love:
dated interiors turned bright, functional, and downright charming. Each one includes a quick takeaway so you can
borrow the strategynot just admire the pretty pictures.
1) The “Curb Appeal Rescue”: From tired siding to “Wait, that’s a mobile home?”
Before: Faded exterior, wobbly steps, patchy skirting, and a front door that looks like it’s given up.
After: Fresh exterior paint in a modern palette, updated trim, a new or refinished front door,
clean-lined skirting, and simple landscaping (gravel + planters + a path) that frames the home like it belongs on purpose.
Why it works: Exterior updates are visual multipliers. A mobile home’s long, low silhouette looks
instantly sharper with contrasting trim and a defined entry.
Steal this idea: Treat your entry like a “mini-porch moment”new light fixture, house numbers, and a door color that isn’t afraid of compliments.
2) The “Open-Feel Living Room”: From dark paneling to bright and breathable
Before: Dark wood paneling, heavy drapes, and lighting that feels like it was designed to hide evidence.
After: Walls painted warm white or soft greige, lighter window treatments, layered lighting
(flush mount + lamps), and a consistent flooring tone that visually stretches the space.
Why it works: Mobile home rooms can feel narrower; bright walls and continuous flooring reduce
visual “stops,” making everything feel wider.
Steal this idea: Add one intentional focal wall (paint, faux shiplap, or textured wallpaper) instead of decorating every wall like it’s competing for prom queen.
3) The “Kitchen Face-Lift”: From dated cabinets to “I can actually cook here”
Before: Honey-oak cabinets, worn laminate counters, and a backsplash that looks like it was installed during the dial-up era.
After: Painted cabinetry, new hardware, a budget-friendly counter refresh, and a simple backsplash
that brightens the workspace. Add under-cabinet lighting and suddenly the kitchen looks like it got a promotion.
Why it works: Kitchens are detail-heavy. Small upgrades compoundhardware + paint + lighting can
create a dramatic “after” without reconfiguring the whole layout.
Steal this idea: Use a “two-tone” trick: lighter uppers + darker lowers (or a single standout island cart) to make the kitchen feel custom.
4) The “Bathroom Glow-Up”: From cramped and tired to clean and spa-ish
Before: Yellowed fixtures, minimal storage, and a fan that sounds like it’s trying to leave the building.
After: Bright paint, a modern vanity (or a refreshed one), better mirror and lighting, and storage
that uses vertical spaceshelves, recessed medicine cabinet, or slim over-toilet cabinetry.
Why it works: Bathrooms are small, so improvements show immediately. Better ventilation and moisture
management also protects everything you just upgraded.
Steal this idea: Swap in a high-quality shower curtain and rod, then add a real towel bar and hooksinstant “adult bathroom” energy.
5) The “Flooring Transformation”: From squishy carpet to durable, modern surfaces
Before: Stained carpet or mismatched flooring transitions that make the home feel chopped up.
After: Durable vinyl plank or laminate (chosen for moisture resistance and easy cleaning),
with clean transitions and baseboards that make the edges look finished.
Why it works: Flooring is the largest visual surface in most homes. Consistency makes rooms feel larger
and more intentional.
Steal this idea: If subfloors are questionable, fix them first. A pretty floor over a soft floor is just a photo opportunity… for regret.
6) The “Built-In Storage Trick”: From clutter magnets to smart organization
Before: Limited closets, awkward corners, and furniture that doesn’t fit the room scale.
After: Wall-mounted shelves, shallow cabinets, bench seating with storage, and closet systems
that use vertical space. Even adding pantry shelving can change daily life.
Why it works: Many mobile homes were designed for efficiency, but storage can be sparse. “Built-ins”
(even faux built-ins) create function without eating floor space.
Steal this idea: Use the “same color as the wall” trick for shelving and storage so it visually recedes and looks custom.
7) The “Energy Comfort Upgrade”: From drafty to cozy (without turning into a furnace)
Before: Cold floors, hot-and-cold rooms, and heating/cooling bills that feel like personal betrayal.
After: Air sealing, duct improvements, belly insulation upgrades, insulated skirting,
and better windows/doors where practical. Comfort improves, and the home feels quieter too.
Why it works: Manufactured homes can lose heat through the belly and leaky ducts.
Sealing and insulating those areas delivers noticeable results fast.
Steal this idea: Start with drafts: weatherstripping, caulk, and duct sealing are often the best “ROI per dollar” upgrades.
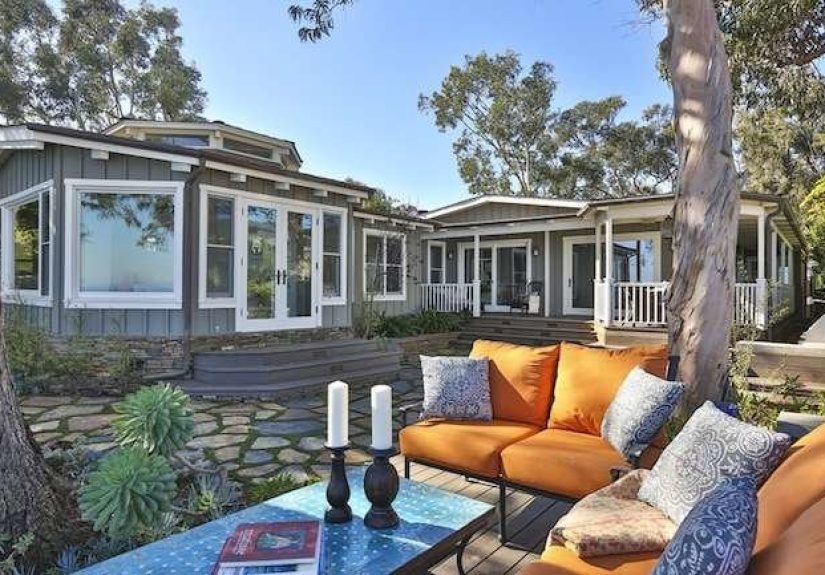
8) The “Porch + Outdoor Room”: From “just steps” to a real front-of-house hangout
Before: A tiny stoop, no shade, and nowhere to sit that doesn’t feel like you’re waiting for a bus.
After: A covered porch or pergola, sturdy railings, outdoor lighting, and seating.
Add container plants and it becomes a welcoming extension of the home.
Why it works: Outdoor spaces make a small home live larger. A porch creates an “entry sequence,”
which makes the whole home feel more substantial.
Steal this idea: Use lighting to make it feel intentional: one overhead fixture + two warm wall/step lights is a simple formula that looks high-end.
9) The “Full Personality Refresh”: From generic to “this is so us”
Before: Builder-grade everything, no focal points, and rooms that feel temporary.
After: Coordinated paint colors, updated fixtures, cohesive hardware finishes,
a statement backsplash or accent wall, and decor that follows one clear vibemodern farmhouse,
coastal, mid-century, minimalist, you name it.
Why it works: When finishes match and the palette is consistent, the home reads as curated,
not “random items in a space.”
Steal this idea: Pick one “hero” element per room (a rug, a light fixture, an accent wall) and let everything else support it.
High-Impact Upgrades That Work Especially Well in Mobile Homes
Upgrade #1: Lighting that doesn’t flatten the room
Many older mobile homes have lighting that’s either too dim or too harsh. Layering matters:
a ceiling fixture for general light, lamps for warmth, and task lighting where you work.
Bonus: new light fixtures are one of the fastest “after” shots you can buy.
Upgrade #2: Cabinet refresh instead of cabinet replacement
Painting cabinets, swapping hardware, and improving lighting can deliver the look of a remodel without
the cost (and layout headaches) of tearing everything out. Prep is the secret sauce: clean, scuff sand,
prime, then paint with patience.
Upgrade #3: Belly + skirting improvements for comfort
If your home has cold floors or drafty rooms, consider the underside.
Better skirting and belly insulation improvements can reduce heat loss and help protect pipes.
Comfort upgrades aren’t glamorous, but they make every other upgrade feel more satisfying.
Upgrade #4: Entry makeover for instant curb appeal
A new door, modern house numbers, a clean porch light, and a little landscaping can make the entire home
look cared forbefore anyone steps inside. It’s the “first impression” upgrade that works every time.
Common Mobile Home Makeover Mistakes (And How to Avoid Them)
- Skipping inspections: Fix leaks, soft spots, and ventilation firstor you’ll redecorate the same problem twice.
- Over-demolishing: Not every wall is “just a wall.” Confirm what’s structural or tied to systems before you swing the hammer.
- Choosing fragile finishes: Ultra-gloss everything looks great until it chips. Pick finishes made for real life.
- Ignoring moisture control: Bathrooms and kitchens need ventilation and water management, not just cute tile.
- Forgetting the “whole-house look”: Mixing five metal finishes and seven wood tones can make a home feel chaotic fast.
Extra: of “Real-World” Makeover Lessons People Learn the Hard Way
You don’t need a reality TV crew or a viral budget spreadsheet to pull off an amazing mobile home makeover.
But there are patterns that show up again and again in successful transformationslessons that homeowners,
DIYers, and contractors tend to repeat because they’re simply true.
First, the best makeovers start with honesty. Not “my home is ugly” honestydiagnostic honesty.
If the floor feels bouncy, call it what it is: a subfloor problem. If the bathroom smells musty, don’t light a candle and declare victory.
Moisture, leaks, ventilation, and insulation are the behind-the-scenes issues that decide whether your
makeover feels like a glow-up or a cover-up.
Second, small homes reward consistency. In a larger house, you can get away with one room being modern and
another room being “vintage chaos.” In a mobile home, sightlines are tighter and transitions are closer together,
so mismatched finishes scream louder. That’s why the simplest strategy is often the most powerful:
a cohesive paint palette, consistent flooring (or at least coordinated tones), and one hardware finish that shows up
repeatedly like it pays rent.
Third, don’t underestimate the emotional power of “finished edges.” Baseboards, trim, caulk lines,
outlet covers, door handles, and clean transitions between materials are the difference between
“we renovated” and “we started renovating.” When people look at a before-and-after photo and feel that
satisfying punch in the brain, it’s usually because the details look completeeven if the upgrades were budget-friendly.
Fourth, mobile homes love upgrades that reduce maintenance. Washable wall paint, durable flooring,
smart storage, and better lighting aren’t flashy, but they lower friction every day. The same goes for
energy comfort improvements: sealing drafts, insulating where practical, and improving duct performance.
A home that stays comfortable is a home you’ll actually enjoy stylingbecause you’re not decorating while wearing three hoodies indoors.
Finally, the biggest “after” results often come from a surprisingly humble mindset: do fewer things, better.
Instead of chasing ten trends, pick one style direction and commit. Instead of replacing everything,
refresh what’s solid and upgrade what’s holding you back. The goal isn’t perfectionit’s transformation.
A well-loved mobile home that’s clean, bright, comfortable, and thoughtfully updated will always beat a half-finished
remodel full of expensive stuff that doesn’t function.
Wrap-Up: Your Best “After” Is a Home That Looks Good and Lives Better
The most amazing mobile home makeovers aren’t about pretending the home is something else.
They’re about making it the best version of what it is: efficient, comfortable, stylish, and genuinely welcoming.
Start with the non-negotiables (structure, safety, moisture, comfort), then layer in the fun upgrades that bring the wow.
The “after” photo will be greatbut the real win is how it feels on a random Tuesday.


