
Table of Contents >> Show >> Hide
If the phrase “cherry pie with a lattice crust” makes you think of summer picnics, red-and-white tablecloths, and someone’s grandma who could bake with her eyes closed, you’re in the right place. This recipe brings together a flaky, buttery double crust, a juicy cherry filling that actually sets, and a lattice top that looks fancy but is secretly very doable.
We’ll walk through exactly how to choose your cherries, how to thicken the filling so it slices cleanly instead of oozing everywhere, and how to weave that charming lattice crust like you’ve been doing it for years. By the end, you’ll have a classic cherry pie recipe that deserves a permanent spot in your recipe box.
Why This Cherry Pie with a Lattice Crust Is a Keeper
There are a lot of cherry pie recipes out there, but this one is designed to balance flavor, texture, and practicality:
- Flaky, sturdy crust: A buttery double crust that’s crisp enough to hold the juicy filling, but still tender and flaky.
- Juicy, not soupy, filling: The cherry mixture is thickened just enough so your slices stand tall without turning into cherry soup.
- Fresh or frozen cherries: Works beautifully with either, so you’re not limited to a short cherry season.
- Eye-catching lattice top: The lattice crust looks impressive, vents steam perfectly, and gives you that “I really know what I’m doing” moment.
Think of this pie as the sweet spot between a showstopper dessert and a reliable, down-to-earth recipe you can make again and again.
Key Ingredients for the Best Cherry Pie
Choosing the Right Cherries
Cherry pie works with both sweet cherries (like Bing) and tart/sour cherries. Tart cherries have that classic pie flavor and often need a little more sugar; sweet cherries are easier to find in most grocery stores and give a richer, deeper flavor. If you can’t get fresh cherries, high-quality frozen cherries are a great choice and are often picked at peak ripeness.
For a standard 9-inch pie, you’ll want about 4 to 5 cups of pitted cherries, roughly 1½ pounds pitted. You can even mix sweet and tart cherries to hit that perfect sweet-tangy balance.
Thickening the Cherry Pie Filling
The secret to a cherry pie that slices neatly is choosing the right thickener and using the correct amount. Common options include:
- Cornstarch: Gives a glossy, fairly clear filling and is easy to find and use. It thickens quickly once the mixture simmers.
- Tapioca flour or quick-cooking tapioca: Makes a slightly clearer, more stable filling that holds up well when slicing. It’s great if you want a less starchy flavor.
- All-purpose flour: Works in a pinch, but can make the filling slightly cloudy and a bit pasty if overused.
This recipe uses cornstarch because it’s widely available and straightforward, but you can swap in tapioca flour if that’s your favorite pie thickener. Just remember: too little thickener and your filling will be runny; too much and it turns gummy. The amounts below are designed for a juicy but sliceable pie.
A Flaky, Buttery Lattice Crust
For the crust, we’re going with a classic, all-butter double crust. Butter gives unbeatable flavor and beautiful browning. The keys to success are:
- Using very cold butter and cold water.
- Handling the dough as little as possible so you keep visible bits of butter (those create flakes!).
- Chilling the dough before rolling and again after assembling the pie so it keeps its shape in the oven.
The lattice top uses the same dough as the bottom crust. You’ll simply cut the top crust into strips and weave them, creating those gorgeous little windows where the cherry filling bubbles up.
Cherry Pie with a Lattice Crust: Step-by-Step Recipe
Ingredients
For the double crust (9-inch pie):
- 2½ cups (300 g) all-purpose flour
- 1 tablespoon granulated sugar
- 1 teaspoon fine salt
- 1 cup (2 sticks / 226 g) cold unsalted butter, cut into small cubes
- 6–8 tablespoons ice-cold water
For the cherry filling:
- 4½ cups pitted cherries (fresh or frozen; if frozen, do not thaw completely)
- ¾ to 1 cup granulated sugar (adjust based on how sweet your cherries are)
- ¼ cup cornstarch (or about 6 tablespoons tapioca flour, if substituting)
- ¼ teaspoon fine salt
- 1 tablespoon fresh lemon juice
- ½ teaspoon vanilla extract
- ¼ teaspoon almond extract (optional but highly recommended)
To finish:
- 1 egg, beaten with 1 tablespoon milk or cream (for egg wash)
- 1–2 tablespoons coarse or granulated sugar (for sprinkling)
Directions
-
Make the pie dough. In a large bowl, whisk together the flour, sugar, and salt. Add the cold butter and cut it into the flour with a pastry cutter or your fingertips until you have a mix of pea-sized and slightly larger pieces of butter. Drizzle in the ice water, starting with 6 tablespoons, and gently toss until the dough just comes together when you squeeze it. Add more water a teaspoon at a time if needed, but stop before it becomes sticky.
-
Chill the dough. Divide the dough into two discs (one slightly larger for the bottom crust). Wrap each in plastic wrap and refrigerate for at least 1 hour, or up to 2 days. You can also freeze the dough discs for longer storage and thaw in the fridge overnight.
-
Prepare the cherry filling. In a large bowl, combine cherries, sugar, cornstarch, salt, lemon juice, vanilla, and almond extract. Gently toss until the cherries are evenly coated and no dry streaks of cornstarch remain. Let the mixture sit for about 10–15 minutes so the cherries release some juice and the cornstarch starts to hydrate.
-
Preheat the oven. Place a rack in the lower third of your oven and preheat to 400°F (200°C). Set a rimmed baking sheet on the rack to preheat as well; it will catch drips and help crisp the bottom crust.
-
Roll out the bottom crust. On a lightly floured surface, roll the larger dough disc into a circle about 12 inches in diameter. Fit it into a 9-inch pie plate, letting the excess hang over the edges. Gently press the dough into the corners of the pan without stretching it. Chill the lined pie plate in the fridge while you work on the lattice.
-
Fill the pie. Stir the cherry filling again, then spoon it into the chilled bottom crust, scraping in all the juices and thickener. Spread the cherries into an even layer.
-
Roll and cut the lattice strips. Roll the second dough disc into another 12-inch circle. Using a knife, pizza cutter, or pastry wheel, cut the dough into 10–12 strips about ½ to ¾ inch wide. Try to keep them roughly even, but don’t stress about perfectionrustic is charming.
-
Weave the lattice top. Lay 5 or 6 strips vertically across the pie, using the longer strips toward the center. Fold back every other vertical strip halfway, then lay a horizontal strip across the center of the pie. Unfold the vertical strips over the horizontal strip. Next, fold back the opposite set of vertical strips and add another horizontal strip. Continue weaving, alternating which vertical strips you fold back, until you’ve created a woven lattice across the whole pie.
-
Seal and crimp the edges. Trim any excess dough so you have about ½ inch of overhang around the edge. Fold the overhang from the bottom crust up and over the ends of the lattice strips, then press to seal. Crimp the edges with your fingers or use a fork for a simple pattern.
-
Egg wash and sugar. Brush the lattice and edges lightly with the egg wash, then sprinkle with coarse or granulated sugar for sparkle and crunch.
-
Bake the pie. Place the pie on the preheated baking sheet. Bake at 400°F (200°C) for 20 minutes, then reduce the oven temperature to 375°F (190°C) and continue baking for 25–35 minutes, or until the crust is deeply golden and the cherry filling is bubbling steadily in the center. If the edges brown too quickly, cover them with strips of foil or a pie shield.
-
Cool completely before slicing. This part is torture, but it’s important. Let the cherry pie cool on a wire rack for at least 3–4 hours. As it cools, the filling thickens and sets, giving you clean slices instead of a delicious mess.
Pro Tips for a Showstopping Lattice Cherry Pie
Prevent a Soggy Bottom
- Use a hot baking surface: Preheating the baking sheet under the pie helps the bottom crust start cooking right away.
- Don’t overload with liquid: If your cherries are very juicy, you can spoon off a tablespoon or two of extra liquid before filling the crust.
- Give it time to cool: A set filling feels thicker and less “wet,” even if you used the exact same ingredients.
Boost the Flavor
- Almond extract: Just a splash really brings out the cherry flavor and gives that classic “bakery cherry pie” aroma.
- Citrus balance: Lemon juice brightens the filling and keeps it from tasting flat or overly sweet.
- Spices, if you like: A pinch of cinnamon or cardamom can add a cozy, subtle warmth without stealing the show.
Make-Ahead, Storing, and Freezing
- Make-ahead filling: The cherry filling can be made a day in advance and stored in the fridge. Stir well before using.
- Room temperature: A baked cherry pie keeps well at room temperature (loosely covered) for up to 2 days.
- Refrigerator: For longer storage, refrigerate up to 4 days. Serve at room temperature or gently rewarm slices in a low oven.
- Freezing: You can freeze the baked pie, well wrapped, for a couple of months. Thaw overnight in the fridge, then crisp it up in a 325°F (165°C) oven for 15–20 minutes.
Serving Ideas and Fun Variations
Classic Ways to Serve Cherry Pie
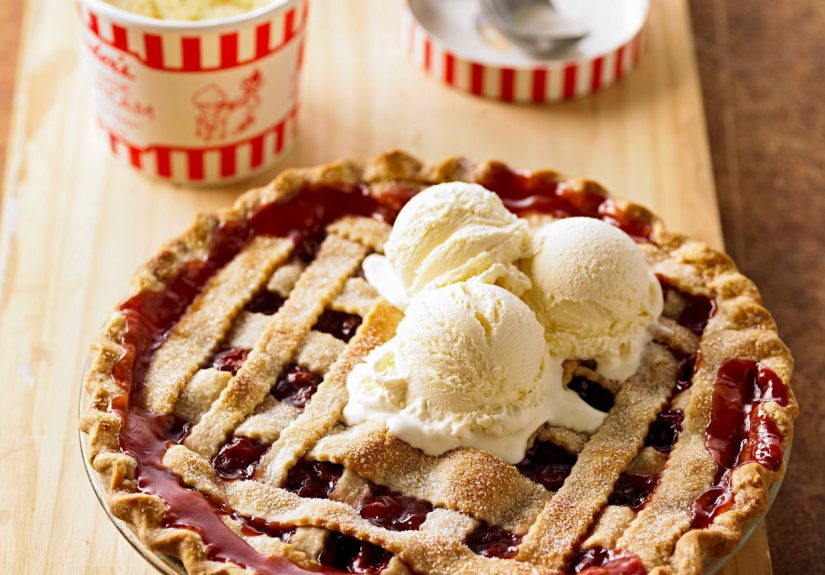
- À la mode: Warm cherry pie with a scoop of vanilla ice cream is the textbook answer for “perfect dessert.”
- With whipped cream: Lightly sweetened whipped cream is a great option if you prefer something less rich than ice cream.
- Breakfast, allegedly: Leftover cherry pie and coffee the next morning is a very valid life choice.
Easy Variations to Try
- Cherry-berry pie: Swap 1 cup of cherries for mixed berries (blueberries, raspberries, or blackberries) for a more complex flavor.
- Brown sugar twist: Replace ¼ cup of the granulated sugar with brown sugar for a deeper, caramel-like sweetness.
- Almond crumble edges: Sprinkle sliced almonds around the edges of the lattice after the egg wash for extra crunch.
Conclusion
This cherry pie with a lattice crust recipe gives you everything you want in a classic dessert: a flaky, golden crust, a glossy, jewel-toned filling, and that satisfying moment when you cut into the pie and the slice stands tall. Once you’ve made it once or twice, the steps feel natural, and the lattice becomes less of a challenge and more of a relaxing, almost meditative kitchen project.
Whether you’re baking for a holiday, a cookout, or just because you scored a big bag of cherries, this is the kind of pie that gets people hovering in the kitchen saying, “When can we cut it?” And honestly, that’s one of the best compliments a baker can get.
Real-Life Cherry Pie Lessons: Extra Tips & Experiences
Every baker has a cherry pie story, and most of them involve at least one slightly chaotic moment. Here are some real-world lessons and experiences that can help you skip a few classic mistakes and get to the good partserving perfect slices.
1. The Great Cherry Volcano Incident
If you’ve ever opened your oven to find cherry filling bubbling over the sides like a fruit lava flow, you’re not alone. Cherry pie loves to bubble. The fix is twofold: always set your pie on a rimmed baking sheet, and don’t overfill the crust. It’s tempting to cram in every last cherry you pitted, but if the filling sits too high above the crust, it will almost certainly spill over. Aim for the filling to sit just below the crimped edge; it will rise as it bakes.
2. When the Filling Wouldn’t Set
One of the most common frustrations with cherry pie is a runny filling. Maybe you followed the recipe exactly, but your cherries were extra juicy, or you cut into the pie too soon. Two experience-based tips:
- Be patient: That 3–4 hour cooling time isn’t a suggestion; it’s part of the recipe. As the pie cools, the thickener finishes its job.
- Adjust next time: If your filling was too loose, add an extra tablespoon or so of cornstarch (or tapioca flour) the next time you bake, especially if you’re using very ripe fresh cherries or cherries that were frozen and then thawed.
3. Lattice Crust Confidence
Many bakers avoid lattice crusts because they look complicated, but once you’ve done it once or twice, it feels surprisingly simple. The first time, it’s normal to lose track of which strip is supposed to go over or under. Don’t panicif you mess up, gently peel the strip back and try again. The dough is more forgiving than you think, especially if it’s been kept cold.
A handy trick from real kitchen experience: weave the lattice on one half of the pie at a time. Mentally divide the pie down the center, complete the lattice on the right side, then repeat the same pattern on the left. It’s like braiding haironce your hands know the rhythm, your brain can relax.
4. Dealing with Sticky Dough
If your crust feels sticky and hard to handle, it’s usually one of two issues: the dough has warmed up too much, or there’s a bit too much water. Either way, the cure is chilling. Pop the dough back into the fridge for 10–15 minutes. Lightly flour your work surface and rolling pin, and try again. It’s better to take an extra break to chill the dough than to fight with it and end up overworking the crust.
5. Finding Your Perfect Sweetness Level
Not everyone likes their cherry pie at the same sweetness level. Some people grew up on very sweet, canned cherry filling; others prefer a more tart, fresh-cherry profile. The more you bake this pie, the more you’ll dial it in for your taste. A good rule of thumb from experience: taste a cherry from your filling before it goes into the crust (as long as you haven’t added raw egg). If the fruit tastes balancedbright, sweet, and just a little tartyou’re in the right zone.
6. Cherry Pie as a Make-Ahead Hero
Cherry pie is one of those desserts that actually benefits from being made ahead. Many bakers purposely bake their pie the day before a party so the filling has plenty of time to set and the flavors can meld. The next day, you can serve it at room temperature or warm slices briefly in the oven. This also frees up your oven for other dishes if you’re cooking a big meal.
7. Turning Leftovers into Something New
If you somehow have leftover cherry pie (rare, but it happens), you can reinvent it in fun ways. Warm slices and serve with yogurt for a weekend brunch “dessert breakfast.” Crumble leftover pie into a parfait glass with whipped cream or vanilla ice cream. You can even lightly toast slices in a skillet with a little butter, French-toast style, for an extremely indulgent treat.
Over time, you’ll build your own set of cherry pie storiessome victories, some near-misses, all delicious. The more you bake this cherry pie with a lattice crust, the more it becomes “your” recipe, with little tweaks and tricks that fit your kitchen, your oven, and your taste. And that’s the real magic: not just following a recipe, but making it your own, one slice at a time.


