
Table of Contents >> Show >> Hide
- Why Make a Corn Husk Summer Wreath?
- Materials You Need
- Choosing the Best Wreath Form
- How to Prepare Corn Husks for Crafting
- How to Make a Corn Husk Summer Wreath
- Summer Design Ideas for a Corn Husk Wreath
- Where to Hang a Corn Husk Summer Wreath
- How to Store and Care for Your Wreath
- Common Mistakes to Avoid
- Budget-Friendly Tips
- Experience: What I Learned Making a Corn Husk Summer Wreath
- Conclusion
- SEO Tags
A corn husk summer wreath is proof that beautiful seasonal decor does not need to arrive in a giant box, cost half your grocery budget, or require a crafting degree from the University of Hot Glue. With a bundle of dried corn husks, a simple wreath form, and a little patience, you can create a warm, breezy decoration that looks right at home on a front door, porch wall, garden gate, kitchen window, or mantel.
Most people think of corn husks as fall decor, and fair enoughcornfields, harvest baskets, and pumpkin spice have been in a long-term relationship for years. But corn husks also work beautifully for summer. Their pale straw color feels coastal, farmhouse, rustic, boho, and sun-washed all at once. Shape them into petals, layer them into a sunburst, add a ribbon in blue or coral, and suddenly your door looks like it booked a weekend at a charming lake cottage.
This guide walks you through how to make a corn husk wreath for summer, including supplies, preparation, design ideas, care tips, mistakes to avoid, and real-life crafting experience so your finished wreath looks intentionalnot like it got into a small argument with a tamale wrapper.
Why Make a Corn Husk Summer Wreath?
A DIY corn husk wreath is lightweight, affordable, customizable, and full of natural texture. Corn husks are thin enough to bend and fold but sturdy enough to hold shape once dry. That makes them ideal for a layered wreath that looks full without needing expensive faux florals.
The best part is the versatility. You can leave the husks natural for a soft neutral look, dye them for a brighter summer palette, trim them into petal shapes, or mix them with dried flowers, raffia, seashells, ribbon, seed pods, mini faux lemons, or sprigs of lavender. The result can be farmhouse, coastal, cottagecore, Southwestern, minimal, or cheerful front-porch Americana.
What Makes Corn Husks Great for Summer Decor?
Corn husks have a naturally sun-bleached tone that pairs well with summer materials like jute, linen, cotton ribbon, wicker, galvanized metal, and terracotta. Their texture adds movement to a space, especially when layered around a wreath form. They also photograph beautifully because the ridges and curled edges catch light, giving the wreath depth without looking busy.
Unlike heavy grapevine wreaths or large faux flower wreaths, a corn husk wreath is easy to hang. You can use a standard wreath hanger, ribbon loop, command hook, or a simple piece of floral wire. It is also a good project for beginners because small imperfections actually make it look more organic. Translation: if one husk folds a little weird, congratulationsyou have achieved “handmade charm.”
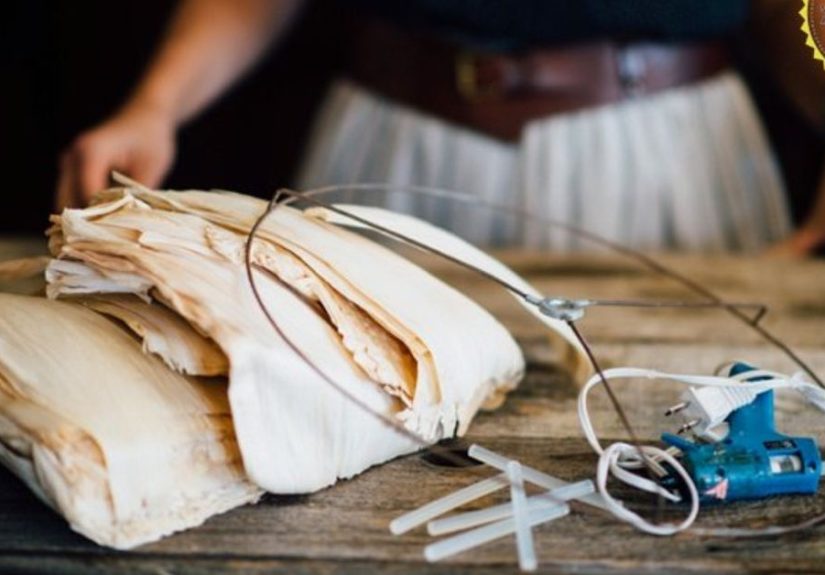
Materials You Need
Before you start, gather everything in one place. Corn husks dry quickly once softened, and nobody wants to run around looking for scissors while holding a damp bundle of husks like a confused scarecrow.
Basic Supplies
- Dried corn husks, such as tamale wrappers or clean dried husks from corn
- 12-inch, 14-inch, or 18-inch wreath form
- Wire, straw, grapevine, or foam wreath base
- Hot glue gun and glue sticks
- Floral pins, U-pins, or thin floral wire
- Scissors or craft snips
- Large bowl or sink filled with water
- Towel or paper towels for drying
- Ribbon, twine, or jute for hanging
Optional Summer Embellishments
- Blue, coral, yellow, or sage ribbon
- Dried lavender, strawflowers, or bunny tails
- Small seashells or starfish for a coastal look
- Mini faux lemons, oranges, or berries
- Raffia bow or burlap ribbon
- Craft paint, fabric dye, or food coloring
- Clear matte spray sealer for light protection
Choosing the Best Wreath Form
Your wreath form determines the overall style and structure. A wire wreath form creates a light, open wreath with a modern layered look. A straw wreath form gives the project a fuller farmhouse shape. A grapevine wreath adds rustic character and works well if you want a less polished, more garden-inspired finish. A foam wreath form is easy for beginners because it accepts floral pins and glue, although it usually needs full coverage so no foam peeks through.
For a summer corn husk wreath, a 14-inch form is a sweet spot. It is large enough to make an impact on a standard door but not so large that you need a heroic number of husks. If you want a dramatic sunburst design, choose an 18-inch form and let the husk tips extend outward.
How to Prepare Corn Husks for Crafting
Dried corn husks are often stiff when they come out of the package. To make them flexible, separate the husks gently and soak them in warm water for about 5 to 10 minutes. They should become pliable, not soggy. If they feel limp like overcooked noodles, let them rest on a towel until they are damp but workable.
Once softened, sort the husks by size. Wide husks are useful for the outer layer, while narrow strips work well for filling gaps or creating detail around the inner ring. If a husk is too wide, tear it along the natural grain. Corn husks usually split cleanly, which makes them easy to customize without a lot of measuring.
Should You Dye the Corn Husks?
You do not have to dye corn husks, especially if you love a natural wheat-colored summer wreath. However, dyeing opens up more design options. Pale blue tips feel coastal. Yellow and orange create a sunny citrus look. Soft pink or coral adds garden-party energy. Green accents can make the wreath feel fresh and botanical.
For a subtle effect, dip only the pointed ends of the husks into dye and let the color fade toward the base. For a bolder design, dye full strips in several shades and arrange them in an ombre pattern. Always allow dyed husks to dry until damp rather than wet before attaching them. Glue and water are not best friends; they are more like coworkers who avoid eye contact in the break room.
How to Make a Corn Husk Summer Wreath
The process is simple: soften, fold, layer, attach, and fluff. The key is to overlap each row so the wreath looks full and hides the form underneath.
Step 1: Soften and Sort the Husks
Place the dried corn husks in warm water for 5 to 10 minutes. Remove them and blot with a towel. Separate the largest pieces for the outside edge, medium pieces for the middle, and smaller pieces for the inner circle. Trim rough ends if needed.
Step 2: Create the First Outer Layer
Lay one husk on the wreath form with the wider end touching the base and the pointed end extending outward. Secure the wide end with hot glue, floral wire, or a floral pin. Add the next husk beside it, slightly overlapping the first. Continue around the wreath until the outer ring is covered.
For a sunburst look, let the pointed ends fan outward. For a softer petal look, fold each husk in half lengthwise before attaching it. For a fuller wreath, stack two or three thinner strips together and attach them as one bundle.
Step 3: Add the Middle Layer
Start the second row slightly inward from the outer layer. Position each husk so it covers the attachment points from the first row. This overlapping method creates dimension and hides glue, pins, or wire. Work in the same direction all the way around the form.
Step 4: Fill the Inner Ring
Use smaller husk pieces around the inside edge. Tuck them under the previous row and glue them in place. If the center looks too open, add a few curled strips facing inward. This gives the wreath a finished, flower-like shape.
Step 5: Fluff and Shape
Once the glue is set, use your fingers to gently bend, curl, and separate the husks. Some pieces will naturally curl as they dry, which is part of the charm. Step back often and check the shape. If one area looks flat, add another strip. If one area looks too wild, trim the tip or tuck it behind a neighboring husk.
Step 6: Add Summer Details
Finish your corn husk summer wreath with decorations that match your style. A blue-and-white striped ribbon gives a coastal porch feeling. A raffia bow keeps it relaxed and farmhouse-friendly. Small faux lemons make it bright and cheerful. Dried lavender adds color and a soft garden touch. For a Fourth of July version, add navy ribbon, small white flowers, and a few red berry stems.
Summer Design Ideas for a Corn Husk Wreath
Coastal Corn Husk Wreath
Use natural husks, whitewashed shells, pale blue ribbon, and a little jute. Keep the palette soft and sandy. This version works well on a beach house, lake cabin, or any door that wishes it lived closer to water.
Farmhouse Sunburst Wreath
Let the husks point outward in long rays and keep the embellishments minimal. Add a burlap bow at the bottom or top. The finished wreath looks warm, simple, and welcoming without shouting for attention.
Garden Party Wreath
Add dyed pink, yellow, or lavender husks with dried flowers tucked into one side. Keep the floral accents asymmetrical for a modern handmade look. This style is perfect for summer brunches, bridal showers, and backyard gatherings.
Boho Neutral Wreath
Combine corn husks with pampas grass, bunny tails, macrame ribbon, or cotton cord. Stick to cream, tan, beige, and muted gold. The finished wreath feels relaxed, textured, and stylish enough for indoor decor.
Where to Hang a Corn Husk Summer Wreath
A corn husk wreath works best in a protected area. Hang it on a covered front porch, screened patio, interior door, kitchen wall, mantel, entryway mirror, or garden shed door that does not get soaked by rain. Corn husks are natural and dried, so too much humidity or direct rain can cause them to soften, warp, or discolor.
If your front door gets strong afternoon sun, consider hanging the wreath inside a storm door only if there is enough ventilation. Trapped heat can make natural materials brittle. For outdoor display, a covered spot is ideal. For long-lasting beauty, bring the wreath inside during heavy storms.
How to Store and Care for Your Wreath
To keep the wreath looking good, dust it lightly with a soft brush or use a hair dryer on the cool, low setting. Avoid wiping the husks with a wet cloth. If the wreath gets damp, place it in a dry, airy room and let it dry naturally.
At the end of summer, store the wreath in a shallow box. Place tissue paper around it so the husks do not get crushed. Keep it in a dry closet rather than a humid garage or attic. If you used shells, faux fruit, or heavy decorations, store the wreath flat instead of hanging it from a hook.
Common Mistakes to Avoid
Using Husks That Are Too Wet
Wet husks are hard to glue and may shrink or twist more than expected as they dry. Aim for damp and flexible, not dripping. If water runs down your wrist while you are crafting, the husks need more towel time.
Skipping the Overlap
Without overlap, the wreath form may show through. Layer the husks like shingles on a roof. Each row should cover the attachment points from the row before it.
Adding Too Many Decorations
Corn husks already bring texture and movement. A few accents can elevate the wreath, but too many can make it look crowded. Choose one main theme: coastal, garden, farmhouse, patriotic, or boho.
Hanging It in Heavy Weather
This is not a hurricane-proof wreath. Natural dried materials prefer shade, airflow, and gentle conditions. Hang it where it can be admired without being personally attacked by a thunderstorm.
Budget-Friendly Tips
You can make a corn husk summer wreath without spending much. Look for dried corn husks in the international or Latin foods section of grocery stores, where they are often sold for tamales. Check thrift stores for old wreath forms you can strip and reuse. Use leftover ribbon, twine, or floral stems from past projects. If you garden or know someone who grows corn, you may be able to dry and save husks for future crafts.
To stretch your supplies, cut large husks into two or three strips. Use the best pieces on the visible front and smaller scraps to cover gaps. If your wreath form is unattractive, wrap it in burlap or strips of corn husk before layering so any tiny openings look intentional.
Experience: What I Learned Making a Corn Husk Summer Wreath
The first thing I learned while making a corn husk summer wreath is that corn husks have personalities. Some are graceful and cooperative, curling like they were born to decorate a cottage door. Others behave like they have a secret agenda. They twist, split, and point in odd directions. At first, I tried to force every piece to look the same, but that made the wreath feel stiff. Once I relaxed and let the husks vary a little, the whole project looked more natural.
Preparation made the biggest difference. The husks that soaked for a few minutes and then rested on a towel were much easier to fold and attach. The pieces I used too quickly were too wet and slippery. The pieces I forgot about for too long became stiff again. The sweet spot was damp, flexible, and slightly cool to the touch. I also found that sorting the husks before starting saved a lot of frustration. Large pieces worked best on the outer ring, while narrow strips were perfect for filling small gaps near the center.
Another lesson: do not underestimate the power of walking away for five minutes. When you stare at the wreath too closely, every tiny uneven spot looks dramatic. Step across the room, and suddenly the shape makes sense. A wreath is viewed from a few feet away, not under a microscope. Unless your guests are inspecting your front door with a jeweler’s loupe, you are probably fine.
I also liked how easy it was to change the mood with one detail. A plain corn husk wreath looked rustic and simple. When I added a soft blue ribbon, it felt coastal. When I tucked in dried lavender, it became more romantic and garden-inspired. A few faux lemon slices made it bright and summery. That flexibility is why this project works so well: the base is neutral, but the final personality is up to you.
One practical discovery was that hot glue works quickly, but floral wire gives extra security. For a door that opens and closes often, a combination of both feels sturdier. I used glue for speed and wire for pieces that stuck out farther from the wreath form. The finished wreath felt light, but not fragile.
The final result had that handmade, sun-washed look that makes a space feel warm before anyone even steps inside. It was not perfect, and that was the point. A corn husk summer wreath should look breezy, textured, and a little wild around the edgeslike summer itself, but with fewer mosquitoes.
Conclusion
A corn husk summer wreath is an easy, affordable way to bring natural texture to your home. With dried husks, a wreath form, and a few simple tools, you can create a piece of seasonal decor that feels warm, welcoming, and refreshingly handmade. Keep it natural for farmhouse charm, dye the tips for a colorful summer twist, or dress it up with ribbon, dried flowers, shells, or citrus accents.
The key is to soften the husks, layer them carefully, protect the wreath from heavy moisture, and let the material’s organic shape do some of the decorating for you. Whether you hang it on a covered porch, above a mantel, or inside an entryway, this DIY corn husk wreath brings sunshine, texture, and a little crafty satisfaction to your summer decor.


