
Table of Contents >> Show >> Hide
- What Gmail Labels Are and Why Color Coding Helps
- Easy Way #1: Start With a Simple Label Plan
- Easy Way #2: Create a New Label in Gmail
- Easy Way #3: Add a Color to a Label From the Sidebar
- Easy Way #4: Use Custom Colors for Better Visual Contrast
- Easy Way #5: Build a Color System, Not Just Random Pretty Dots
- Easy Way #6: Nest Labels to Keep Your Sidebar Under Control
- Easy Way #7: Let Gmail Filters Apply Labels Automatically
- Easy Way #8: Show Important Labels and Hide the Rest
- Easy Way #9: Use Labels With Search Instead of Clicking Around
- Common Mistakes to Avoid When Color Coding Gmail Labels
- Best Practices for a Cleaner, Smarter Gmail Inbox
- Conclusion
- Experience: What It’s Like to Actually Use Color-Coded Labels in Gmail Every Day
If your Gmail inbox looks less like a communication tool and more like a digital junk drawer, color-coded labels can help. They are one of the easiest ways to organize email without turning your inbox into a full-time job. Instead of squinting at subject lines and guessing which message matters most, you can train your eyes to spot work, bills, family, travel, receipts, and newsletters in a split second.
The beauty of Gmail labels is that they work like folders, but smarter. A single message can carry more than one label, which means an email can belong to both Clients and Urgent at the same time. Add color to that system, and suddenly your inbox stops looking like alphabet soup. It starts making sense.
In this guide, you’ll learn easy ways to color code labels in Gmail, create a system that is actually usable, avoid common mistakes, and set up filters so Gmail does some of the sorting for you. In other words, fewer clicks, less chaos, and a much better chance of finding that important email before your coffee gets cold.
What Gmail Labels Are and Why Color Coding Helps
Before we get into the fun part, let’s clear up one common Gmail myth: labels are not exactly the same as folders. Traditional email folders move messages into one place. Gmail labels act more like tags. You can apply several labels to the same message, which gives you more flexibility and a lot less filing regret.
Color coding adds a visual shortcut to that system. Instead of reading every label name one by one, you can recognize meaning by color. Blue might mean work. Green might mean money. Purple might mean personal. Red might mean “open this before something catches fire.” Once you set up a consistent pattern, your brain does the sorting faster than your mouse ever could.
It also helps to know that Gmail categories and Gmail labels are different things. Categories such as Primary, Promotions, Social, Updates, and Forums are built into Gmail. Labels are the custom tags you create yourself. Categories are automatic inbox tabs. Labels are your personal organization system. One is Gmail’s opinion. The other is yours.
Easy Way #1: Start With a Simple Label Plan
The fastest way to make label colors useful is to decide what your labels are for before you start clicking random shades. Color coding works best when the labels themselves are clear, short, and practical.
Good label ideas for everyday Gmail use
- Work for job-related email
- Clients for customer or freelance communication
- Bills for statements, invoices, and due dates
- Travel for flights, hotels, and bookings
- Receipts for order confirmations and purchase records
- Family for personal messages that actually matter
- Read Later for newsletters and articles you swear you will open someday
Try not to create fifty labels right away. That is how you end up building an inbox filing cabinet so detailed that even you cannot use it. Start with five to seven strong labels and expand only when you notice a real need.
Easy Way #2: Create a New Label in Gmail
If you don’t already have labels, create them first. On desktop Gmail, you can do this from the left sidebar by clicking the option to create a new label. You can also create labels from Gmail settings if you prefer the scenic route.
How to create a Gmail label
- Open Gmail on your computer.
- Look at the left-hand menu and find the Labels area.
- Click Create new label.
- Type a name for the label.
- If needed, nest it under another label to make a sub-label.
- Click Create.
For example, you might create a main label called Work and then sub-labels like Clients, Projects, and Invoices. That keeps your system tidy without flattening everything into one giant wall of labels.
Easy Way #3: Add a Color to a Label From the Sidebar
Now for the part that makes Gmail look less beige. To color code a label, hover over the label name in the left sidebar. Click the three-dot menu next to it, choose Label color, and select the color you want.
How to color code labels in Gmail
- Open Gmail on desktop.
- Move your cursor over the label you want to edit.
- Click the three dots next to the label name.
- Select Label color.
- Choose one of the preset colors or add a custom color.
That’s it. No ceremony. No advanced degree in inbox architecture. Just a few clicks and a better-looking sidebar.
If you use many labels, this single step makes a big difference. Color helps you scan your inbox faster, especially when multiple labeled messages pile up during a busy workday.
Easy Way #4: Use Custom Colors for Better Visual Contrast
Preset colors are handy, but custom colors are where the magic happens. Gmail lets you create your own combinations for background and text, which is great when the default shades feel too close together or too bland.
Custom colors are especially useful if you want a cleaner visual system. Maybe you want all money-related labels in different shades of green, or all work-related labels in cool tones. Maybe you just want your urgent label to scream a little louder. Gmail allows enough flexibility to make the system yours without turning it into a rainbow accident.
A good rule is to prioritize contrast and readability. A bright label is only helpful if you can still read the text. Neon yellow with pale gray lettering may look artistic, but it also looks like a cry for help.
Easy Way #5: Build a Color System, Not Just Random Pretty Dots
Here is where most people go wrong: they assign colors based on whatever looks nice in the moment. That creates a decorative inbox, not an organized one. Instead, use colors with purpose.
Examples of smart Gmail label color systems
- Red: urgent or time-sensitive email
- Orange: follow-up needed
- Yellow: pending or waiting
- Green: payments, receipts, and financial records
- Blue: work and project communication
- Purple: personal and family messages
- Gray: low-priority archives or reference material
You do not need to copy this exact setup. The point is consistency. Once you assign meaning to a color, stick with it. If red means urgent on Monday and travel on Thursday, your brain will stage a protest.
Easy Way #6: Nest Labels to Keep Your Sidebar Under Control
If your Gmail sidebar gets too long, nested labels can save you. Gmail lets you place one label under another, which works well for organizing broad categories into smaller groups.
For example:
- Work
- Clients
- Team
- Invoices
- Personal
- Family
- Travel
- Shopping
This structure helps you stay organized without creating a giant unbroken list of labels. It also makes colors easier to manage because you can reserve one palette for a parent category and use related shades for the sub-labels.
Easy Way #7: Let Gmail Filters Apply Labels Automatically
Manual labeling is fine if you get ten emails a day. If you get one hundred, filters are your best friend. Gmail filters can automatically apply labels to incoming email based on sender, subject line, keywords, attachments, or other criteria.
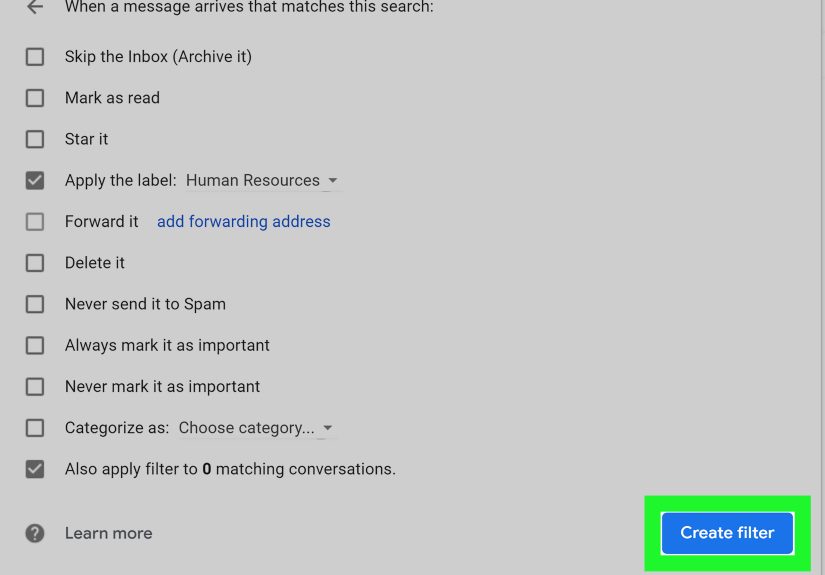
How to create a Gmail filter for labels
- Click the search options icon in Gmail’s search bar.
- Enter filter criteria such as sender, subject, or keywords.
- Click Create filter.
- Choose Apply the label.
- Select the label you want Gmail to use.
- Save the filter.
This is where Gmail goes from “organized” to “suspiciously efficient.” You can automatically label all receipts from stores, all newsletters sent to a plus-address, all client emails from a domain, or all messages with invoice in the subject line. You can also combine labels with archiving so low-priority email skips the inbox but stays easy to find later.
Real examples of useful filters
- Apply Receipts to order confirmations and archive them
- Apply Clients to messages from customer domains
- Apply Travel to booking confirmations and itinerary emails
- Apply Newsletters to subscription mail and mark it read
- Apply Urgent to messages from your boss or key contacts
Easy Way #8: Show Important Labels and Hide the Rest
Not every label deserves permanent front-row seating in your sidebar. Gmail lets you choose whether labels show in the label list, show in the message list, or stay hidden until needed.
This matters because the more clutter you remove, the more useful your color coding becomes. If your sidebar is packed with dozens of labels you never click, the important colors get buried. Show the labels you use every day. Hide the ones that are mostly reference material. Your inbox should work like a good kitchen, not an overstuffed junk drawer.
A good approach is to keep your top five to seven labels visible all the time and hide the rest under More. That way, your color-coded system stays quick to scan rather than visually noisy.
Easy Way #9: Use Labels With Search Instead of Clicking Around
Color coding is fantastic for scanning, but Gmail search is still the secret weapon. Labels become even more powerful when you use them with search operators. Instead of hunting through your inbox manually, you can search by label, sender, date, keyword, or category.
Helpful ways to search labeled email
label:Receiptsto find everything under that labellabel:Work from:[email protected]to narrow a searchlabel:Travel has:attachmentto find booking files fastcategory:updatesif you want to search Gmail categories rather than your custom labels
This is why labels beat old-school folders. They are visual when you need speed and searchable when you need precision.
Common Mistakes to Avoid When Color Coding Gmail Labels
Even a good system can go sideways if you overdo it. Here are the most common mistakes people make:
- Too many labels: If everything gets a label, nothing stands out.
- Too many bright colors: A rainbow inbox sounds fun until it starts yelling at you.
- No consistent meaning: Random color choices create confusion, not clarity.
- No filters: If you label everything by hand, you will eventually stop doing it.
- Mixing up labels and categories: Categories are built-in tabs. Labels are your custom system.
The best Gmail organization strategy is not the most complicated one. It is the one you will actually keep using three weeks from now.
Best Practices for a Cleaner, Smarter Gmail Inbox
If you want your color-coded Gmail labels to keep working over time, do a quick maintenance check every month or two. Rename unclear labels, delete ones you never use, and update filters when your workflow changes.
It also helps to label based on action, not just topic. For example, labels like Waiting, To Reply, and Read Later can be more useful than labels like Miscellaneous, which is basically the email version of shoving everything into a kitchen drawer and hoping for the best.
And remember: mobile Gmail is useful for applying labels and managing messages on the go, but the desktop version is usually the easiest place to build and fine-tune a serious color-coding system. If you want precision, use the full-size workspace.
Conclusion
Learning how to color code labels in Gmail is one of those small productivity upgrades that pays off fast. It does not require a new app, a paid tool, or a dramatic life reset. It just requires a few smart labels, a consistent color system, and a couple of filters to handle the repetitive stuff.
Once you set it up, your inbox becomes easier to scan, easier to search, and a lot less mentally exhausting. Important email stands out. Receipts stop crowding your main view. Newsletters stop pretending they are urgent. And you stop wasting time opening messages just to figure out what category they belong in.
So yes, color coding Gmail labels may sound like a tiny trick. But tiny tricks are often the ones that keep your digital life from turning into a swamp. And that is a service your future self will absolutely appreciate.
Experience: What It’s Like to Actually Use Color-Coded Labels in Gmail Every Day
Using color-coded labels in Gmail every day feels a lot different from simply reading about them. At first, it seems like a cosmetic feature, something you set up because it looks neat. Then a busy week hits, your inbox starts filling with receipts, meeting invites, project updates, and personal messages, and suddenly the colors start doing real work.
One of the biggest benefits is speed. When labels are color coded well, you do not have to read every line to understand what is in front of you. You can scan your inbox and instantly spot what needs attention. Blue labels might tell you a message is work-related. Green labels might mean money or receipts. Red might signal something urgent. That kind of visual pattern recognition saves more time than people expect.
There is also a psychological benefit. A chaotic inbox can feel heavier than it should. It creates friction before you have even opened a message. But when your Gmail account has a clear label system with colors that make sense, it feels more manageable. The inbox stops looking like a giant pile and starts looking like a sorted workspace. It is the difference between walking into a messy garage and walking into a room where every tool hangs where it belongs.
Another thing people notice over time is how well labels work with habits. After a week or two, you begin to trust the system. You know that if a travel confirmation arrives, it will show up under the right label. If a client email lands, it will carry the color you expect. That trust matters because it lowers decision fatigue. You are no longer asking yourself what to do with every new message. The system answers that question for you.
Of course, there is a learning curve. The first version of your setup may be too complicated. Many people create too many labels in the beginning, then realize they only use a handful regularly. That is normal. The best experience usually comes after trimming the system down. Fewer labels, clearer names, and stronger color meaning almost always work better than an inbox that looks like a box of spilled crayons.
In real life, the most useful setups are practical rather than perfect. A freelancer might use labels for clients, invoices, leads, and admin. A parent might sort school messages, family communication, shopping receipts, and travel plans. A student might use classes, financial aid, deadlines, and campus updates. Different people need different structures, but the experience improves whenever the colors connect to real priorities.
The long-term payoff is not just a prettier inbox. It is faster retrieval, fewer missed messages, and less stress every time you open Gmail. Once you get used to color-coded labels, going back to an unorganized inbox feels like trying to find your car keys in a dark room. Technically possible, but far more annoying than it needs to be.


