
Table of Contents >> Show >> Hide
- First: What Kind of “Glow” Do You Mean?
- Pick Your Glow Strategy (A Quick Decision Guide)
- Materials That Matter (Because Fur Is… Opinionated)
- Method 1: Make Fur Pop Under Blacklight (Fluorescent Build)
- Method 2: Glow-in-the-Dark Fur (Phosphorescent Afterglow)
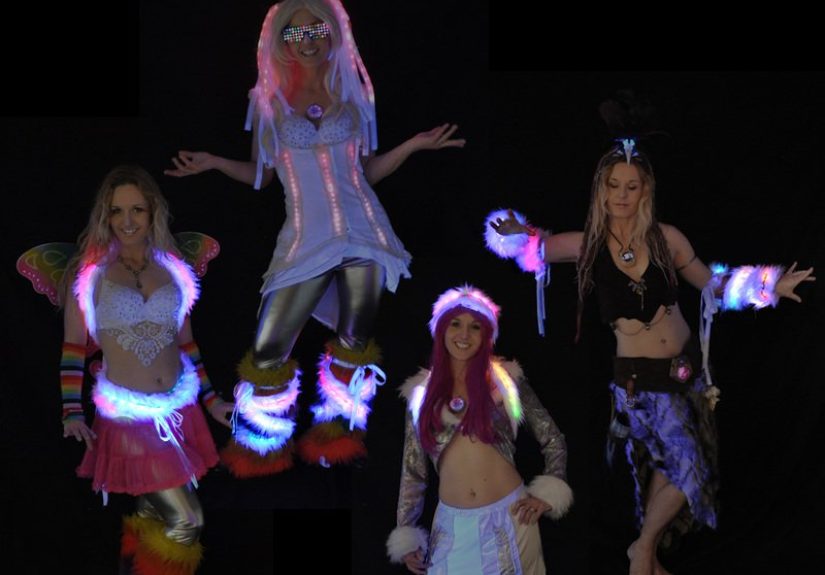
- Method 3: LED “Glow Fur” (The Make:-Style Showstopper)
- Method 4: Fiber Optic Fur (Soft, Sparkly, Unreal)
- Sewing and Assembly: How to Work With Faux Fur Without Losing Your Mind
- Power and Safety (Unsexy, Necessary, Saves the Build)
- Troubleshooting: Common Glow-Fur Problems (and Fixes)
- Three Build Ideas (From Quick to Legendary)
- Conclusion: Your Fur Can Glow, and It Doesn’t Have to Be Complicated
- Maker Experiences: Lessons From the Glow Bench (So You Don’t Repeat Our Collective Mistakes)
Faux fur is already doing the mostsoft, dramatic, and somehow able to shed into your coffee from across the room. Now imagine it glowing: a jacket trim that pops under blacklight, a fuzzy bandolier that looks like a neon comet, or a fiber-optic mane that turns every hallway into a runway.
This guide breaks down the main ways makers get “glow fur” effects (and when each one is the right choice), with practical build tips, materials that actually behave, and the safety stuff you don’t want to learn the exciting way. We’ll keep it fun, but we’re also going to keep your project from becoming “sad, crunchy fur with a suspicious smell.”
First: What Kind of “Glow” Do You Mean?
“Glow” is a bucket word. In maker-world it usually means one (or a combo) of these:
1) Blacklight-reactive (fluorescent) glow
This is the party trick glow: it looks normal (or loud) in daylight, but under a UV/blacklight it lights up like it has secrets. The moment the UV light goes away, the glow mostly stops. [1]
2) Glow-in-the-dark (phosphorescent) afterglow
This is the after party glow: you “charge” it with light, then it keeps glowing for a while in the dark. Brighter charge = better glow. Time and pigment quality matter a lot. [2]
3) Powered light (LEDs, EL wire, fiber optics)
This is the no excuses glow: it doesn’t care if there’s a blacklight. You’re literally adding light sourcesLED pixels/strips, electroluminescent (EL) wire, or LEDs feeding fiber optics. EL wire is basically a phosphor-coated wire that glows when driven with an AC signal (that’s why it uses an inverter/driver). [3]
Pro tip: The best “fur glow” builds often layer effects: fluorescent paint for blacklight pop, plus small LEDs for “always-on magic,” plus reflective elements for headlights/flash photos.
Pick Your Glow Strategy (A Quick Decision Guide)
If you want the easiest win
Blacklight-reactive paint/ink on fur trim. Fast, cheap, no soldering. Looks amazing in UV lighting.
If you want “lights out” glow
Glow-in-the-dark fabric paint or glow pigments in a flexible binder. You’ll trade brightness for simplicity (and you’ll become obsessed with charging tests).
If you want maximum brightness and animations
NeoPixel-style addressable LEDs inside/behind fur, or fur as a diffuser over strips. This is where you get rainbow chases, pulsing, reactive patternsfull sci-fantasy vibes.
If you want “ethereal” and soft-looking light
Fiber optics fed by LEDs. It’s a little more work, but the result is dreamy: tiny points of light scattered through fur like stardust.
If you want glow with a side of safety/visibility
Add reflective material (not glow, but it blasts back light from headlights/flash). It’s a great supporting effect for outdoor costumes or nighttime events. [4]
Materials That Matter (Because Fur Is… Opinionated)
Fur choice: pile length and density
- Long pile: dreamy and dramatic, but it can hide paint and block LEDs unless you manage placement.
- Short/medium pile: easier to paint evenly and easier to get light to read on camera.
- Dense backing: holds stitches better and sheds less into your lungs and future.
Paint and dye reality check
Most faux fur is synthetic (often acrylic/poly blends). True “dyeing” can be tricky compared to cotton, but there are synthetic-fiber dye systems that rely on heat, plus fabric paints that color the surface. Testing a swatch first is not optionalit’s your insurance policy. [5]
Electronics basics (for powered glow)
- LED strip or pixels: addressable LEDs for effects, or simple LED strips for constant glow.
- Controller: small wearable boards exist for this exact chaos.
- Power: AA/AAA packs are easy; LiPo/Li-ion is compact but demands respect and proper handling. [6]
- Diffusion: fur can diffuse light, but you may also want sheer fabric, foam, or light tubing depending on the look.
Method 1: Make Fur Pop Under Blacklight (Fluorescent Build)
This method is ideal for trims, cuffs, collars, tails (costume tailslet’s keep it wholesome), bags, and hats. You’ll get vivid UV response with minimal equipment.
Step-by-step
- Test first. Brush out a small hidden section, apply paint/ink, let it dry, then hit it with a blacklight. Some “neon” colors look loud in daylight but disappoint in UV.
- Mask what you don’t want painted. Fur loves to migrate. Tape and plastic sheeting help.
- Use thin layers. Heavy paint can stiffen the fur and clump the fibers. Build color gradually.
- Work with the grain. Brush paint downward along the pile to avoid crunchy “fur spikes.”
- Lock it in. Follow the paint’s instructions for drying/heat setting (if recommended for fabric use).
How to avoid the “crispy fur” problem
- Choose flexible fabric paints/inks made for textiles (not rigid craft paint).
- Focus color on the tips of the fibers for a softer look.
- After drying, gently brush with a pet slicker brush or wide-tooth comb (yes, your craft room is now a salon).
Best use case: If you’re going to a venue with blacklights, fluorescent fur is the highest “wow per minute” of any method.
Method 2: Glow-in-the-Dark Fur (Phosphorescent Afterglow)
Glow-in-the-dark is a different vibe: subtle in daylight, surprisingly magical in darkness. Many glow paints are phosphorescentmeaning they need to be “charged” by a light source to glow later. [2]
Two reliable approaches
A) Glow fabric paint on the fiber tips
Works best on lighter fur. Apply thin coats, allow full cure, then do a charge test in a dark room. Charging with a bright light usually beats hoping your ceiling light did enough.
B) Glow pigment + flexible binder (for custom intensity)
If you want more control, glow powders designed for casting can be mixed into compatible mediums (the key is using a binder that stays flexible on fabric). Some pigment systems are engineered for long afterglow performance when used as directed. [7]
Practical expectations (so you don’t feel betrayed)
- Glow-in-the-dark reads best in darkness, not in a bright room.
- Big, smooth surfaces glow more evenly than tiny fur fibersso aim for coated tips, patches, or backing fabric accents.
- Green glows usually look brighter than blue; that’s just how many phosphorescent pigments behave.
Method 3: LED “Glow Fur” (The Make:-Style Showstopper)
Here’s the signature maker move: hide LEDs under fur so the light blooms through the fibers like a fuzzy aura. One popular wearable approach is a fur bandolier/harness concept using addressable LEDs, a small controller, and smart power planning. [8]
Design rules that save your sanity
- Plan pixel count early. Wearables often keep total LEDs in a manageable range (think dozens, not hundreds) so wiring and power stay simple. [8]
- Keep service access. Make the battery/controller removable with Velcro or a pocket so you can repair without surgery.
- Strain relief is not optional. Movement tugs wires; secure connections so nothing rips loose at the worst possible time. [8]
A simple build blueprint
- Create the base. Sew or assemble a bandolier/strap system. Add fur trim on top as your diffuser layer.
- Mount LEDs. Attach strips/pixels to a backing (fabric tape, stitched channels, or a thin flexible substrate). Keep LEDs facing the fur.
- Add the controller. Place it near the center or a stable spot to reduce cable runs.
- Power safely. Choose a battery solution that matches your LED draw and comfort levelAAA packs for simplicity, or compact rechargeable packs if you know proper handling and charging practices. [6]
- Tune diffusion. If hotspots show through, add a thin diffusion layer (sheer fabric) between LEDs and fur, or increase distance slightly.
Animation tips that look expensive
- Slow gradients look “cinematic” through fur.
- Warm-to-cool fades read well on camera.
- Low brightness, high contrast often beats full blast (and saves battery).
Method 4: Fiber Optic Fur (Soft, Sparkly, Unreal)
Fiber optics let you sprinkle tiny points of light through fur. The challenge is coupling: getting LED light into the fiber ends efficiently. Maker guides describe ways to connect fibersranging from simple bundling and taping to more permanent couplings using adhesives/heat-shrink approaches for a tighter junction. [9]
How fiber optic glow looks best on fur
- “Starfield” effect: many fiber ends poking out through fur at random lengths.
- Edge shimmer: a line of fibers along a hood or sleeve seam.
- Gradient sparkle: denser fibers near the light source, fewer as you move away.
Build tips that prevent heartbreak
- Use a base layer. Stitch fibers into a backing fabric or mesh before you marry it to the fur. It keeps spacing consistent.
- Protect bends. Tight kinks reduce brightness. Give fibers gentle curves.
- Finish the ends. Clean, square cuts brighten output. (Messy ends scatter less light where you want it.)
- Use a bright LED source. Fiber effects love strong point light. Some builds use high-power addressable LEDs specifically intended for fiber illumination projects. [10]
Sewing and Assembly: How to Work With Faux Fur Without Losing Your Mind
Cutting faux fur with scissors is how you create a blizzard indoors. Better practice: cut the backing only, using a razor or craft knife so the pile stays intact. Sewing resources for faux fur also recommend tools like a walking foot for better feeding and techniques like hinge seams depending on backing type. [11]
Quick sewing checklist
- Mark patterns on the backing, cut single-layer, and avoid chopping the pile. [11]
- Brush fur away from seam lines as you sew so it doesn’t get trapped.
- Use longer stitches; fur is thick and needs room to move.
- If hiding electronics, sew channels or pockets so wires aren’t rubbing directly against skin.
Power and Safety (Unsexy, Necessary, Saves the Build)
Battery choices
AA/AAA packs are straightforward and widely available. LiPo/Li-ion packs are compact and powerful, but can be dangerous if damaged or improperly handledespecially if punctured, shorted, or charged incorrectly. Wearable electronics guides and battery safety resources emphasize careful charging practices, avoiding damage, and adding strain relief to protect connections. [6]
Consumer safety groups also warn that lithium-ion batteries can catch fire or fail violently if misused or damaged, so treat power as a design featurenot an afterthought. [12]
UV/blacklight safety
Blacklight is typically UVA (roughly 315–400 nm). High-intensity UV can irritate eyes/skin, and eye protection guidance recommends taking UV exposure seriouslyespecially with strong sources or prolonged exposure. [13]
Heat and comfort
- Keep LEDs off direct skin contact if they warm up.
- Don’t trap batteries in airtight pockets with no airflow.
- Avoid placing electronics where bending/crushing is likely (hips, elbows, shoe soles).
Troubleshooting: Common Glow-Fur Problems (and Fixes)
“My glow paint looks weak.”
- Charge it longer with a brighter light source.
- Use more coats (thin layers) or a higher-quality pigment system.
- Put glow on lighter fur or on a backing patch that’s more visible.
“My fur turned stiff.”
- Use flexible textile paint, not rigid acrylic craft paint.
- Apply to tips only instead of saturating the pile.
- Brush after curing to restore softness.
“I can see LED hotspots.”
- Add a diffusion layer (sheer fabric) under the fur.
- Increase spacing between LEDs and fur by a few millimeters.
- Lower brightness and use smoother animations.
“The LEDs flicker when I move.”
- That’s usually a connection issue. Add strain relief and secure solder joints.
- Check that power wiring is thick enough and connections are tight.
Three Build Ideas (From Quick to Legendary)
1) Blacklight-reactive fur cuffs
Paint the tips of fur trim with UV-reactive fabric paint, stitch into cuffs, and add a hidden reflective strip for flash/headlight pop. Easy, wearable, and very camera-friendly.
2) Glow-in-the-dark “constellation” collar
Apply glow paint in scattered dots on a fabric backing, then stitch fur around it so the glow peeks through. It reads like stars in darknesssubtle, but magical.
3) LED + fur bandolier with animated gradients
Build a removable LED strip module under a fur layer for diffusion, keep LED count manageable, and program slow fades. It looks expensive and stays practical for wear. [8]
Conclusion: Your Fur Can Glow, and It Doesn’t Have to Be Complicated
If you want instant impact, go fluorescent and let blacklight do the heavy lifting. If you want a “lights out” moment, use glow-in-the-dark paints and manage expectations (charge time is king). If you want full control, build powered glow with LEDs or fiber opticsthen use the fur as your diffuser to turn hard points of light into soft, fuzzy magic.
Whatever path you choose, the secret sauce is the same: test swatches, build in access for repairs, respect batteries, and remember that faux fur is basically glitter with opinions.
Maker Experiences: Lessons From the Glow Bench (So You Don’t Repeat Our Collective Mistakes)
Every “glow fur” project has a moment where you think, “This is either genius or I’ve invented a new form of lint-based chaos.” That moment usually happens about five minutes after you cut the fur backing and realize your room now contains an ecosystem of floating fibers that will be discovered again in 2039.
One common first-timer surprise is how different fur behaves depending on where you apply color. When you paint the whole strand, it can turn into a stiff little stick and stop moving like fur. When you paint just the tips, you keep the softness and get a glow that looks more “alive.” The second surprise: your eyes will swear you applied an even coat… until you hit it with UV light and see streaks you didn’t know existed. The fix is boring but effective: thinner layers, better lighting while you work, and swatch tests that you actually label (because “the green one” is not a system).
Electronics introduce their own genre of learning. The first time you hide LEDs under fur, you may get that “hotspot polka-dot” looklike your costume was attacked by a very organized glow worm. Makers usually solve this by increasing diffusion or distance. A few millimeters can be the difference between “premium aura” and “Christmas lights fighting for attention.” Also: brightness isn’t always the flex. Turning the LEDs down often makes the fur look richer and the animations smoother, and it stops your battery from rage-quitting early.
Then there’s the movement test. In the mirror, your build is perfect. The moment you walk, something flickers. That’s when you learn the spiritual importance of strain relief and secure connections. A wearable isn’t a shelf project; it’s a tiny earthquake with fashion goals. Makers who build in service access (Velcro pockets, removable modules, labeled connectors) get to fix problems in minutes. Makers who don’t… become experts in emergency hand-sewing in parking lots.
Fiber optics can feel like wizardry right up until you realize you’ve made a beautiful bundle… and forgot to plan where it lives on the body. A thick fiber bundle needs a home that won’t jab you when you sit, and the light source needs airflow and protection. The “aha” moment for many builders is treating the fiber layer as a separate textile panelsomething you can attach to the fur instead of trying to thread fibers through already-assembled fluff. It’s cleaner, easier to repair, and less likely to become a tangled glowing spaghetti monster.
Finally, the most relatable glow-fur experience: you finish the project, turn off the lights, and the glow is… fine. Not “movie magic,” just “nice.” Then you charge it properly, step outside, or hit it with the right UV lightand suddenly it’s exactly what you pictured. Glow is context-dependent. The win isn’t making the brightest fur on Earth; it’s making fur that looks incredible in the environment where it will actually be seen.


