
Table of Contents >> Show >> Hide
- What Is a Modified Post and Beam Frame?
- Why Builders Choose This System
- Before You Build: Design First, Sawdust Second
- How to Build a Modified Post and Beam Frame
- 1. Lay out the building carefully
- 2. Build the foundation and footings
- 3. Install post bases and set the posts
- 4. Install beams and primary connections
- 5. Add temporary and permanent bracing
- 6. Frame the floors and roof
- 7. Build the infill walls
- 8. Dry in the shell and manage moisture
- 9. Finish utilities, insulation, and interior surfaces
- Common Mistakes to Avoid
- A Practical Example
- Final Thoughts
- Experience and Lessons From the Field
If standard stick framing is the jeans-and-T-shirt of residential construction, a modified post and beam frame is the well-tailored jacket that still knows how to carry a ladder. It gives you the drama of heavy timber, the flexibility of modern framing, and enough visual charm to make drywall feel slightly underdressed. Better yet, it can be a practical way to build a home, shop, cabin, or barn-style structure when you want open spans without going full medieval joinery wizard.
In simple terms, a modified post and beam frame uses large posts and beams as the main structural skeleton, then combines that skeleton with conventional framing, structural panels, or other infill systems to finish the walls, floors, and roof. Think of it as a hybrid: the big timbers do the heavy lifting, while the secondary framing helps with enclosure, utilities, insulation, and often lateral stability. That hybrid approach is why the system appeals to so many modern builders. You get the look of traditional timber framing without signing up for a romantic relationship with chisels, pegs, and endless hand-cut mortises.
What Is a Modified Post and Beam Frame?
A traditional timber frame usually relies on wood-to-wood joinery such as mortise-and-tenon connections. A post and beam frame, by contrast, often uses metal connectors, bolts, plates, and structural screws. A modified post and beam frame pushes that idea one step further by combining heavy structural members with more conventional building components. In many projects, that means exposed posts and beams paired with standard floor joists, roof rafters, wall studs, SIPs, or structural sheathing.
That combination offers a few major benefits. First, it creates large open interior spaces because the primary loads travel through the posts and beams instead of being carried by lots of closely spaced load-bearing walls. Second, it often speeds up construction because the enclosure can be built with familiar materials and methods. Third, it usually makes mechanical work easier. Electricians and plumbers tend to prefer drilling ordinary framing rather than negotiating with giant timbers that behave like they were carved out of a stubborn mountain.
Why Builders Choose This System
There is a reason modified post and beam construction keeps showing up in homes, pavilions, shops, and rural buildings. It balances aesthetics, structure, and practicality. Exposed timber creates warmth and character. Hybrid framing helps meet modern energy and enclosure expectations. And because the walls are often infill rather than the primary vertical structure, floor plans stay flexible.
This does not mean the system is “easy” in the casual Saturday-afternoon sense of the word. It is still structural work. Loads must be traced from roof to beam, beam to post, post to footing, and footing to soil. The frame must resist uplift, racking, and lateral loads from wind and, in some regions, seismic forces. In other words, gravity is only one member of the complaint department.
Before You Build: Design First, Sawdust Second
Start with engineering, permits, and a clear load path
The smartest way to build a modified post and beam frame is to begin with drawings that show exactly how the structure works. That means foundation layout, post spacing, beam sizes, floor and roof framing, connectors, uplift hardware, and lateral bracing or shear walls. If your design includes long spans, second floors, cathedral ceilings, high snow loads, or exposed structural members, engineering is not a luxury. It is the difference between a confident build and a very expensive guessing game.
Use local code requirements and site conditions to shape the design. Footing depth depends on frost depth and soil conditions. Post bases and hold-down details depend on uplift and lateral forces. Roof loads vary by region. What works beautifully in one county can become a permit-office jump scare in another. Build from approved plans, not internet optimism.
Choose your material strategy
Most modified post and beam projects use one of three approaches for the main members:
- Solid-sawn timbers for a traditional look and straightforward fabrication.
- Glulam beams and columns when you want more dimensional stability, longer spans, or cleaner engineered performance.
- A mix of timbers and dimensional lumber, such as heavy posts with built-up beams or conventional rafters.
Choose species, grades, and sizes with the structural design in mind. Also think about moisture content. Heavy wood moves as it dries. Checks, shrinkage, and slight twists are normal, but poor storage and rushed installation can make them worse. Keep members off the ground, protected from weather, and ventilated before installation.
Decide how the walls will work
This is where the “modified” part really matters. Your walls may be framed between posts with conventional studs and sheathing. They may be enclosed with structural insulated panels. They may use timber girts with panelized infill. The right choice depends on budget, climate, crew skill, and design goals.
Whatever you choose, do not assume the pretty timber skeleton alone will resist racking. Many modified systems rely on structural wall panels, diaphragms, braced walls, or engineered lateral elements to stiffen the building. If you ignore that part, you may end up with a frame that looks heroic and sways like it had too much coffee.
How to Build a Modified Post and Beam Frame
1. Lay out the building carefully
Everything starts with layout. Establish square lines, confirm diagonal measurements, mark post locations, and double-check dimensions against the plans. Post-and-beam work punishes sloppy layout because mistakes compound fast. When a post is out of position, the beam does not politely adapt. It announces the problem to the whole job site.
Use batter boards, string lines, and a builder’s level or laser. Mark finished floor heights, footing centers, and anchor locations. Confirm that stair openings, window locations, and mechanical chases make sense before concrete is placed.
2. Build the foundation and footings
A modified post and beam frame needs a foundation system that matches the design. Common options include isolated concrete piers, perimeter foundations, slab-on-grade with thickened sections, or full basements. The exact approach depends on the structure, the soil, frost depth, and how the posts will be supported.
Accuracy matters here. If the tops of your piers are not aligned, the rest of the build turns into a live-action lesson in shims, muttering, and regret. Install anchor bolts, post bases, or embedded hardware exactly where the plans require. Make sure hardware is compatible with treated wood where needed, and use the correct standoff details to keep wood from sitting in water-trapping conditions.
3. Install post bases and set the posts
Once the concrete has cured and layout is confirmed, install the post bases or knife plates called for in the plans. Then stand the posts, plumb them in both directions, and brace them temporarily. Use durable temporary diagonal bracing and do not rush this step. A well-braced post line makes beam installation dramatically easier.
At this stage, many crews label each post and connection point before lifting anything into place. That sounds fussy until you are staring at four similar timbers and one of them is supposed to be 1 1/2 inches shorter. Suddenly labeling feels less like bureaucracy and more like wisdom.
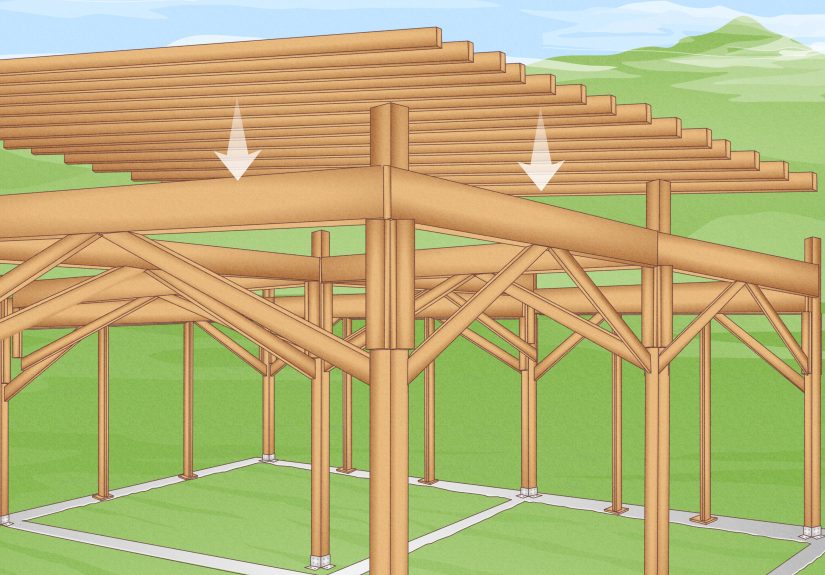
4. Install beams and primary connections
With the posts plumb and braced, install the beams using the specified connectors. In a modified post and beam frame, this may involve saddles, concealed knife plates, steel side plates, through-bolts, structural screws, or brackets designed for heavy timber. Do not substitute hardware because it “looked close enough” on the shelf. Structural connectors are not fashion accessories.
As beams go in, check level, crown orientation if applicable, bearing length, and connector fit. Use washers where required. Follow installation schedules for bolt diameter, edge distances, fastener spacing, and tightening. Improper drilling or fastener placement can weaken connections, split members, or reduce capacity.
5. Add temporary and permanent bracing
After the main posts and beams are in place, stabilize the frame before moving on. Temporary diagonal bracing keeps things plumb during erection. Permanent bracing may include knee braces, structural panels, let-in bracing, metal straps, diaphragms, or engineered shear walls. The exact system depends on the approved design.
This is one of the most misunderstood parts of building a modified post and beam frame. People fall in love with the romance of giant timbers and forget that stability is a full-time job. Open frames are beautiful, but beauty does not resist wind by itself. A building needs a complete lateral system, not just confidence.
6. Frame the floors and roof
Once the main frame is stable, install floor joists, roof rafters, trusses, purlins, or decking according to the design. Some modified systems use conventional joists hung from beams. Others use timber decking, T&G roof decks, or panelized assemblies. For floors, make sure bearing points, hangers, and blocking are properly installed. For roofs, verify uplift connections, alignment, and diaphragm details.
If you are using conventional framing in combination with heavy timber, be disciplined about drilling and notching. Oversized holes and casual cuts in structural members are a classic way to turn good engineering into wishful thinking. Run utilities where planned, not wherever a bored installer feels creatively inspired.
7. Build the infill walls
With the primary frame standing, build the wall system between or around the posts. Infill walls can be framed conventionally with studs and sheathing, or enclosed with SIPs or panel systems. This step is where the project starts to look like a building instead of a really ambitious sculpture.
Pay close attention to how the infill ties into the timber frame. Connections must allow the enclosure to perform without creating moisture traps or awkward structural conflicts. If the design relies on wall sheathing for shear resistance, nail patterns, blocking, and hold-down details matter. A wall panel is only as strong as the way it is connected to the rest of the structure.
8. Dry in the shell and manage moisture
Once the roof sheathing, underlayment, windows, flashing, and weather-resistive barrier go in, the structure begins to behave like a building rather than a weather experiment. Good moisture control is one of the biggest determinants of long-term performance in timber-heavy construction.
Use proper flashing at penetrations, transitions, windows, doors, and cladding terminations. Keep end grain protected where possible. Maintain drainage and drying space behind cladding where the assembly calls for it. Use treated wood or preservative strategies where members are close to concrete, exposed to splashback, or in ground-contact conditions. Water is patient. If you build a trap for it, it will accept your invitation.
9. Finish utilities, insulation, and interior surfaces
One advantage of a modified post and beam frame is that utilities can often run through conventional wall and roof framing instead of hacking through the exposed timbers. Plan chases early. That keeps the main structure cleaner and preserves the visual effect of the frame.
Choose insulation and air-sealing strategies that fit the wall and roof assembly. Many hybrid systems perform best when the enclosure is treated as a high-performance shell. The frame may be the star of the show, but comfort comes from boring, disciplined details like continuity of insulation, air barriers, flashing, and sealing.
Common Mistakes to Avoid
- Skipping engineering: Long spans and concentrated loads are not guess-and-check territory.
- Ignoring moisture: Timbers, bases, and wall intersections need drying paths and smart detailing.
- Underestimating bracing: Open frames need a complete lateral system.
- Improper hardware substitution: Fastener type, size, coating, and spacing matter.
- Poor timber storage: Sun, standing water, and ground contact can damage members before they are even installed.
- Bad layout: An out-of-square start becomes an all-day argument with the whole building.
A Practical Example
Imagine a small workshop with exposed 8×8 posts, engineered beams, conventional 2x wall infill, and a simple gable roof. The posts and beams create the main structure and open interior. The stud walls between the posts carry sheathing, insulation, windows, and siding. Roof trusses or rafters sit on the beams, and the roof diaphragm works with the braced walls to resist lateral loads. That is a classic modified post and beam strategy: visually rich, structurally clear, and easier to build than a full traditional timber frame.
Final Thoughts
Building a modified post and beam frame is part engineering, part carpentry, and part humility. The heavy timbers create beauty and strength, but the supporting details are what make the system successful. Good foundations, smart connectors, reliable bracing, dry assemblies, and a disciplined load path are what turn a handsome frame into a durable building.
If you approach the project with solid design, realistic planning, and respect for the structural details, the result can be outstanding: open spaces, visible craftsmanship, and a building that feels both old-school and current. It is one of the few systems that can look romantic in photos and still make practical sense in real life. That is rare. Usually, the internet only lets you pick one.
Experience and Lessons From the Field
Builders who work with modified post and beam frames often say the same thing after their first project: the big stuff gets all the attention, but the small decisions make the frame succeed. Everyone remembers the day the posts went up and the beams were flown into place. Fewer people remember the extra hour spent checking diagonals, the careful shimming of one base, or the decision to protect the timbers from sun and rain before installation. Yet those quieter moves are usually the reason the glamorous day goes smoothly.
One common lesson is that timber loves preparation. Crews that label members, pre-stage hardware, and dry-fit complicated connections tend to move faster once the lifting begins. Crews that skip those steps tend to spend more time standing around a beam, pointing at it like it has personally betrayed them. Heavy members are not forgiving. If a connection is off, the correction is rarely elegant.
Another recurring experience is that temporary bracing deserves more respect than it gets. New builders often think of bracing as something you tack on for a minute and remove the second the frame stands. Experienced builders know better. A frame can look stable long before it truly is. The safest jobs treat temporary bracing like essential structure until the permanent system is complete. That habit prevents movement, protects workers, and keeps the geometry of the building from drifting during the hectic middle stages of the project.
Moisture is another teacher, and it usually teaches with expensive tuition. People remember the visible frame, but they sometimes forget the splashback zone near grade, the end grain left exposed during a wet week, or the cladding junction that traps water. On successful projects, builders think constantly about drainage, drying, and separation from concrete. That attention does not feel glamorous in the moment, but it pays off years later when the frame still looks crisp and the connections remain sound.
There is also a practical lesson about aesthetics. Many owners want every timber exposed, every connection hidden, and every mechanical line invisible. In real projects, the best outcomes usually come from compromise. Expose the parts of the frame that deserve to be seen. Let the enclosure do its job quietly. Give the electrician and plumber planned pathways. A modified post and beam frame works best when the structure, the shell, and the trades stop competing and start cooperating.
Finally, experienced builders learn that this system rewards patience more than brute force. You do not bully a frame into becoming square, plumb, and durable. You measure, adjust, brace, and verify. Then you do it again because confidence is great, but a tape measure is less emotional. The best modified post and beam buildings are not just beautiful when they are finished. They are calm, logical, and durable because someone respected the details when nobody was taking pictures.


