
Table of Contents >> Show >> Hide
- Why an A-Frame Ladder Shelf Works So Well
- Plan the Build Before You Cut Anything
- How to Build the A-Frame Ladder Shelf
- Best Wood and Finish Choices for This Project
- Styling an A-Frame Ladder Shelf Without Making It Look Overcrowded
- Common Mistakes to Avoid
- Is This a Good DIY Project for Beginners?
- Final Thoughts
- Real-World Experience: What Building and Living With an A-Frame Ladder Shelf Teaches You
- SEO Tags
If your home needs more storage but your room already feels one throw pillow away from a traffic violation, an A-frame ladder shelf is a smart fix. It gives you vertical storage without the visual bulk of a boxy bookcase, and it looks polished enough that guests might assume you bought it from a trendy furniture brand with a suspiciously high shipping fee. The best part? You can build one yourself with basic lumber, patient measuring, and the willingness to sand a little more than you hoped.
This project blends form and function in the way all good DIY furniture should. An A-frame ladder shelf is narrow at the top, wider at the bottom, and naturally suited to books, baskets, plants, framed art, folded towels, or all the decorative objects you swear are “intentional.” With the right wood, solid joinery, and a durable finish, it can become one of those rare DIY wins that is both useful and brag-worthy.
Why an A-Frame Ladder Shelf Works So Well
The biggest appeal of a ladder shelf is visual lightness. Because the shelves taper upward, the unit feels open and airy instead of heavy and blocky. That makes it especially useful in apartments, bathrooms, entryways, bedrooms, and corners that need storage but cannot handle a hulking cabinet. It also works in living rooms where you want display space without building a wall of wood that says, “I own too many baskets.”
There is also a practical advantage to the shape. The deepest shelf sits at the bottom where heavier items belong, while the shallower upper shelves are ideal for lighter decor. That creates a more stable piece and a more balanced look. In other words, your cast-iron collection should not live on the top shelf unless chaos is your design style.
Plan the Build Before You Cut Anything
Before you grab a saw and start feeling powerful, decide where the shelf will live. Measure the wall width, note the ceiling height, and think about what you actually want to store. A bathroom shelf can be narrower and lighter. A living room shelf may need deeper lower tiers for books and baskets. If the shelf is mostly decorative, you can prioritize looks. If it will hold real weight, build for strength first and style second.
A Practical Example Size
A beginner-friendly build is around 69 to 72 inches tall, roughly 20 to 24 inches wide at the upper section, and about 12 to 16 inches deep at the bottom shelf. One proven layout uses two ladder sides joined into an A shape with five shelves that increase in width as they move downward. A cut list like this gives you a useful, attractive proportion:
- 4 side rails at 69 inches from 1×2 lumber
- 12 ladder rungs at 9 1/2 inches from 1×2 lumber
- 5 shelves from 1×10 boards at 13, 20, 25, 31, and 37 inches
- 2 cleats for the bottom shelf from square dowel or scrap wood
- 2 hinges for the top if you want a foldable A-frame design
This size works well for general home decor and light to moderate storage. If you need to hold heavier books, consider using 3/4-inch plywood or solid wood shelves with a stiffening lip on the front edge. Longer spans sag faster than most DIYers expect, which is woodworking’s polite way of saying gravity never misses leg day.
Tools and Materials
You do not need a giant workshop to pull this off. A miter saw makes life easier, but a circular saw with a guide can work. A drill/driver, tape measure, square, clamps, wood glue, sander, screws or brad nails, wood filler, and finish are the core kit. Poplar and pine are beginner-friendly choices because they are easy to cut and easy to find. Poplar is a little cleaner-looking for paint projects, while pine can look warm and casual under stain if you prep it carefully.
How to Build the A-Frame Ladder Shelf
1. Cut Every Piece and Label It
Start by cutting all side rails, rungs, and shelves. Label the parts as you go. This is not glamorous, but it will save you from staring at a pile of nearly identical boards later like a detective in a lumber-themed mystery. If you are creating angled ends, use a miter saw and test on scrap first. Accuracy matters here because small mistakes multiply when the frame leans.
After cutting, dry-fit the shelves from smallest to largest to confirm the proportions look right. This is the moment to tweak depth or width if your room needs a narrower footprint.
2. Sand Before Assembly
Light sanding before assembly is one of those “future you will be grateful” steps. Smooth the cut edges and faces with medium grit, then move to fine grit. If you plan to stain, sanding with the grain is essential for a clean finish. Do not skip dust removal either. Sawdust has a magical ability to appear exactly where you do not want it and stay there like an uninvited relative.
3. Build the Two Ladder Sides
Lay out two side rails parallel to each other on a flat surface. Mark where each rung will go. A common method is to start near the top and space the rungs evenly to support the future shelf positions. Glue and fasten the rungs between the rails. Then repeat for the second side. Use a square often. If the first side is slightly off, the second side will happily copy the mistake and the whole shelf will lean like it has opinions.
You can join the parts with wood glue and brad nails, wood screws with pilot holes, or pocket-hole screws if that is your preferred system. Pocket holes create a clean, sturdy connection and are especially handy if you want the fasteners hidden on the less visible sides.
4. Form the A-Frame
Once both ladder sides are built, stand them up and bring the tops together. If you want a foldable shelf, attach hinges at the top. If you prefer a more rigid piece, use a fixed top bridge and back supports instead. Hinges make the shelf easier to move and store, while fixed joinery can feel sturdier in daily use. Either approach works, but keep the footprint wide enough that the shelf stands securely without wobbling.
Set the unit on a flat floor and adjust until both sides sit evenly. This is the stage where shimming, trimming, and muttering become part of the process.
5. Install the Shelves From Top to Bottom
Place the top shelf first, then work downward. That makes it easier to keep the spacing consistent and the shelf faces level. The upper shelves are usually shallower and lighter, while the bottom shelf should be the deepest and strongest. Use a level before fastening each one. Not “looks level to me” level. Actual level.
Fasten each shelf with glue and screws into the supports or rungs. If the shelf design leaves open sides, you can also add small cleats underneath for extra bearing surface. For heavier storage, this is a smart upgrade. A shelf that merely rests on hopes and aesthetics is not a shelf. It is a countdown.
6. Reinforce the Structure
At this point, give the shelf a gentle shake test. If it wobbles, add back supports, corner blocks, or a stretcher across the rear. You can also stiffen longer shelves by gluing a hardwood strip along the front or back edge. Increasing thickness and shortening span both reduce sag. That matters most on the lower shelves, where books, baskets, and life decisions tend to gather.
If you have kids, pets, or uneven floors, add an anti-tip strap or anchor the piece to the wall. Freestanding furniture should not double as a trust exercise.
7. Fill, Finish, and Protect
Once the build is solid, fill nail holes or minor gaps with wood filler and sand again. For stain, prep the wood carefully so it absorbs evenly. A typical sequence is medium-grit sanding followed by fine-grit sanding, always with the grain. Then apply stain with a cloth, foam brush, or bristle brush, wipe off the excess, and let it dry fully. Finish with a protective clear coat if the shelf will see regular use.
If you prefer paint, prime first for a smoother result, especially on pine. A semigloss or satin finish is practical because it is easier to wipe clean. Painted ladder shelves look crisp and modern, while stained shelves feel warmer and more natural. Neither is wrong. Choose based on your room, not your fear of commitment.
Best Wood and Finish Choices for This Project
For an easy paint-grade build, poplar is a strong contender. It machines well, sands smoothly, and gives a clean finished look. Pine is more budget-friendly and widely available, but it can absorb stain unevenly unless you sand carefully and work patiently. Plywood is also a smart option for shelves because it is dimensionally stable and less likely to move than solid wood across wider spans.
If your shelf will hold mostly decor, standard 1x material is usually fine. If you want to load the lower shelves with large books or storage bins, step up the design. Use thicker shelf stock, add edging, or shorten shelf spans. Furniture looks better when it stays straight, and so do shelves.
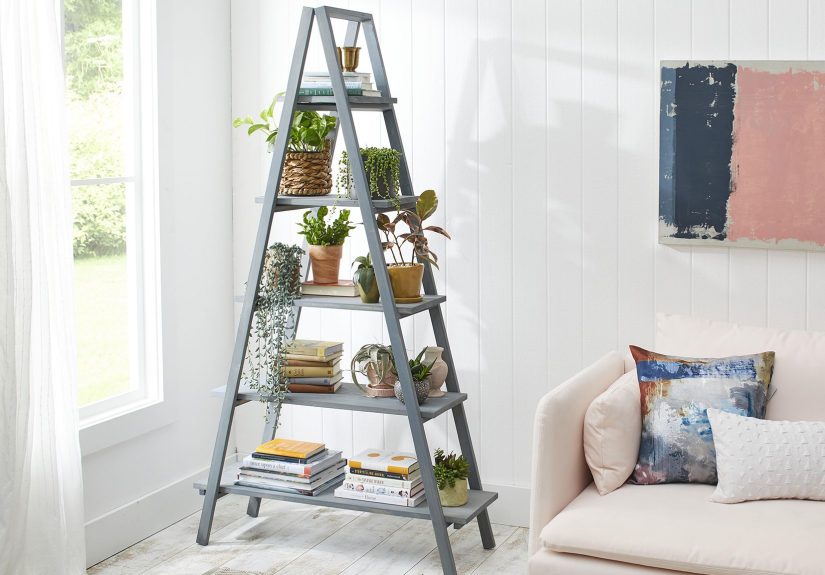
Styling an A-Frame Ladder Shelf Without Making It Look Overcrowded
The magic of this shelf is that it stores things while still looking airy. To keep that effect, style from bottom to top. Put heavier visual items such as baskets, large books, or storage boxes on the lower shelves. Use the middle shelves for a mix of practical and decorative items. Save the top shelf for smaller accents like framed art, candles, or a trailing plant that says, “I own a watering can and maybe have my life together.”
Leave some negative space. Every shelf does not need to be packed edge to edge. Open shelving works best when the eye has room to rest. If you are using it in a bathroom, rolled towels, jars, and a small basket look polished. In a living room, mix books with ceramics, framed photos, and greenery. In an entryway, think baskets, mail storage, and a tray for keys.
Common Mistakes to Avoid
- Ignoring shelf sag: long, thin shelves loaded with heavy books will eventually droop. Reinforce them.
- Skipping the level: a ladder shelf can be intentionally angled, but the individual shelves still need to be level.
- Using weak joinery: glue alone is not enough for a frequently used piece of furniture. Pair it with screws, nails, or pocket holes.
- Finishing too soon: do a full dry-fit before paint or stain so you do not have to redo pieces later.
- Overdecorating: open shelving looks best when it can breathe.
Is This a Good DIY Project for Beginners?
Yes, with one condition: you need to be willing to measure carefully and slow down at the assembly stage. The project is beginner-friendly in materials and tools, but the clean look depends on accuracy. It is not complicated joinery, but it is the kind of build where crooked cuts and rushed fastening show up immediately.
A practical approach is to build a simple version first, using straightforward cuts and visible screws placed neatly and consistently. Once you have one shelf under your belt, you can make a second version with pocket-hole joinery, plywood shelves with edge banding, or a custom stain color that makes you feel suspiciously talented.
Final Thoughts
An A-frame ladder shelf earns its popularity honestly. It is stylish, space-smart, customizable, and actually useful. You can build it in a weekend, tailor the size to your room, and finish it to match almost any decor style. More importantly, it solves a very modern problem: how to add storage without making a room feel crowded or turning every flat surface into a monument to clutter.
If you build with a solid plan, strong shelf supports, and a finish that suits the room, this project can look far more expensive than it is. That is one of DIY’s finest tricks. The other is pretending you enjoyed sanding the whole time.
Real-World Experience: What Building and Living With an A-Frame Ladder Shelf Teaches You
The first surprising thing about building an A-frame ladder shelf is how quickly it starts to feel like a real piece of furniture rather than a weekend experiment. At the beginning, it is just boards, clamps, tape measure, and a growing awareness that wood has an incredible talent for being almost the right size. But once the two ladder sides are assembled and the shelves begin to go in, the project suddenly has presence. You can see exactly where it will live, what it will hold, and how it will change the room. That visual payoff arrives early, which is one reason this project is so satisfying.
The second lesson is that small decisions matter more than people expect. A shelf that is off by even a little bit can look strangely awkward once it is loaded with books or decor. A finish that seemed “close enough” on the sample can look completely different in daylight. Even shelf spacing affects how useful the piece becomes. Too tight, and you cannot fit baskets or taller books. Too wide, and the proportions feel clumsy. Building this style of shelf teaches you to notice scale in a very practical way. Suddenly you are the kind of person who casually comments on visual balance in other people’s furniture, which is either personal growth or a sign you need another hobby.
Living with the finished shelf teaches even more. The bottom shelf always ends up doing the heavy lifting. That is where baskets, big art books, and heavier storage naturally migrate. The middle shelves become the most versatile zone, especially for objects you use often. The top shelf almost always turns decorative, no matter what your original plan was. This happens in nearly every home. You start by saying it is for “practical storage,” and two weeks later there is a candle, a framed print, and a trailing plant up there living their best lives.
Another real-world takeaway is that open storage gently forces you to edit. Closed cabinets hide chaos. Ladder shelves do not. If you overload them, they look busy immediately. That turns out to be helpful. You become more selective, more organized, and slightly less likely to keep random junk just because it fits somewhere. In that way, the shelf is not only storage furniture. It is also a mild accountability system with legs.
Finally, there is the satisfaction factor. A well-built A-frame ladder shelf feels personal in a way store-bought furniture rarely does. Every measurement, adjustment, and finish choice reflects your space and your taste. Even the tiny imperfections become part of the story. Maybe one rung fought back. Maybe the stain went darker than planned. Maybe you learned, the hard way, that glue squeeze-out is absolutely real. None of that ruins the piece. It makes it yours. And every time someone asks where you bought it, you get to enjoy the best line in DIY: “I built it.”


