
Table of Contents >> Show >> Hide
- What “Default Print Size” Means on a Mac
- How to Change the Default Paper Size in macOS
- How to Change Print Scaling on a Mac
- How to Save Your Preferred Print Size as a Preset
- How to Create a Custom Paper Size on a Mac
- How to Change Print Size in Specific Apps
- Why Your Mac Keeps Ignoring the Print Size You Chose
- Best Practices for Getting the Right Print Size Every Time
- Quick Fixes if Print Size Still Looks Wrong
- Final Thoughts
- Experiences: What It’s Really Like to Fix the Default Print Size on a Mac
- SEO Tags
If your Mac keeps trying to print everything on the wrong paper size, shrinks your document like it is preparing for dollhouse delivery, or insists on using settings you never asked for, welcome to one of the most oddly specific frustrations in modern life. Printing on a Mac is usually easy right up until it is not. Then suddenly you are in a standoff with paper size menus, scaling boxes, and printer presets that sound helpful but behave like tiny bureaucrats.
The good news is that you can change the default print size on a Mac. The slightly less glamorous news is that “print size” can mean a few different things. Sometimes it means your default paper size, such as Letter, Legal, A4, or 4 x 6. Sometimes it means scale, like printing at 100% instead of shrinking to fit. And sometimes it means saving a preset so your favorite settings stop disappearing every time you print a PDF, a shipping label, or a school form at 11:54 p.m.
This guide breaks it all down in plain English. You will learn how to change the default paper size in macOS, adjust scaling, save print presets, create custom sizes, and fix the most common reasons your Mac keeps ignoring your choices. In other words, this is the print rescue mission your desk has been waiting for.
What “Default Print Size” Means on a Mac
Before changing anything, it helps to know what you are actually trying to fix. On a Mac, default print size usually falls into one of these buckets:
1. Default paper size
This is the standard paper your Mac assumes you want to use, such as US Letter or A4. It affects new print jobs and, in some apps, the page size used when you create a new document. If your Mac keeps switching to the wrong sheet size, this is often the first place to look.
2. Scaling or print percentage
This controls how large or small the content prints on the page. A document printed at 100% keeps its original size. A document printed at 90% gets reduced. A document printed using “Scale to fit paper size” may be enlarged or shrunk automatically. Great when needed. Annoying when surprise-cropped recipes are involved.
3. App-specific page setup
Some Mac apps let you choose paper size, orientation, and scale in a Page Setup window before you even open the Print dialog. Others skip that step and toss you directly into Print. So yes, your printing experience may vary depending on whether you are in Preview, Pages, Word, Acrobat, or something that looks like it was designed in 2009 and never emotionally recovered.
4. Saved print presets
Presets are the secret weapon for repeat printing. They let you save a combination of settings such as paper size, orientation, duplex mode, grayscale, and sometimes layout options. If you print the same kind of document often, presets can save time, paper, and several dramatic sighs.
How to Change the Default Paper Size in macOS
If your main goal is to stop your Mac from defaulting to the wrong paper size every time you print, start here.
- Click the Apple menu.
- Open System Settings.
- Select Printers & Scanners.
- Look for the option labeled Default paper size.
- Choose the paper size you want, such as US Letter, A4, Legal, or another available option.
That setting becomes your routine default for printing. It can also affect the default page size when you create new documents in certain Mac apps. So if your documents keep opening in the wrong format, changing the system paper size may solve two headaches with one click.
Example: If you are in the United States and your Mac keeps trying to print on A4, switch the default paper size to Letter. If you work with international clients and keep seeing content spill awkwardly across the page, you may want to use A4 instead. Neither choice is morally superior. The printer just wants you to commit.
How to Change Print Scaling on a Mac
If the issue is not the paper itself but the size of the content on the paper, you need scaling. This is what determines whether your document prints at full size, shrinks a little, or stretches to fit the selected paper.
To change print scaling on a Mac:
- Open the document you want to print.
- Choose File > Print.
- If needed, click Show Details.
- Look for options such as Paper Size, Scale, or Scale to Fit Paper Size.
- Set the scale percentage you want, such as 100%.
For many users, 100% is the magic number. It prevents the Mac from shrinking or enlarging the content unless you tell it to. That is especially helpful for tax forms, labels, printable planners, legal paperwork, and anything else where physical dimensions actually matter.
If your app includes a Page Setup option, open that too. Some apps let you set scaling there before printing. In those cases, the Page Setup menu may control the document layout more directly than the Print window.
How to Save Your Preferred Print Size as a Preset
This is where life gets better.
Mac printing becomes much less annoying when you stop re-entering the same settings every single time. If you regularly print with a certain paper size, scale, orientation, or layout, save it as a preset.
Here is how:
- Open a document and choose File > Print.
- Set your preferred options, such as:
- Paper Size: Letter, A4, 4 x 6, or custom
- Scale: 100%, 90%, or Fit to Page
- Orientation: Portrait or Landscape
- Color or Black and White
- Single-sided or double-sided
- Open the Presets menu.
- Choose Save Current Settings as Preset.
- Name the preset something obvious, like Shipping Labels 4×6 or Letter 100% B&W.
The next time you print, choose that preset from the menu instead of rebuilding your settings from scratch like a noble but exhausted office wizard.
This is one of the best ways to create a practical “default print size” on a Mac, especially if you switch between document types often. You may not have one universal button for every app and printer, but presets get you very close.
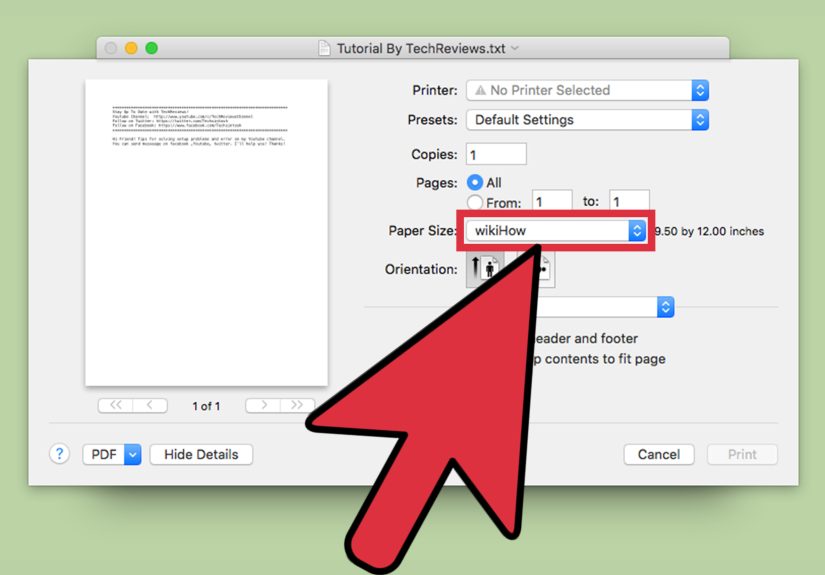
How to Create a Custom Paper Size on a Mac
Sometimes the size you need is not in the standard list. Maybe you are printing labels, invitations, envelopes, recipe cards, artwork proofs, or a tiny form apparently designed by a very determined bureaucratic squirrel. That is when custom paper sizes save the day.
To create one:
- Open your file and choose File > Print.
- Open the Paper Size menu.
- Choose Manage Custom Sizes.
- Click the plus sign to add a new size.
- Enter the dimensions and margins.
- Name the size clearly.
- Save it and select it for your print job.
Custom paper sizes are especially helpful for label printers, photo paper, greeting cards, or specialty business printing. Just remember that your printer must actually support the size you choose. Your Mac may be optimistic, but your printer remains a creature of mechanical limits and deeply held opinions.
How to Change Print Size in Specific Apps
Because apps do not always behave the same way, here is how the process usually works in the most common scenarios.
Preview
Preview is the default PDF and image viewer on a Mac, and it is often the fastest place to print cleanly. Open the file, go to File > Print, and check the paper size and scale. If you print PDFs often, Preview is a good place to build simple presets.
Adobe Acrobat
Acrobat adds its own scaling controls for PDFs, including options like Fit and Shrink oversized pages. That is useful when the PDF size does not match your selected paper, but it can also create confusion if you expect the Mac’s normal print scale to do all the work. When accuracy matters, review Acrobat’s scaling menu carefully before printing.
Microsoft Word
Word may let you manage page size through its layout settings before you ever hit Print. If your document prints strangely, check both the document’s paper size and the printer settings. A Word file built for one page size can still look odd when sent to a different paper format at print time.
Pages or other Mac apps
Apple’s own apps generally play nicely with macOS printing. Still, it is worth checking both document setup and print setup if the result looks off. New documents may inherit the standard paper size currently selected on your Mac.
Why Your Mac Keeps Ignoring the Print Size You Chose
If you set everything correctly and your Mac still behaves like it has trust issues, one of these is probably the culprit:
The app overrides the system setting
Some apps use their own layout or print logic. That means your Mac’s default paper size may not fully control what happens inside that app.
The preset was saved for one printer only
Some presets apply only to a specific printer. If you change printers, the preset may not appear or may behave differently.
The printer driver has its own preferences
Printer makers such as HP, Brother, Canon, Epson, Ricoh, and Xerox often include driver-specific options that affect paper handling and layout. Those settings can influence what happens in the Print dialog.
The document was created in a different page size
If a document was designed in A4 and you print on Letter without adjusting anything, the content may be shrunk, clipped, or shifted. Matching the document size and paper size usually gives the cleanest result.
You are printing a PDF with automatic resizing turned on
PDF apps often add automatic fit options. Those are convenient until you need exact size. Then they become tiny saboteurs.
Best Practices for Getting the Right Print Size Every Time
- Set the correct default paper size in System Settings first.
- Use 100% scaling when exact physical size matters.
- Save frequently used settings as presets.
- Create custom paper sizes for labels, photos, and specialty media.
- Double-check app-specific print options, especially in Acrobat and Word.
- Print a single test page before launching a large print job.
That last tip may sound obvious, but it is the difference between one mildly annoying mistake and accidentally producing twenty-seven beautifully mis-scaled pages.
Quick Fixes if Print Size Still Looks Wrong
If you still cannot get the right result, try this short troubleshooting list:
- Quit and reopen the app.
- Remove and reselect the printer in the Print dialog.
- Check whether the document size matches the selected paper size.
- Try printing from Preview instead of the original app.
- Create a fresh preset instead of relying on “Last Used Settings.”
- Update the printer driver or use the latest compatible driver.
- If printing problems are widespread, reset the Mac printing system and re-add the printer.
Resetting the printing system is a last-resort move, but it can help when a Mac keeps forgetting settings or a printer acts like it joined the rebellion.
Final Thoughts
Changing the default print size on a Mac is not hard once you know where Apple hides the controls. The real trick is understanding that there is no single master switch for every printing situation. Instead, macOS gives you a few layers: a default paper size for your system, scaling options inside apps, and presets for the settings you use all the time.
If you want the simplest fix, start by setting the correct default paper size in Printers & Scanners. If you need precise content sizing, set the scale manually, usually to 100%. And if you print the same kind of document regularly, save a preset and never look back.
Your printer may still have occasional moods. That seems to be part of its personality. But with the right settings in place, you can at least stop letting it make creative decisions on your behalf.
Experiences: What It’s Really Like to Fix the Default Print Size on a Mac
In real life, most people do not search for “how to change the default print size on a Mac” because they suddenly developed a passion for printer menus. They search because something annoying happened first. Usually, it starts with a document that looked perfect on screen and came out looking like it had been lightly bullied on the way to the printer.
A common example is the person who prints one return label every week. Everything seems fine until the Mac suddenly decides that the label should be “fit to page,” which is a polite way of saying “wrong size.” The printed barcode ends up too large, too small, or shifted just enough to ruin the scan. After a few rounds of blaming the label printer, the internet, and possibly Mercury in retrograde, the real fix turns out to be simple: set the correct custom paper size, save a preset, and stop trusting the mysterious “last used settings.”
Another familiar experience happens in home offices. Someone switches between Letter paper for regular documents and 4 x 6 media for photos or labels. The Mac remembers one setting in one moment, forgets it the next, and behaves like paper sizes are merely suggestions. Once that user changes the default paper size for routine printing and creates separate presets for different tasks, life gets dramatically easier. Suddenly there is a preset for invoices, one for shipping labels, and one for full-page forms. The printer did not become smarter. The workflow did.
Students and remote workers run into a different version of the same problem. They open a PDF form, print it, and realize the margins are off or the content looks slightly reduced. That tiny scale change may not matter for a reading handout, but it matters a lot for official forms. The usual lesson is that PDFs often need extra attention. Printing from Preview or Acrobat with scale locked at 100% solves the issue more often than people expect.
Then there are the international paper size adventures. A user in the United States gets an A4 document from overseas and prints it on Letter paper without thinking about it. The Mac tries to help. The printer tries to help. The result is helpful in the way a raccoon is helpful in a kitchen. It technically interacted with the situation, but not in a way anyone wanted. Matching the document size to the paper size, or using the correct fit setting intentionally, usually fixes that headache fast.
The biggest experience people report after finally getting everything right is relief. Not joy, exactly. Printing rarely inspires joy unless it works on the first try, which is how legends begin. But there is real relief in opening the Print dialog and seeing your preferred size, layout, and scale already waiting for you. No more last-minute corrections. No more wasted paper. No more staring at a preview window like it personally betrayed you.
That is why presets matter so much on a Mac. They turn printing from a recurring surprise into a routine. And when printing becomes routine, it fades into the background where it belongs. Which, frankly, is the highest compliment anyone can give a printer.


