
Table of Contents >> Show >> Hide
- What Is a Chinese Finger Trap, Exactly?
- Materials You Need
- How to Create a Chinese Finger Trap Step by Step
- How the Finger Trap Actually Works
- Tips for Making a Better DIY Finger Trap
- Common Mistakes and How to Fix Them
- Fun Variations to Try
- Why This Craft Is Great for Kids and Adults
- Experiences People Commonly Have When Making a Chinese Finger Trap
- Final Thoughts
If you have ever met a Chinese finger trap, you already know its personality. It looks harmless, lightweight, and almost too silly to take seriously. Then you slip in your fingers, pull, and suddenly this tiny woven tube turns into a life coach with commitment issues. The harder you fight it, the worse it gets.
The good news is that making one at home is surprisingly simple. Even better, it is one of those crafts that feels like a magic trick, a paper-weaving lesson, and a mini science demo all rolled into one. You are not just making a toy. You are building a braided tube that changes shape when tension is applied. That sounds fancy, but do not worry. We are still working with paper, glue, and the kind of determination usually reserved for opening snack bags without tearing the whole top off.
In this guide, you will learn how to create a Chinese finger trap with paper, how the weave works, what mistakes to avoid, and how to make your finished piece actually trap a finger instead of flopping around like a confused paper noodle. By the end, you will have a fun DIY finger trap, a better grasp of basic paper weaving, and possibly a new favorite rainy-day craft.
What Is a Chinese Finger Trap, Exactly?
A Chinese finger trap is a small woven tube that tightens when you pull on it. Traditional versions were often made from bamboo, but paper versions work beautifully for a homemade craft. The basic structure is a braided cylinder made from strips crossing at angles. When the tube gets longer, its diameter shrinks. That is why it grips your fingers when you try to yank them out.
That same woven-braid principle shows up in much more serious places too, including gripping tools, braided sleeves, and mechanical structures that convert pulling into tightening. So yes, your paper prank toy is secretly hanging out with real engineering ideas. Not bad for a project that starts with scissors and glue.
Materials You Need
- 1 sheet of standard paper or lightweight cardstock
- Glue stick or white craft glue
- Scissors
- Ruler
- Pencil
- A thin dowel, pencil, straw, or rolled paper tube to use as a form
- Tape or small removable adhesive, optional but helpful
If you want a brighter look, use two colors of paper. That makes the woven pattern easier to see and gives the final finger trap a more playful finish. Construction paper can work, but regular printer paper is often easier to weave neatly because it bends without getting stubborn.
How to Create a Chinese Finger Trap Step by Step
1. Cut Your Paper Strips
Start by cutting four long strips of paper. Aim for strips about 1/2 inch wide. Try to keep them as even as possible. This is not the moment for “close enough” energy. Uneven strips make the weave lopsided, and a lopsided finger trap is more decorative than functional.
If your paper is letter-size, cut along the long edge so each strip has enough length to wrap and weave into a proper tube. Longer strips make the process easier and give you more room to adjust.
2. Make Two L-Shaped Pieces
Take two strips and glue them together at a right angle, forming an L shape. Do the same with the other two strips. Let the glue set for a minute so your project does not fall apart the second you start weaving. This is craft time, not an action movie.
3. Attach the Strips to Your Form
Place your dowel, pencil, straw, or rolled paper tube on your work surface. Attach one L-shaped strip to one side of the form and the other L-shaped strip to the opposite side. A tiny piece of tape can help hold them in place while you begin.
Your form should be just a little narrower than the finger you want the trap to fit. Too wide, and it will not grip. Too narrow, and it will feel like a personal insult.
4. Begin the Over-Under Weave
Now for the fun part. Start weaving the strips around the form in an over-under pattern. Each strip should alternate as it crosses the others, creating a diagonal braid. Keep the weave snug, but do not pull so tightly that the paper buckles.
The goal is to build a smooth tube with a consistent pattern. If the strips twist, flatten them gently as you go. If the weave loosens, slide the strips closer together. A finger trap works best when the braid looks tidy and evenly spaced.
5. Continue Until the Tube Is Long Enough
Keep weaving until your tube is roughly 5 to 6 inches long, or long enough to fit comfortably over a finger with a little extra room. You do not need an exact measurement, but you do want enough length for the tightening effect to feel satisfying.
Short versions can still work, but they tend to be less dramatic. And if you are making a finger trap, dramatic is part of the charm.
6. Glue the Overlaps
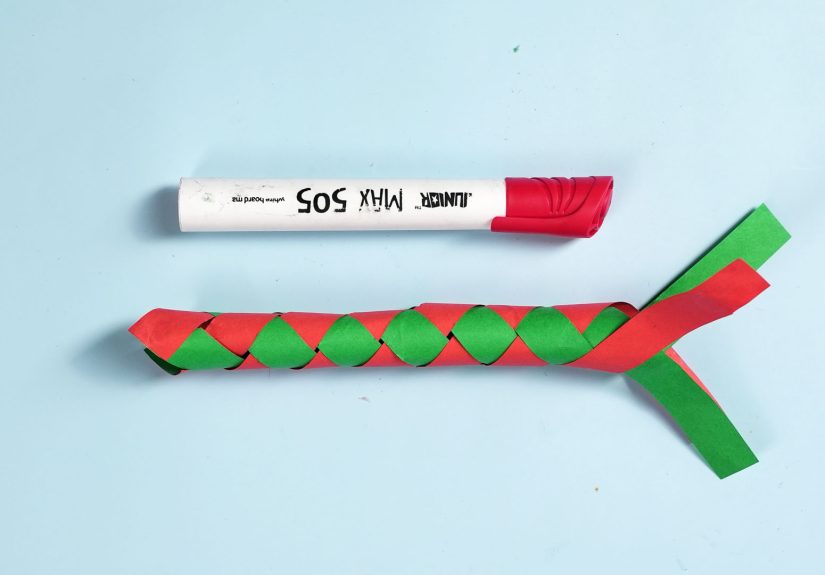
When you reach your desired length, glue the overlapping ends on opposite sides of the tube. Hold them in place until the glue sets. Then carefully remove the woven tube from the form.
Trim away any excess paper so the ends look clean. If needed, press the braid lightly back into shape with your fingers. Congratulations. You now have a homemade Chinese finger trap and, perhaps, a dangerous amount of confidence.
How the Finger Trap Actually Works
The magic is in the braid geometry. The strips are woven diagonally, not straight up and down. When you pull the tube lengthwise, those diagonal angles shift. The braid stretches longer, and as it does, the opening narrows. That makes the tube grip whatever is inside it.
To get your fingers out, you do the opposite of what panic suggests. Instead of pulling outward, push inward. That shortens the tube, widens the opening, and lets your fingers slide free. In other words, the escape plan is calm cooperation, which is a surprisingly mature lesson from a paper prank.
Tips for Making a Better DIY Finger Trap
Use Even Strips
Uniform strip width is one of the biggest keys to success. If the strips are uneven, the tube will tighten unevenly too.
Choose the Right Paper
Paper that is too flimsy tears easily. Paper that is too thick fights every fold like it is negotiating a contract. Regular printer paper is usually the sweet spot.
Keep the Weave Snug
Loose braiding creates gaps and weakens the tightening action. Slide the weave together as you work so the tube holds its shape.
Match the Form to the Finger
If your form is much wider than your finger, your trap will look great and do absolutely nothing. Aim for a size just slightly smaller than the intended finger width.
Let the Glue Dry Fully
Yes, patience is annoying. Yes, it matters. A half-dried finger trap is basically a paper bracelet with unrealistic ambitions.
Common Mistakes and How to Fix Them
The Tube Falls Apart
This usually means the glued joints were too weak or the weave was too loose. Re-glue the overlaps and tighten the braid before the adhesive dries.
It Does Not Tighten
Your tube may be too wide, too short, or too loosely woven. Use a narrower form next time and keep the crossing angles more consistent.
The Paper Kinks or Wrinkles
You may be pulling too hard while weaving. Slow down and guide the strips smoothly around the form instead of forcing them.
It Is Too Tight to Use Comfortably
Go up one size on the form or use slightly wider spacing in the braid. The goal is a playful grip, not a tiny paper vendetta.
Fun Variations to Try
- Two-color finger trap: Use contrasting strips for a checkerboard-style braid.
- Party favor version: Make several in bright colors for birthdays or classroom activities.
- STEM demo: Pair the craft with a short explanation of tension, geometry, and woven structures.
- Mini finger trap garland: String several finished tubes together for a quirky decoration.
- Challenge mode: Experiment with metallic paper, patterned paper, or recycled magazine pages.
Why This Craft Is Great for Kids and Adults
Learning how to create a Chinese finger trap is not just about making a novelty toy. It also builds fine motor skills, hand-eye coordination, pattern recognition, and patience. The measuring and strip-cutting add a bit of practical math. The weaving teaches sequencing. The finished toy delivers instant feedback, because it either works or it very dramatically does not.
For adults, it is a charming little project that scratches the same itch as origami, basket weaving, and other hands-on paper crafts. It is inexpensive, portable, and weirdly satisfying. There is also a certain joy in making something that looks simple but has a clever mechanical trick built right into it.
Experiences People Commonly Have When Making a Chinese Finger Trap
One of the most common experiences with this craft is underestimating it right away. People often look at a Chinese finger trap and assume it is basically a paper tube with a funny name. Then they begin weaving and realize the project has opinions. The strips need to stay flat. The angles need to stay consistent. The form has to be the right size. Suddenly, a five-minute craft becomes a tiny workshop in precision and patience.
First-time makers also tend to discover that measuring matters more than they expected. When the strips are cut evenly, the braid starts to look clean and professional almost immediately. When the strips are uneven, the whole tube starts drifting off course like a shopping cart with one rebellious wheel. That moment teaches an important lesson: simple crafts are often the ones that reveal whether you are being careful or just emotionally supportive of the ruler from a distance.
Another common experience is the surprising satisfaction of watching the braid take shape around the form. At first, the crossed strips seem awkward and floppy. Then, after a few rounds of over-under weaving, the pattern begins to lock into place. The paper starts acting less like scraps and more like a real woven structure. That transition is a big reason this project is so enjoyable. You can literally see order emerging from chaos.
In classrooms, family craft sessions, and casual weekend projects, people often turn this into a mini science demonstration without planning to. Someone slips a finger inside, someone else gives the classic warning not to pull, and of course someone pulls anyway. The trap tightens, everybody laughs, and the room accidentally learns a lesson about tension and geometry. It is one of those rare crafts that naturally leads to questions like “Why does that happen?” which is always a good sign.
There is also the experience of trial and error with materials. Some makers find that construction paper looks great but feels bulky. Others realize printer paper weaves more smoothly but may need careful handling so it does not tear. Recycled magazine paper can produce cool colors, but glossy pages sometimes slide more than expected. These small experiments help people understand that material choice changes the final behavior of the object, not just the way it looks.
Many people who make one finger trap end up making several. That is partly because the first version teaches the method, while the second version usually looks better and works better. By the third, people start adjusting size, color, strip width, and tube length on purpose. What began as a novelty suddenly becomes a design challenge. Can you make one for smaller fingers? Can you make one with a tighter braid? Can you make one that looks fancy enough to give away? That repeatability is part of the fun.
Probably the most memorable experience, though, is the moment the finished trap actually works. There is a brief pause, a little skeptical tug, and then that tiny woven tube does exactly what it promised. It grips. It resists. It turns a humble paper craft into a miniature performance. That instant payoff is why this project sticks with people. It is playful, clever, and just educational enough to make everyone feel slightly smarter than they were ten minutes earlier.
Final Thoughts
Now that you know how to create a Chinese finger trap, you have a craft that is equal parts prank, puzzle, and paper engineering. It is easy to make with basic supplies, fun to customize, and surprisingly rich in hands-on learning. Whether you are making one for a classroom activity, a rainy afternoon, a party favor, or just to delight your inner craft goblin, this little woven tube delivers a lot of fun for very little cost.
Best of all, it reminds us that clever design does not have to be complicated. Sometimes a few strips of paper, woven the right way, can create something memorable, interactive, and just weird enough to be wonderful.


