
Table of Contents >> Show >> Hide
- What “Shin Muscles” Actually Means (And Why They Matter)
- Before You Start: A Quick Safety Check
- The 9 Steps to Exercise Your Shin Muscles
- Step 1: Warm Up Your Ankles (Yes, Your Ankles)
- Step 2: Find a Stable Foot Position (Tripod Foot Setup)
- Step 3: Start With Seated Toe Raises (Beginner-Friendly and Sneaky Effective)
- Step 4: Add Resistance Band Dorsiflexion (Your Shin’s Favorite Tug-of-War)
- Step 5: Try Standing Tibialis Raises (The Classic “Shin Builder”)
- Step 6: Heel Walks (Functional Strength You Can’t Fake)
- Step 7: Train the “Slow Lower” (Eccentric Toe Lowers)
- Step 8: Balance the System With Calf Strength and Mobility
- Option A: Calf Raises
- Option B: Calf Stretch (Straight Knee + Bent Knee)
- Step 9: Program It Smart (So Your Shins Don’t Mutiny)
- A Simple 10-Minute Shin Routine (Beginner to Intermediate)
- Common Questions (Because Shins Love Drama)
- of Real-World Experiences (What People Notice When They Train Their Shins)
- Conclusion
Your shins are the unsung heroes of your lower legs. They don’t get the glamour of “six-pack abs” or the reputation of “power calves.”
Instead, they quietly lift your toes, stabilize your ankles, help you brake on downhill walks, and keep you from tripping over… air.
Then, the minute you start running, hiking, jumping rope, or just aggressively speed-walking through Target, they can start complaining.
Loudly.
The good news: most people don’t need fancy equipment or a boot-camp personality to strengthen their shin muscles. What you need is
a smart progression that trains the muscles along the front of your lower leg (especially the tibialis anterior) and supports the
whole ankle-foot system so your shins aren’t doing overtime.
What “Shin Muscles” Actually Means (And Why They Matter)
When people say “shin muscles,” they usually mean the muscles on the front and outer side of the lower legespecially the
tibialis anterior. This muscle helps pull your foot upward (ankle dorsiflexion) and helps turn the foot slightly inward
(inversion). Translation: it’s your “toe-lift” muscle and a big part of ankle control.
Strong shin muscles can improve walking and running mechanics, support balance, and help your lower legs tolerate impact better.
They’re often discussed in conversations about shin splints, but even if you’ve never had shin pain, training these muscles can help
with ankle stability, foot control, and smoother movement.
Before You Start: A Quick Safety Check
Shin strengthening is usually safe, but it’s not a “push through anything” situation. If you have sharp pain, pain that’s very
localized to one spot on the bone, noticeable swelling, numbness, weakness, or pain that worsens quickly with exercise,
pause and consider getting medical guidance. Some conditions (like stress injuries or compartment-related issues) need a different
plan than “more reps.”
Helpful rule of thumb
- Muscle burn during shin exercises: normal (especially at first).
- Sharp or escalating pain (especially on the bone): not your “ignore it” moment.
- Pain that changes your gait (you limp or compensate): scale back and reassess.
The 9 Steps to Exercise Your Shin Muscles
-
Step 1: Warm Up Your Ankles (Yes, Your Ankles)
Shin exercises work best when your ankle joint is moving smoothly. A quick warm-up also reduces the “my shins feel like rusty
door hinges” effect.- Ankle circles: 10 slow circles each direction per foot.
- Ankle pumps: Point toes away, then pull toes toward your shin, 15 reps.
- March in place: 30–45 seconds, focusing on rolling through the foot.
Keep it controlled. If your warm-up sounds like a bowl of Rice Krispies, slow downnot everything needs to be “snappy.”
-
Step 2: Find a Stable Foot Position (Tripod Foot Setup)
Strong shins can’t fully do their job if your foot collapses like a lawn chair at a cookout. Aim for a stable base:
pressure under (1) the heel, (2) the base of the big toe, and (3) the base of the little toe. This is often called a “tripod foot.”Practice standing tall with soft knees, ribs stacked over hips, and feet grounded. This improves how your shin muscles work with
your arches and anklesespecially when you move from seated exercises to standing ones. -
Step 3: Start With Seated Toe Raises (Beginner-Friendly and Sneaky Effective)
Seated toe raises are a simple way to target the tibialis anterior without loading your whole body. Sit tall in a chair,
feet flat on the floor, knees bent about 90 degrees.- Keep your heels on the ground.
- Lift your toes and forefoot toward your shins.
- Pause 1 second at the top, then lower slowly.
Do: 2–3 sets of 12–20 reps per side.
Make it harder: Add a light dumbbell on the toes (carefully), or do one leg at a time.
Common mistake: Rocking the whole body backward. The movement should come from the ankle. -
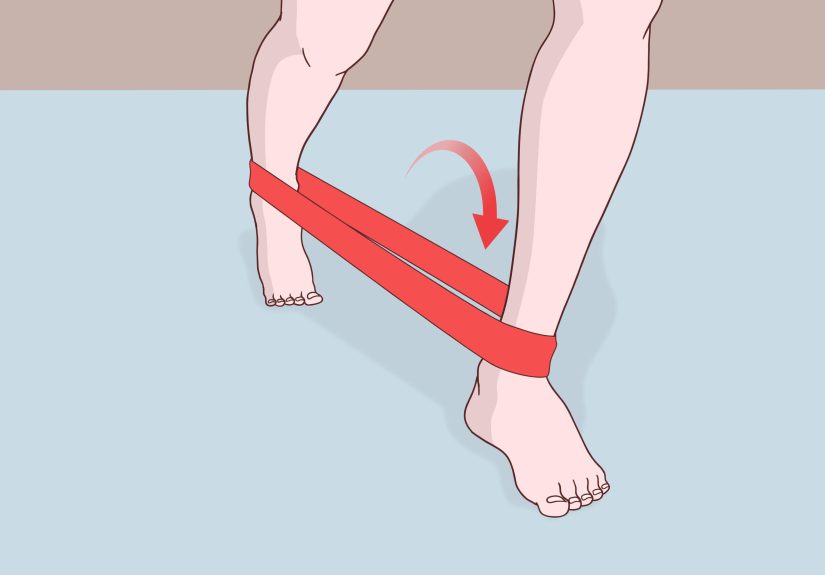
Step 4: Add Resistance Band Dorsiflexion (Your Shin’s Favorite Tug-of-War)
Once you can do seated raises with control, add a resistance band for a clearer strength stimulus.
Anchor the band to a sturdy object (like a heavy table leg), loop it around the top of your foot, and sit with your leg extended.- Start with toes pointed slightly away (band has tension).
- Pull toes toward your shin slowly (dorsiflex).
- Return with controldon’t let the band “snap” you back.
Do: 2–3 sets of 10–15 reps each side, slow tempo.
Pro tip: Control the lowering phase for 2–3 secondsthis builds durability, not just “movement.” -
Step 5: Try Standing Tibialis Raises (The Classic “Shin Builder”)
This one looks almost too simple, which is how it tricks you into realizing your shins are, in fact, mortal.
Stand with your back against a wall, feet about 6–12 inches away from the wall. Keep your body straight and use the wall for balance.- Keep heels down.
- Lift toes up toward shins.
- Lower slowly without slamming the forefoot down.
Do: 2–4 sets of 12–25 reps.
Progression: Move feet slightly farther from the wall (more leverage), or add a pause at the top.
Regression: Reduce range of motion and focus on smooth reps. -
Step 6: Heel Walks (Functional Strength You Can’t Fake)
Heel walks train your shin muscles the way your body actually uses them: holding the foot up while you move.
Stand tall, lift your toes so you’re walking on your heels, and take small controlled steps.- Begin: 2 rounds of 15–30 seconds.
- Build: Up to 3–5 rounds of 30–60 seconds.
Keep your torso upright. If you’re leaning forward like you’re sneaking cookies at midnight, reset your posture.
This exercise should challenge your shins, not your stealth. -
Step 7: Train the “Slow Lower” (Eccentric Toe Lowers)
Eccentric work (the controlled lowering phase) is a simple way to build tissue tolerance. Start in a “toes up” position
(from Step 5 or Step 3), then lower your foot very slowlythink 3 seconds down.Do: 2–3 sets of 8–12 slow reps.
Why it helps: It improves control and endurance, which can matter a lot for runners and anyone who changes pace,
terrain, or incline.If you feel cramping, shake out your legs, rest 30–60 seconds, and resume. This is not a test of your suffering tolerance.
-
Step 8: Balance the System With Calf Strength and Mobility
Shin muscles don’t live in a vacuum. Tight or weak calves can change how your lower leg absorbs force, and limited ankle mobility
can increase stress where you don’t want it. Pair shin work with one calf strength move and one calf stretch.Option A: Calf Raises
- Stand holding a support.
- Rise up on the balls of your feet.
- Pause briefly, then lower with control.
Do: 2–3 sets of 10–20 reps.
Option B: Calf Stretch (Straight Knee + Bent Knee)
- Straight-knee wall stretch targets the gastrocnemius.
- Bent-knee wall stretch targets the soleus.
Hold each stretch 20–30 seconds, 2 rounds each. No bouncing. You’re stretching, not trying to start a fire.
-
Step 9: Program It Smart (So Your Shins Don’t Mutiny)
The most effective shin training plan is the one you can actually repeat. Most people do well with shin strengthening
2–3 times per week on non-consecutive days, especially at the start.- Week 1–2: Pick 2 exercises (e.g., seated toe raises + band dorsiflexion).
- Week 3–4: Add a third (e.g., wall tibialis raises).
- Week 5+: Add heel walks or eccentrics for endurance and control.
If you run or jump as part of your sport, build volume gradually. A slow progression and consistent strength work usually beat
“I added three miles and a hill sprint workout because I felt unstoppable.”
A Simple 10-Minute Shin Routine (Beginner to Intermediate)
- Warm-up (1–2 minutes): ankle circles + ankle pumps
- Seated toe raises: 2 x 15–20
- Banded dorsiflexion: 2 x 12–15 each side
- Wall tibialis raises: 2 x 15–25
- Heel walks: 2 x 20–30 seconds
- Calf stretch: 2 x 20–30 seconds each position
Want to level up? Add one extra set to one exercise each week, or slow your tempo before you increase resistance.
Your shins respond well to consistency and control.
Common Questions (Because Shins Love Drama)
How fast will I feel stronger?
Many people notice better control and less “shin fatigue” within 2–4 weeks if they train consistently. True strength and endurance
improvements can continue for monthsespecially if you progressively increase difficulty.
Can I do shin exercises every day?
Some light mobility and a small amount of easy volume may be fine, but hard strengthening (especially high reps to fatigue)
is usually better 2–3 times per week. If you’re sore for more than 48 hours, reduce volume or intensity.
Are shin exercises the same as treating shin splints?
Not exactly. Shin splints (often called medial tibial stress syndrome) can involve training errors, impact load, footwear,
and muscle/tendon irritation. Strengthening can help, but it’s usually part of a bigger strategy: smart progression, rest when needed,
cross-training, and addressing mobility and mechanics.
of Real-World Experiences (What People Notice When They Train Their Shins)
In the real world, shin training tends to show up in people’s lives in three very relatable moments: (1) when they start running,
(2) when they return to exercise after a break, or (3) when a hobby quietly turns their calves into divas (hello, hiking and jump rope).
The pattern is often the same: the athlete or weekend warrior is doing “enough” cardio to feel proud, but not doing enough lower-leg
strength to make their shins feel supported.
A common runner experience is the “new route surprise.” Someone feels great on flat ground, then tries hills or a harder surface
and suddenly their lower legs feel beat upespecially the front of the shins. When these runners begin adding seated toe raises
and banded dorsiflexion two or three days per week, they often report a subtle shift first: less foot slapping, better control on
downhill sections, and less fatigue in the front of the lower leg after longer runs. It’s not magic; it’s basic capacity. If your
tibialis anterior can handle repetitive toe-lifting without burning out, your running stride tends to feel smoother.
Another common story involves people who lift weights but skip “small” muscles. They can squat, deadlift, and do calf raises,
yet they feel unstable when they do lunges, step-downs, or change directions. When they introduce standing tibialis raises and
heel walks, the first week feels oddly humblinglike discovering a secret level in a video game. By week three or four, they’re
often surprised that their ankles feel steadier during leg day, and their feet feel more “connected” to the ground. The shin work
doesn’t replace big lifts; it supports them.
A third group includes people who spend a lot of time sittingdesk workers, students, driverswho start walking more and suddenly
notice shin tightness. For them, shin training can feel like restoring a skill their body forgot. A simple routine of ankle pumps,
toe raises, and gentle heel walks (done consistently) often leads to a very practical win: walking longer without that “front-of-shin
fatigue” and feeling less stiff when they stand up after long periods of sitting. Pairing shin work with calf stretching is often
what makes the change stick, because tight calves can limit ankle motion and push extra strain into the lower leg.
Across all these experiences, the biggest lesson is surprisingly boringand therefore true: the shins respond best to gradual
progress. People who go from zero shin work to 300 wall tibialis raises in a day usually discover a new emotion called “regret.”
People who start with two exercises, keep reps controlled, and progress week by week tend to feel steadier, less achy, and more
confident in their movement. If your goal is fewer nagging lower-leg issues and more reliable workouts, shin training is one of those
small habits that pays back like a good savings accountquietly, consistently, and right when you need it.
Conclusion
Exercising your shin muscles isn’t flashy, but it’s one of the smartest “little things” you can do for lower-leg strength,
ankle stability, and smoother movement. Start with controlled toe raises and banded dorsiflexion, build into standing tibialis raises
and heel walks, and balance everything with calf strength and mobility. Keep the progression gradual, listen to pain signals, and
give your body time to adaptbecause strong shins aren’t built in a weekend.


