
Table of Contents >> Show >> Hide
- What a Ductless Heat Pump Installation Really Involves
- Before You Install: Plan First, Drill Later
- DIY vs. Pro Installation: What You Can Do and What You Shouldn’t
- Step-by-Step: How a Ductless Heat Pump Is Installed (Safely and Properly)
- Step 1: Confirm system design, zones, and line-set paths
- Step 2: Mount the indoor unit bracket
- Step 3: Create a clean, protected wall penetration
- Step 4: Set the outdoor unit on a stable base
- Step 5: Run the line set, communication cable, and drain line
- Step 6: Complete code-compliant electrical work (licensed electrician)
- Step 7: Connect refrigerant lines and perform commissioning tests (licensed HVAC tech)
- Step 8: Startup, drain check, and final walkthrough
- Common Ductless Heat Pump Installation Mistakes to Avoid
- How Long Does Installation Take?
- What Installation Costs Usually Include
- Maintenance After Installation
- Real-World Installation Experiences (Extra Section)
- Conclusion
Installing a ductless heat pump (also called a mini-split) is one of those home upgrades that sounds simple at firstuntil you meet the glamorous cast of characters involved: permits, electrical work, refrigerant lines, condensate drainage, load calculations, and that one wall you really don’t want to drill through. The good news? Ductless systems are genuinely easier to install than full ducted systems, and they can be an excellent solution for older homes, additions, garages, and rooms that never seem to get comfortable.
This guide gives you a practical, SEO-friendly, real-world walkthrough of how to install a ductless heat pumpwith a big emphasis on safety, code compliance, and getting good performance (not just “it turns on, so I guess we’re done”). You’ll learn what homeowners can prep themselves, what should be handled by licensed pros, how to avoid common mistakes, and what a clean, professional installation process should look like.
What a Ductless Heat Pump Installation Really Involves
A ductless heat pump system typically includes an outdoor unit and one or more indoor units connected by refrigerant piping, wiring, and a condensate drain. Unlike central HVAC, there’s no ductwork to build into walls and ceilings. That’s why ductless systems are such a popular retrofit option.
But “ductless” does not mean “tool-free.” A proper installation still requires:
- Correct sizing (this is huge for comfort and efficiency)
- Smart indoor/outdoor placement
- Code-compliant electrical work with a dedicated circuit
- Proper refrigerant handling and line connections
- Condensate drainage that won’t leak into your wall later
- Commissioning tests to verify the system is actually performing correctly
In other words, a ductless heat pump is easier than installing full ducted HVACbut it’s still an HVAC project, not a “Saturday and a screwdriver” project.
Before You Install: Plan First, Drill Later
1) Size the system correctly
The first step is not shopping for the prettiest wall unit. It’s sizing. A contractor should perform a proper load calculation (commonly called Manual J) so the system matches your home’s heating and cooling needs. An oversized unit can short-cycle and reduce comfort. An undersized one may run constantly and still leave the room chilly (or sweaty).
2) Choose the right installation type
Ductless systems come in multiple formats: wall-mounted, floor-mounted, ceiling cassette, and ducted mini-split variants. For most homes, the wall-mounted indoor head is the common choice because it’s flexible, fast to install, and works well for room-by-room zoning.
3) Pick indoor and outdoor locations carefully
Placement affects comfort, noise, serviceability, and reliability. You want the indoor unit where airflow can reach the room effectively, and the outdoor unit where it has clear airflow, a solid mounting base, and safe drainage. Avoid “I’ll just tuck it anywhere” thinkingbad placement is a classic install regret.
4) Check permits and local code requirements
Most areas require permits for ductless heat pump installation because the job includes electrical work and refrigerant connections. This is also where homeowners discover a very important truth: your city inspector does not accept “but the YouTube guy said it was fine.”
5) Verify electrical capacity
Some homes need an electrical upgrade (or at least panel space) before a heat pump can be added. Even if your service is adequate, you may need a new breaker or subpanel space depending on the system and your current electrical load.
DIY vs. Pro Installation: What You Can Do and What You Shouldn’t
Here’s the honest version: many homeowners can handle prep work, but most should hire licensed professionals for the critical parts. That isn’t gatekeepingit’s risk management.
Homeowner-friendly tasks (in many situations)
- Getting quotes and comparing equipment options
- Choosing indoor/outdoor placement with the installer
- Clearing installation access indoors and outdoors
- Installing a pad area (if your contractor approves the location and specs)
- Basic post-install maintenance (filter cleaning, visual checks)
Licensed HVAC / electrician tasks
- Load calculations and final equipment selection
- Electrical circuit, disconnect, breaker, and code compliance
- Refrigerant line connections and any refrigerant handling
- Pressure testing, evacuation, charge verification, commissioning
- Final startup verification and documentation
Important note: refrigerant handling is regulated. Even connecting hoses or pre-charged lines during installation can require EPA Section 608 certification. If a job touches the refrigerant circuit, that’s pro territory.
Step-by-Step: How a Ductless Heat Pump Is Installed (Safely and Properly)
Step 1: Confirm system design, zones, and line-set paths
Before tools come out, your installer should confirm:
- Single-zone vs. multi-zone layout
- Indoor unit locations and mounting heights
- Outdoor unit location and service clearance
- Line-set route (refrigerant piping, wiring, drain line)
- Electrical route and disconnect location
This planning stage is where good installers prevent ugly exterior line runs, awkward indoor placement, and future service headaches.
Step 2: Mount the indoor unit bracket
For wall-mounted units, the installer mounts a metal bracket plate on the wall, making sure it is level and properly anchored. This bracket supports the indoor unit and sets the alignment for the line-set penetration through the wall.
A small wall penetration is then created for the line set, wiring, and drain. Ductless systems usually need only a small opening, which is one reason they’re so popular for retrofits and finished spaces.
Step 3: Create a clean, protected wall penetration
A professional installation uses a properly sized wall sleeve and sealant to protect the opening from water intrusion, pests, and air leakage. This is also where drain routing matters: the condensate line needs proper slope so water exits the system instead of backing up into the wall.
This step looks simplebut sloppy wall penetrations are a major source of future leaks and “why is there a stain on the drywall?” phone calls.
Step 4: Set the outdoor unit on a stable base
The outdoor condenser is placed on a pad, bracket, or stand designed for the unit’s weight and local conditions. A solid, level base reduces vibration, noise, and long-term wear. In snowy or wet climates, the unit may be raised to improve drainage and avoid ice or snow buildup.
The installer should also leave enough clearance around the outdoor unit for airflow and service access. Cramping the unit into a tight corner may look neat on day one, but it can hurt performance and make maintenance frustrating.
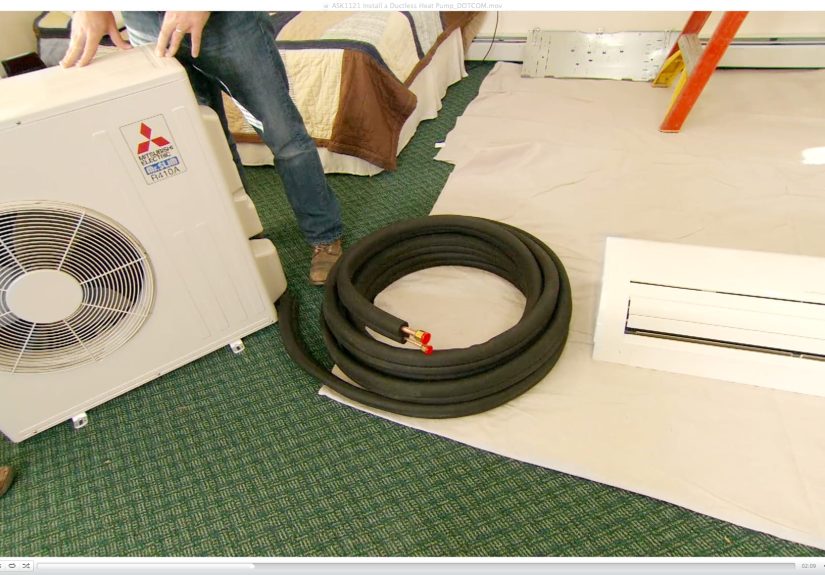
Step 5: Run the line set, communication cable, and drain line
The indoor and outdoor units are connected by:
- Refrigerant piping (line set)
- Electrical/communication wiring
- Condensate drain line
These are typically bundled and protected with line-hide covers or UV-resistant materials on exterior walls. The best installations look intentional and tidynot like a rushed science fair project attached to your siding.
The installer also follows manufacturer routing rules, bending limits, and protection requirements so the piping isn’t kinked or damaged. Physical protection for refrigerant piping is especially important where the line set is exposed.
Step 6: Complete code-compliant electrical work (licensed electrician)
Ductless heat pumps require a dedicated power circuit and proper overcurrent protection. The installation also usually includes an outdoor disconnect switch within sight of the equipment (as required by local code). Wiring must match the manufacturer’s requirements and local/national electrical code.
This is not the place to “just make it fit.” Incorrect wiring can cause nuisance shutdowns, communication errors, component damage, or serious hazards.
Step 7: Connect refrigerant lines and perform commissioning tests (licensed HVAC tech)
Once the equipment is mounted and wired, a licensed HVAC technician completes the refrigerant-side work and commissioning. A quality install should include professional verification steps such as:
- Nitrogen pressure testing
- Vacuum decay testing
- Refrigerant charge verification
- Controls verification
These steps are not “extra credit.” They’re what separate a system that merely runs from a system that performs efficiently, lasts longer, and avoids avoidable callbacks.
Step 8: Startup, drain check, and final walkthrough
During startup, the installer verifies heating and cooling operation, airflow, drainage, thermostat/remote behavior, and basic sound/vibration levels. They should also show the homeowner how to:
- Operate the controls and modes
- Clean the indoor filters
- Recognize signs of a drainage issue
- Schedule maintenance and service
If the contractor leaves before doing a drain check, ask for one. A five-minute test now can save a very annoying drywall repair later.
Common Ductless Heat Pump Installation Mistakes to Avoid
Oversizing the unit
Bigger is not always better. Oversized heat pumps can cycle too often, reduce dehumidification, and feel less comfortable even if they technically meet the temperature setpoint.
Bad indoor unit placement
Installing the indoor head where airflow is blocked (behind doors, near obstructions, or pointed awkwardly) can create hot/cold spots. Placement should support even air distribution across the room.
Poor drain line slope
Condensate drainage problems are one of the most common mini-split complaints. Kinks, poor slope, or improperly terminated drains can cause leaks, odors, and mold issues.
Skipping commissioning tests
If the installer doesn’t verify the refrigerant side and controls with proper testing, you’re basically hoping for the best. Hope is nice. Test results are better.
Ignoring the house envelope
Even a great heat pump won’t perform well in a drafty house. Air sealing and insulation can dramatically improve comfort and efficiency, especially in older homes.
How Long Does Installation Take?
A straightforward single-zone ductless heat pump installation can often be completed in about a day, especially when the line-set route is simple and electrical work is already planned. Multi-zone systems, harder wall access, long line runs, or panel upgrades can take longer.
The biggest schedule variables are usually:
- Number of indoor heads (zones)
- Electrical upgrades or panel work
- Challenging line routing (brick, concrete, finished spaces)
- Permit/inspection timing
- Weather (especially for exterior work)
What Installation Costs Usually Include
When comparing quotes, make sure you’re comparing the same scope. A low quote may not include everything you need. A good quote typically separates:
- Equipment (indoor + outdoor units)
- Line set and protective line-hide materials
- Mounting pad/bracket/stand
- Electrical work (breaker, disconnect, wiring)
- Labor and commissioning
- Permit fees (sometimes separate)
Also ask whether the quote includes startup documentation and manufacturer warranty registration. That paperwork matters more than people think.
Maintenance After Installation
A ductless heat pump is not a “set it and forget it forever” system. Fortunately, routine maintenance is simple:
- Clean or wash indoor filters regularly (follow the manual)
- Keep the outdoor unit free of leaves, snow, and debris
- Check for blocked condensate drainage
- Schedule periodic professional service
Think of it like owning a good coffee machine: small regular care keeps performance high and prevents expensive surprises.
Real-World Installation Experiences (Extra Section)
One of the most common homeowner experiences with a ductless heat pump installation is surprise at how little demolition is involved. People expect a major construction project, but in many homes the visible work is limited to mounting the indoor unit, drilling a small wall opening, running a neat exterior line cover, and setting the outdoor unit. That’s a huge reason mini-splits have become so popular in older houses, converted attics, home offices, and garage workshops.
Another common experience: the quote process teaches homeowners more about their house than they expected. A good contractor doesn’t just ask, “What size system do you want?” They ask how the room is used, whether doors stay open, how sunny the space gets, how old the windows are, and whether the home feels drafty in winter. That can be eye-opening. Many people start out shopping for a machine and end up learning they also need air sealing or insulation to get the comfort they want.
Noise is another real-world topic. Homeowners often worry the indoor head will be loud, but many are surprised by how quiet ductless systems feel in normal operation. The bigger lesson is usually outside placement: if the outdoor unit is too close to a bedroom window, deck seating area, or tight reflective corner, even a relatively quiet unit can be more noticeable than expected. Installers who think through placement early tend to avoid this problem.
In cold-weather regions, people also discover that “heat pump performance” is really a system design conversation, not just a brand conversation. The installation experience is better when the contractor explains cold-climate sizing, defrost behavior, and realistic expectations during very low temperatures. Homeowners who get that education upfront are usually much happier than those who were simply told, “It’ll work great,” with no context.
A frequent post-install experience is improved comfort in rooms that were hard to heat or cool before. Bonus rooms above garages, sunrooms, upstairs bedrooms, and additions often become the “wow” spaces. Homeowners also like zoning controlespecially in houses where one person is always cold and another somehow believes 66°F is a personality trait.
The less fun experience, when it happens, is usually tied to installation shortcuts: a drain line with poor slope, messy exterior line routing, no commissioning paperwork, or an oversized unit that cycles too much. These issues are rarely caused by the heat pump technology itself. They’re usually installation quality problems. That’s why choosing a strong installer matters as much as choosing the equipment brand.
The best homeowner experiences tend to have three things in common: a proper load calculation, clear discussion of placement options, and a final walkthrough that explains operation and maintenance. When those pieces are in place, a ductless heat pump installation feels less like a risky project and more like a smart upgrade that pays off in comfort, efficiency, and everyday convenience.
Conclusion
Installing a ductless heat pump is one of the most practical ways to add efficient heating and cooling without tearing open your house for ductwork. The key is to treat installation as a system design and commissioning projectnot just a hardware purchase. If you size it correctly, place it thoughtfully, and use licensed professionals for electrical and refrigerant work, you’ll get the comfort and efficiency ductless systems are famous for.
In short: plan carefully, install cleanly, test thoroughly, and enjoy the fact that your home finally has a room-by-room comfort upgrade that doesn’t involve window units, noisy space heaters, or thermostat arguments.


