
Table of Contents >> Show >> Hide
- Before You Launch: Safety (Seriously, This Part Matters)
- What You’ll Need
- 11 Steps to Make a Baking Soda and Vinegar Rocket
- Step 1: Pick a launch site with lots of open space
- Step 2: Put on eye protection and set ground rules
- Step 3: Build a simple stand so the rocket can launch straight
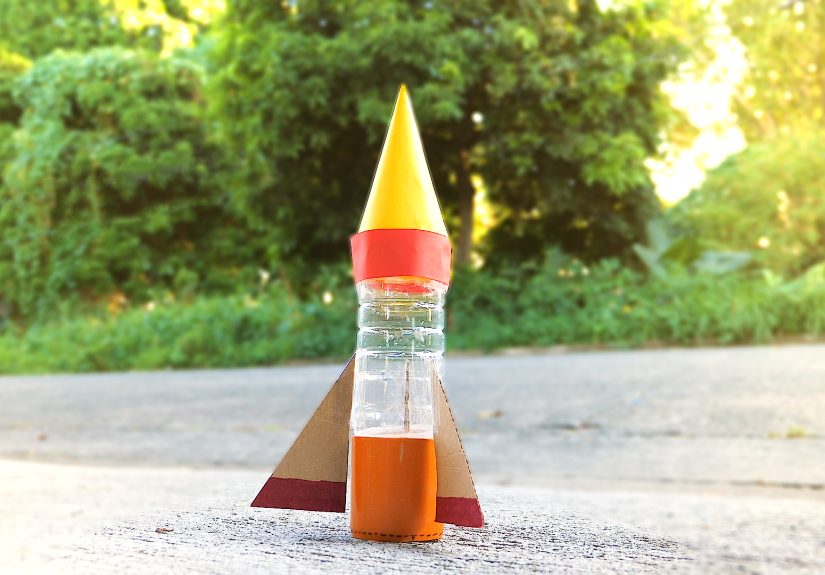
- Step 4: (Optional) Decorate your rocket
- Step 5: Measure and pour vinegar into the bottle
- Step 6: Make a baking soda “fuel packet”
- Step 7: Check your cork/stopper fit (the Goldilocks test)
- Step 8: Get into launch position before you combine anything
- Step 9: Load the baking soda packet into the bottle (don’t drop it yet)
- Step 10: Seal, flip, and set it on the standthen back away
- Step 11: Launch, observe, and record what happened
- What’s Happening Inside the Rocket (The Science, Minus the Snooze)
- Troubleshooting: If Your Rocket Won’t Launch (Or Launches… Weird)
- Make It a Real Experiment: Easy Variables to Test
- Cleanup and Disposal
- FAQ
- Real-World Launch Lessons: of Experience (So Your First Mission Goes Better)
- Final Takeaway
Want to launch a “rocket” with supplies that live in your kitchen pantry? A baking soda and vinegar rocket is the classic
STEM activity that turns fizz into lift-off. It’s messy in the best way, surprisingly educational, and a great reminder
that science doesn’t always wear a lab coatsometimes it wears safety goggles and smells faintly like salad dressing.
This guide walks you through an easy, safer, small-scale rocket build, plus the science behind the pop, troubleshooting tips,
and fun variations. Do it outside, protect your eyes, and treat your rocket like a tiny, enthusiastic surprise: give it space and
don’t put your face over it. Your eyebrows will thank you.
Before You Launch: Safety (Seriously, This Part Matters)
- Adult supervision is recommendedespecially for younger kids and for handling the launch setup.
- Wear eye protection (goggles are best; sunglasses are better than nothing).
- Launch outdoors in a clear area away from people, pets, cars, windows, and anything breakable.
- Never lean over the rocket once it’s sealed. Step back and wait for the “surprise.”
- Use plastic only (no glass containersever).
- Keep amounts modest. Bigger bottles and bigger loads can mean bigger force and bigger mess.
What You’ll Need
- 1 small plastic bottle (12–20 oz works great; a 2-liter is powerful but not necessary)
- White vinegar
- Baking soda
- Paper towel or tissue (for a “fuel packet”)
- A cork or soft rubber stopper that fits the bottle opening snugly (not permanently!)
- Funnel (optional, but it saves your sanity)
- Measuring spoons
- Tape (duct tape or masking tape)
- Launch stand materials (choose one): three unsharpened pencils, sturdy straws, cardboard, or small blocks
- Safety goggles
- Optional decorations: paper fins, stickers, markers (because every rocket deserves a glow-up)
11 Steps to Make a Baking Soda and Vinegar Rocket
Step 1: Pick a launch site with lots of open space
Find a flat outdoor spotdriveway, sidewalk, patio, or a clear patch of grass. Make sure everyone can stand well back.
The goal is “wow!” not “why is there vinegar on my shoe?”
Step 2: Put on eye protection and set ground rules
Goggles on. Hair tied back. No one stands in the launch zone. No one looks down the bottle. No one “helps” by holding
the rocket when it’s sealed. (Science is fun. Medical bills are not.)
Step 3: Build a simple stand so the rocket can launch straight
You need the bottle to rest upside down (cap/cork toward the ground) without falling over. Try one of these easy stands:
- Pencil tripod: Tape three unsharpened pencils evenly around the bottle like legs.
- Straw legs: Tape 3–4 sturdy straws around the upper part of the bottle as supports.
- Cardboard cradle: Cut a snug hole in thick cardboard so the bottle neck can sit centered.
Test the stand with the empty bottle first. If it wobbles now, it’ll face-plant laterusually at the exact moment you’re
feeling confident.
Step 4: (Optional) Decorate your rocket
Add paper fins, draw a window, slap on stickersjust keep decorations light and avoid blocking the bottle opening.
A top-heavy rocket tends to topple, which is less “NASA” and more “sad penguin.”
Step 5: Measure and pour vinegar into the bottle
Start small: pour about 1/4 to 1/3 cup of vinegar into the bottle (roughly 2–3 inches deep for a 12–20 oz bottle).
This gives you enough liquid to react without turning your yard into a vinaigrette slip-n-slide.
Step 6: Make a baking soda “fuel packet”
Tear off a small square of tissue or paper towel. Put 1 tablespoon of baking soda in the center, then roll it up
into a tight little log and twist the ends. The packet delays the reaction for a momentjust long enough to seal and flip.
Make 2–3 extra packets so you can launch again without resetting your whole “rocket program.”
Step 7: Check your cork/stopper fit (the Goldilocks test)
Insert the cork into the bottle opening without vinegar inside (dry test). You want it snug enough to hold briefly, but not
so tight that you have to wrestle it like a jar lid in a sitcom. If it takes superhero strength, choose a different stopper.
Step 8: Get into launch position before you combine anything
Place your stand on the ground. Set the vinegar bottle nearby. Make sure your “mission control” spectators are already
standing back. The next steps move fast, and a smooth setup is safer than a frantic “WAITWHERE’S THE CORK?”
Step 9: Load the baking soda packet into the bottle (don’t drop it yet)
Tip the bottle slightly and slide the packet into the neck so it hangs near the opening, not fully submerged.
Some bottle necks will “catch” the packet for a seconduse that moment to get ready to seal.
Step 10: Seal, flip, and set it on the standthen back away
Push the cork/stopper into the bottle opening. Hold it firmly, flip the bottle upside down, and quickly place it onto
the stand with the cork toward the ground.
Now step back immediately. Don’t hover. Don’t peek. Don’t lean in for “just a quick look.” The reaction is building
carbon dioxide gas, pressure rises, and the cork will pop when it’s readylike a tiny fizzy countdown you can’t negotiate with.
Step 11: Launch, observe, and record what happened
When the cork pops, the rocket lifts off. Watch where it goes, how high it gets, and how quickly it launches. If you want to
turn this into a real experiment, jot down:
- How much vinegar you used
- How much baking soda you used
- How long until launch
- Approximate height (even “low / medium / high” is a start)
What’s Happening Inside the Rocket (The Science, Minus the Snooze)
Baking soda (sodium bicarbonate) and vinegar (acetic acid) react in an acid-base reaction that produces carbon dioxide gas,
water, and sodium acetate. The important part for rocketry is the carbon dioxide gas.
Gas takes up more space than the original dissolved ingredients, so it builds pressure in the sealed bottle. Once the pressure
is high enough, it forces the cork out. That fast push downward creates an equal-and-opposite push upward (hello, Newton’s
Third Law), and your bottle launches.
Translation: you’re turning pantry fizz into thrust. Deliciously nerdy.
Troubleshooting: If Your Rocket Won’t Launch (Or Launches… Weird)
Problem: Nothing happens
- The cork is too loose: If gas escapes around the sides, pressure never builds. Try a better-fitting stopper.
- The packet dissolved too slowly: Use a thinner tissue/paper towel or a smaller packet so it breaks down faster.
- Not enough reactants: Increase vinegar slightly or use a bit more baking soda (in small increments).
Problem: It fizzes immediately and leaks everywhere
- The packet fell in too soon: Have the cork ready, and insert the packet so it sits near the top until you seal.
- Too much liquid: Reduce vinegar so there’s more air space for gas pressure to build.
Problem: It pops, but barely lifts off
- Too much “dead weight”: Heavy decorations and thick tape can reduce lift.
- Unstable stand: If the rocket tips, thrust goes sideways instead of up.
- Ratio mismatch: Try adjusting amounts; sometimes one ingredient becomes “the limiter” and extra doesn’t help.
Make It a Real Experiment: Easy Variables to Test
Once you’ve had a successful launch, you can run “official rocket trials” like a backyard scientist. Change only one thing at
a time and keep the rest the same.
- Vinegar amount: 1/4 cup vs. 1/3 cup vs. 1/2 cup
- Baking soda amount: 1 tsp vs. 2 tsp vs. 1 tbsp
- Packet style: tissue vs. paper towel, tight roll vs. loose fold
- Bottle size: small bottle vs. larger bottle (with extra caution and supervision)
- Launch stability: pencil tripod vs. cardboard cradle
You’ll notice a pattern: more isn’t always better. If you add a lot of baking soda but don’t have enough vinegar to react with
it (or vice versa), you hit a point where extra ingredient doesn’t produce extra gas. That’s a classic chemistry concept in action:
the reaction can be limited by whichever ingredient runs out first.
Cleanup and Disposal
The leftovers are mostly diluted vinegar solution and harmless salts. Rinse the bottle with water, wipe the area if needed,
and wash hands. If your launch site smells like a deli counter, a quick hose-down fixes it.
FAQ
Is this safe for kids?
It can be a great family STEM activity with eye protection, outdoor space, and adult supervision. The biggest risks come from
pressurization and the cork poppingso distance and good rules are key.
Do I need a cork?
You need something that seals temporarily and pops under pressure. A soft rubber stopper often works well. Whatever you use,
it must not permanently seal the bottle, and nobody should be in the launch path.
Why use a baking soda packet instead of dumping it in?
The packet buys you a few seconds so you can seal and flip the bottle before the reaction goes full fizz-mode. It also makes
launches more consistent, which is great if you’re testing different ratios.
Real-World Launch Lessons: of Experience (So Your First Mission Goes Better)
Most people imagine a baking soda and vinegar rocket as a neat little “3…2…1…” moment followed by a polite hop. In reality,
the first launch is often a comedy of tiny misunderstandings between humans and chemistry. The good news? Those “oops”
moments are basically the curriculum.
For example, a very common first-time outcome is The Instant Volcano: you drop the baking soda in, the bottle foams like
it’s auditioning for a soda commercial, and suddenly everyone is doing the awkward backyard shufflehalf laughing, half
realizing vinegar travels farther than expected. That’s not failure; that’s a lesson in timing and why the fuel packet exists.
Next attempt, you’ll stage everything first: cork in hand, stand ready, spectators back. Magically, you look 70% more like
a responsible rocket engineer.
Another classic is The Silent Treatment, where your sealed rocket just sits there like it’s thinking deep thoughts.
People hover. People lean in. People get tempted to “check” the cork. Resist that urge. When it finally launches, it often does
so the moment you look awaybecause rockets have a sense of humor and enjoy dramatic timing. If it truly won’t go after a
reasonable wait, the usual culprit is a leaky seal. That’s when you learn the art of the snug-but-not-stuck stopper: tight enough
to build pressure, not so tight you need a tool (or a personal pep talk) to remove it.
After a few launches, you start noticing patterns that feel oddly satisfying. A thinner packet breaks down faster. Extra vinegar
can make a bigger splash but not always a bigger launch. A sturdier stand makes the flight straighter. And you’ll discover that
“rocket design” matters more than you’d thinkpencil legs spaced evenly, a bottle that’s not dented, decorations that don’t turn
it into a lopsided parade float.
The best “experience upgrade,” though, is turning launches into trials. Run three launches with the same vinegar amount and
three different baking soda amounts. Write down what happens. Suddenly you’re not just launching a bottleyou’re doing real
experimentation: controlling variables, observing outcomes, and refining a method. That’s the part kids (and adults) remember,
because it feels like discovery instead of instructions.
And yes, someone will always ask, “Can we make it go higher?” The most useful experience-based answer is: “We can make it
go smarter.” Higher isn’t the only victory. A consistent countdown, a stable launch, and a repeatable resultthat’s the kind of
rocket program that would make a science teacher nod with pride (and would keep your backyard from becoming an accidental
pickle jar).
Final Takeaway
A baking soda and vinegar rocket is a perfect blend of simple supplies and big “whoa!” energy. Start small, stay safe, and treat
every launch like a mini science mission: plan, test, learn, adjust, repeat. Once you’ve nailed the basics, the real fun begins
not just in the height of the launch, but in how well you can make it launch on purpose.


