
Table of Contents >> Show >> Hide
- What Is a DIY Window Shade?
- Why Make Your Own Window Shade?
- Before You Start: Pick the Right Window
- Tools and Materials You Need
- Choose the Best Fabric for a 15-Minute Shade
- How To Measure for a DIY Window Shade
- The 15-Minute DIY Window Shade Plan
- Renter-Friendly Version
- Design Ideas for DIY Window Shades
- Common Mistakes To Avoid
- Safety Note: Keep It Cordless
- How To Clean a DIY Fabric Window Shade
- When a 15-Minute DIY Shade Is Not Enough
- Real-Life Experience: What This Project Actually Feels Like
- Conclusion
There are two kinds of windows in a home: the ones that look charming and intentional, and the ones that suddenly make you feel like you are living inside a display case at a furniture store. If your window is currently giving “fishbowl with curtains pending,” good news: you do not need a sewing machine, a professional installer, or an entire lost weekend to fix it. You can make a simple DIY window shade in about 15 minutes with fabric, a wood strip, a dowel, basic tools, and a tiny bit of confidence.
This quick project is best described as a no-sew faux Roman shade or fixed fabric window shade. It gives you privacy, softens harsh sunlight, adds color or texture, and makes a room look finished fast. It is especially useful for kitchens, bathrooms, laundry rooms, home offices, rental spaces, small windows, and awkward little panes that refuse to cooperate with standard curtains.
The goal is not to build a complicated, corded shade system. In fact, skipping cords makes this project faster and safer. Instead, you will create a tailored fabric panel mounted at the top of the window, with a neat weighted bottom edge. The result looks polished, hangs smoothly, and does not require you to whisper encouraging words to a bobbin.
What Is a DIY Window Shade?
A DIY window shade is a handmade window covering designed to block light, improve privacy, or decorate a window without relying on custom-made blinds. Depending on your materials, it can look casual, elegant, farmhouse-inspired, modern, coastal, playful, or “I absolutely meant to do that.”
For this 15-minute version, the shade is made from fabric attached to a narrow wood mounting strip. A small dowel or lightweight rod is rolled into the bottom edge to help the shade hang straight. The shade can be mounted inside the window frame for a clean built-in look or outside the frame for more light coverage.
Why Make Your Own Window Shade?
Custom shades can be beautiful, but they can also cost more than the actual window emotionally deserves. A DIY fabric shade lets you choose the color, pattern, opacity, and size. You can match the room’s personality instead of settling for “landlord beige,” which is technically a color but spiritually a sigh.
DIY window shades are also practical. They can reduce glare on screens, cover a window over a sink, soften a bathroom, hide a not-so-scenic view, and make a room feel warmer. If you use thicker fabric or add lining, the shade can also help block stronger sunlight. For a full energy-saving solution, professionally made cellular shades may perform better, but for a quick decorative privacy fix, this simple method is surprisingly effective.
Before You Start: Pick the Right Window
This fast DIY window shade works best on smaller or medium-size windows. Think kitchen windows, powder room windows, laundry room windows, small bedroom windows, or glass panes in doors. Very wide windows may need a stronger wood strip, extra brackets, or a more structured shade design.
Also consider how often you need to open and close the covering. This 15-minute version is ideal when you want a fixed shade, a decorative faux Roman shade, or a privacy panel that mostly stays in place. If you need a shade that moves up and down every day, choose a cordless roller shade, cellular shade, or a more advanced Roman shade design with safe hardware.
Tools and Materials You Need
Basic Supplies
- Fabric panel, tea towel, curtain panel, pillowcase fabric, or medium-weight cotton
- One narrow wood strip, such as a 1×2 board or thin furring strip
- Small wooden dowel, tension rod, or lightweight round rod for the bottom edge
- Measuring tape
- Scissors or rotary cutter
- Staple gun and staples
- Drill or screwdriver
- Two screws for mounting
- Iron or fabric steamer, if the fabric is wrinkled
Optional Supplies
- Fusible hem tape for cleaner no-sew edges
- Fabric glue for quick edge finishing
- Blackout lining for stronger light blocking
- Decorative trim, ribbon, or tassels
- Command-style hooks or tension rod for renter-friendly mounting
Choose the Best Fabric for a 15-Minute Shade
The fabric makes the project. A medium-weight cotton, linen blend, canvas, ticking stripe, drop cloth, or sturdy curtain panel works well. Avoid stretchy knits because they can sag like a tired hammock. Avoid very sheer fabric unless your goal is “privacy, but make it theoretical.”
For kitchens, washable cotton is a smart choice. For bathrooms, choose fabric that can handle humidity and dries easily. For bedrooms, consider heavier fabric or add blackout lining if you need more light control. For a cheerful breakfast nook, a striped or floral fabric can make the window look styled instead of forgotten.
How To Measure for a DIY Window Shade
Accurate measuring is what separates a crisp DIY window shade from a fabric rectangle having an identity crisis. First, decide whether you want an inside mount or outside mount.
Inside Mount
An inside mount sits within the window frame. It looks clean, modern, and built-in. Measure the width inside the frame at the top, middle, and bottom. Use the narrowest measurement so the shade fits without scraping the sides. Then measure the height from the top of the frame to the sill.
Outside Mount
An outside mount sits on the wall or trim above the window. It is better for blocking more light and hiding uneven frames. Measure the full window width, then add 2 to 4 inches total for better coverage. Measure from where the shade will hang down to where you want it to end.
The 15-Minute DIY Window Shade Plan
This method is fast because it uses simple construction: staple the fabric to a mounting strip, roll a dowel into the bottom edge, and attach the strip to the window frame. No sewing machine. No complicated pulleys. No crying into the instruction manual.
Minute 1–2: Measure the Window
Measure your window width and desired shade length. If you are mounting inside the frame, cut the wood strip slightly narrower than the window opening so it fits easily. If you are mounting outside the frame, cut the wood strip to match the shade width or slightly wider for a more substantial look.
Minute 3–5: Cut or Prepare the Fabric
Lay your fabric flat. Cut it to the desired width and length, leaving enough extra fabric at the top to wrap around the wood strip and enough at the bottom to wrap around the dowel. If you are using a pre-finished curtain panel, tea towel, or fabric remnant with finished edges, congratulations: you just saved yourself several minutes and earned a tiny imaginary trophy.
If the edges look rough, fold them under and press with an iron. You can use fusible hem tape or fabric glue if you want a cleaner finish. For a true 15-minute project, focus on the visible edges and do not obsess over the back. The wall has seen worse.
Minute 6–8: Attach the Fabric to the Wood Strip
Place the wood strip along the top back side of the fabric. Wrap the fabric over the strip and staple it securely along the back. Pull the fabric smooth as you staple, but do not stretch it. A staple every few inches is usually enough for a small shade.
Make sure the front side looks straight before moving on. If your fabric has stripes or a bold pattern, check that the pattern is level. Crooked stripes are not a design feature; they are a daily reminder that gravity has won.
Minute 9–11: Add the Bottom Dowel
Place the dowel along the bottom edge of the fabric and roll the fabric around it once or twice. This creates a neat, weighted edge that helps the shade hang evenly. Secure the roll with a few staples, small hand stitches, fabric glue, or safety pins hidden on the back.
The dowel gives the shade structure. Without it, the bottom may curl, wave, or flap dramatically every time the air conditioner turns on. With it, the shade looks intentional and finished.
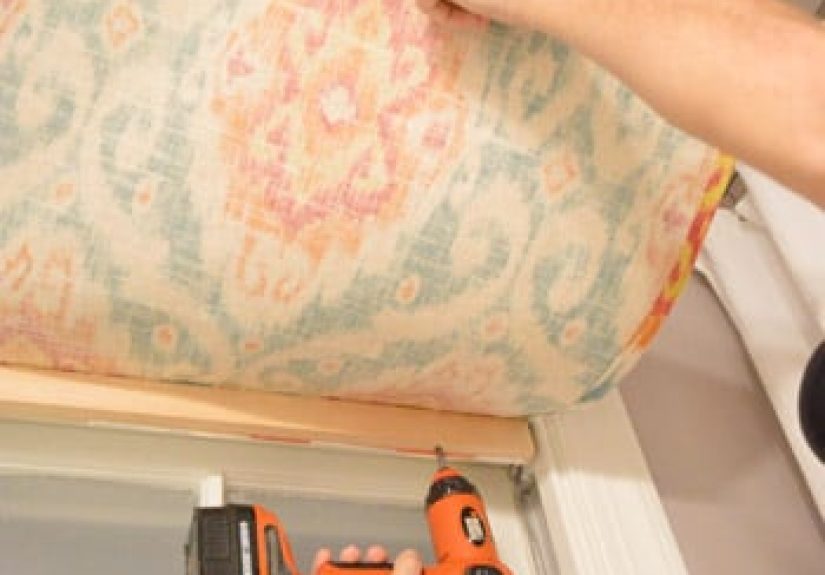
Minute 12–15: Mount the Shade
Hold the wood strip in place at the top of the window frame. Drill pilot holes if needed, then drive screws through the wood strip into the frame or wall. For an inside mount, screw upward or forward into the top of the frame depending on the window structure. For an outside mount, screw the strip into the trim or wall above the window.
Step back and adjust the fabric folds. Smooth the front, straighten the bottom, and gently tug the corners if needed. In 15 minutes, your window has gone from “unfinished business” to “I have my life together, at least in this one corner.”
Renter-Friendly Version
If you rent and cannot drill into the frame, use a tension rod instead of a wood strip. Fold the top of the fabric over the rod and secure it with clip rings, fabric glue, iron-on hem tape, or even neat safety pins on the back. Place a second small rod or dowel at the bottom to keep the shade straight.
Another option is a magnetic shade for metal doors. Sew-free magnetic window covers can work well on steel entry doors with glass panes. Use strong magnets sewn or glued into the side hems, then press the fabric directly onto the door. It is simple, removable, and ideal for people who enjoy privacy but not patching holes.
Design Ideas for DIY Window Shades
1. The Café Kitchen Shade
Use a striped cotton fabric, flour sack towel, or cheerful vintage-style print. This works beautifully over a kitchen sink, especially if your view is less “rolling garden” and more “neighbor’s recycling bin.”
2. The Linen Bathroom Shade
A neutral linen-look fabric adds softness without making the bathroom feel heavy. Choose a washable material and avoid fabric that absorbs too much moisture.
3. The Faux Roman Shade
Create soft folds by gently tacking the fabric at the back in two or three places. This gives the appearance of a Roman shade without the lifting mechanism. It is decorative, fast, and charmingly low-stress.
4. The Blackout Bedroom Shade
Use heavier fabric and add blackout lining with fusible hem tape. This version may take longer than 15 minutes, but it improves privacy and reduces early morning light. Your future sleeping self may send a thank-you card.
5. The Pattern Pop Shade
If the room is mostly neutral, choose a bold floral, geometric print, block print, or colorful stripe. Small windows are a safe place to experiment with pattern because they add personality without taking over the whole room.
Common Mistakes To Avoid
Using Fabric That Is Too Thin
Thin fabric can look limp and may not provide enough privacy. Hold the fabric up to a bright window before using it. If you can clearly see shapes through it, consider doubling it or adding lining.
Skipping the Bottom Weight
The dowel is small but mighty. It helps the shade hang straight and gives the bottom edge a finished look. Skipping it can make the shade appear wrinkled or floppy.
Forgetting About Window Hardware
Check for locks, handles, cranks, or trim that might get in the way. A window shade should not block the window from opening if you use that window for ventilation.
Mounting Without Checking Level
Even a tiny tilt can be noticeable. Use a level or measure down from the top of the frame on both sides before attaching the strip.
Safety Note: Keep It Cordless
For homes with babies, young children, or pets, cordless window coverings are the safer choice. Avoid creating long dangling cords or loops. Keep furniture, beds, cribs, and toys away from windows and window coverings. This 15-minute DIY shade design is intentionally cord-free, which makes it simple and safer for everyday home use.
How To Clean a DIY Fabric Window Shade
Dust the shade regularly with a microfiber cloth, lint roller, or vacuum brush attachment. If the fabric is removable, hand wash or machine wash according to the fabric type. For kitchen shades, choose fabric that can handle occasional grease or steam. For bathrooms, let the room ventilate after showers to reduce moisture buildup.
If the shade is attached with staples, spot cleaning is easiest. Use mild soap and a damp cloth, then blot dry. Do not soak the wood strip or dowel. Wood and water have a complicated relationship, and not the cute kind.
When a 15-Minute DIY Shade Is Not Enough
This quick project is excellent for style, privacy, and light filtering, but it is not the best solution for every window. If you need daily adjustability, strong insulation, blackout performance, or professional child-safe operation, consider cordless roller shades, cellular shades, solar shades, or custom Roman shades.
For large windows or patio doors, a simple fabric panel may look undersized. In those spaces, a properly installed shade system or curtains may be more functional. The 15-minute DIY shade shines brightest on smaller windows where speed, charm, and budget matter most.
Real-Life Experience: What This Project Actually Feels Like
The first time you make a DIY window shade in 15 minutes, you may spend the first five minutes confidently gathering supplies and the next two minutes wondering why scissors are always in the last drawer you check. That is normal. The beauty of this project is that it does not require perfection. It rewards momentum.
One of the best experiences with this kind of shade is how quickly a room changes. A bare kitchen window can make the whole space feel unfinished, even if the counters are clean and the coffee maker is doing its heroic daily work. Add a simple fabric shade, and suddenly the room feels warmer. The window becomes part of the design instead of an empty rectangle silently judging your backsplash.
Fabric choice also becomes surprisingly fun. A leftover curtain panel can feel brand new when cut down into a custom shade. A tea towel can become a charming café-style covering. A drop cloth can look relaxed and rustic. A bold print can turn a tiny laundry room window into the most cheerful part of the house, which is useful because laundry itself rarely brings that energy.
The most satisfying moment is attaching the shade and stepping back. Before installation, the materials look almost suspiciously simple: fabric, wood, dowel, staples. After installation, they look like a finished window treatment. It is one of those rare DIY projects where the gap between effort and reward is delightfully unfair in your favor.
There are, however, a few lessons you learn fast. First, iron the fabric if it is wrinkled. A wrinkled shade still works, but it may look like it just woke up from a nap under a pile of laundry. Second, check the pattern before stapling. Stripes, checks, and geometric prints are honest little tattletales. They will reveal even the slightest angle. Third, do not skip the bottom dowel. It gives the shade weight, shape, and dignity.
Another practical lesson is to test privacy at night. Some fabrics look perfectly private in daylight but become surprisingly transparent when the room is lit after dark. Before committing, hold the fabric against the window and turn on the room lights. If the outside view becomes a shadow puppet theater, add lining or choose a thicker fabric.
This project is also a great confidence builder for people who feel nervous about home improvement. You are not rewiring a ceiling fan or building a deck. You are covering a window with fabric in a smart, attractive way. The tools are simple, the budget is friendly, and the risk level is low. If something goes wrong, you can remove a staple, straighten the fabric, or cut a new panel. The house will forgive you.
For renters, the tension rod version is especially satisfying. It gives the look of a custom shade without holes, screws, or awkward conversations with a landlord. For homeowners, the mounted wood-strip version feels sturdier and more finished. Both versions prove that window treatments do not have to be complicated to look good.
The biggest takeaway is this: a DIY window shade is not just a quick fix. It is a small design upgrade that makes a room feel cared for. In 15 minutes, you can add privacy, soften light, introduce pattern, and solve that one window that has been annoying you for months. That is a pretty good return on a quarter hour, especially compared with scrolling online for “affordable custom shades” and accidentally losing 90 minutes of your life.
Conclusion
Learning how to make a DIY window shade in 15 minutes is a simple way to upgrade your home without spending much money or dragging out complicated tools. With fabric, a wood strip, a dowel, and a few staples, you can create a clean, cordless window covering that adds privacy and style fast.
The key is choosing the right fabric, measuring carefully, keeping the design simple, and using a bottom dowel for a polished finish. Whether you want a no-sew kitchen shade, a renter-friendly window treatment, or a quick faux Roman shade, this project proves that small DIY upgrades can make a big visual difference.
Note: This 15-minute DIY window shade is designed as a quick cordless decorative and privacy solution. For windows that require frequent raising and lowering, choose a professionally made cordless shade or a properly installed window treatment system.


