
Table of Contents >> Show >> Hide
- Why a Fall Wreath Works So Well
- Supplies You’ll Need
- Step 1: Choose Your Fall Wreath Style Before You Glue Anything
- Step 2: Prep the Base
- Step 3: Build Your Main Shape
- Step 4: Add Layers of Texture
- Step 5: Fill Gaps Without Overcrowding the Design
- Step 6: Add the Ribbon or Bow
- Step 7: Secure Everything Properly
- Easy Fall Wreath Variations to Try
- Common Mistakes to Avoid
- How to Hang a Fall Wreath
- How to Store and Refresh Your Wreath
- Final Thoughts on Making a Fall Wreath
- Real Experiences and Lessons From Making a Fall Wreath
There are two kinds of people in autumn: the ones who casually place one tasteful pumpkin by the door, and the ones who suddenly believe they are woodland designers with access to unlimited ribbon. This guide is for both. If you’ve been wondering how to make a fall wreath that looks charming instead of chaotic, cozy instead of cluttered, and seasonal instead of “my craft bin exploded,” you’re in the right place.
A great DIY fall wreath does not require a design degree, a glue-gun PhD, or a backyard full of rare botanicals harvested at sunrise. It just needs a solid base, a clear color story, a few textures, and the good judgment to stop adding things before your front door looks like it lost a fight with a pumpkin patch. The good news is that making a front door wreath for fall is easier than most people think. The even better news is that once you learn the basic method, you can customize it for rustic, modern, farmhouse, boho, elegant, spooky, or “I saw this on social media and now I must prove I can do it too” style.
In this step-by-step tutorial, you’ll learn what supplies to buy, how to choose a wreath base, how to arrange fall foliage, and how to build a wreath that actually looks balanced. You’ll also get practical tips for hanging, storing, and refreshing your wreath so it survives more than three windy afternoons and one aggressive package delivery.
Why a Fall Wreath Works So Well
A fall wreath is one of the easiest ways to make your home feel seasonal without redecorating every square inch. It adds instant personality to a front door, porch wall, entryway mirror, or mantel. It also creates that warm “someone here probably bakes something with cinnamon” energy, even if the closest you’ve come to baking lately is opening store-bought cookies with determination.
The beauty of autumn wreath ideas is their flexibility. You can go natural with dried leaves, wheat, twigs, acorns, and pinecones. You can lean classic with faux maple leaves, berries, burlap ribbon, and mini pumpkins. Or you can create a modern fall wreath with a metal hoop, asymmetrical florals, muted colors, and just enough drama to make your neighbors pretend not to be impressed.
Supplies You’ll Need
Before you start, gather your tools and materials in one place. This saves time and prevents that classic DIY moment when you’re holding a half-glued stem in one hand and yelling, “Where are the wire cutters?” into the void.
Basic Wreath-Making Tools
- Wreath base: grapevine wreath, wire form, foam form, straw form, or metal hoop
- Floral wire or paddle wire
- Wire cutters
- Hot glue gun and glue sticks
- Scissors or pruning shears
- Floral tape or zip ties for extra hold
- Ribbon for hanging or a decorative bow
Decorative Fall Elements
- Faux or preserved fall leaves
- Pinecones, acorns, seed pods, or twigs
- Dried flowers, wheat stalks, grasses, or eucalyptus
- Mini pumpkins or gourds
- Berries, mums, sunflowers, or dahlias
- Burlap, velvet, plaid, or satin ribbon
- Moss or filler greenery to cover gaps
If you’re a beginner, start with a grapevine wreath. It’s forgiving, textured, and easy to tuck stems into without needing to wire every single piece. If you want a cleaner, more modern look, choose a metal hoop or wire form. If your goal is fullness and volume, foam and straw forms are reliable options because they hold pins and glued materials well.
Step 1: Choose Your Fall Wreath Style Before You Glue Anything
This step is important because wreaths go sideways fast when you mix every pretty thing in the craft aisle. Pick one direction first.
Popular Fall Wreath Styles
Rustic harvest wreath: grapevine base, leaves, pinecones, burlap ribbon, wheat, and muted pumpkins.
Elegant autumn floral wreath: rich faux blooms, berries, greenery, velvet ribbon, and a balanced color palette.
Natural foraged wreath: twigs, dried grasses, acorns, branches, seed pods, and earthy texture.
Modern asymmetrical wreath: metal hoop, clustered stems on one side, clean lines, minimal ribbon.
Playful front door wreath: brighter oranges, plaid bows, oversized florals, and cheerful pumpkin accents.
Once you pick a style, choose two or three dominant colors. Traditional fall palettes include orange, rust, gold, burgundy, brown, olive, cream, and deep green. If you prefer a softer look, try dusty rose, muted mustard, tan, copper, and pale pumpkin. Limiting your palette makes your DIY fall wreath look intentional rather than accidentally assembled during a caffeine event.
Step 2: Prep the Base
Your wreath base is the skeleton of the whole project, so give it a little attention before decorating. If you’re using a grapevine wreath, trim any wild twigs sticking out unless you like the “nest built by an emotional crow” aesthetic. If you’re using a foam form or wire frame, wrap it in ribbon, burlap, or jute first if the base might show through.
For a fuller wreath, consider attaching a base layer of greenery or leaves around the form first. This creates volume and hides exposed sections later. You do not need to cover every inch if you’re going for a more modern or asymmetrical look. In fact, some empty space makes a wreath feel more stylish and less like it’s trying too hard.
Step 3: Build Your Main Shape
Now it’s time to place your largest pieces. Think of these as the anchor elements. These might be big faux leaves, mini pumpkins, large flowers, or bundles of dried grass. Lay everything out before attaching it permanently. Seriously. Dry fitting saves marriages, glue sticks, and dignity.
Start by positioning your largest accents around one side, the lower half, or in a balanced arrangement across the wreath. Most fall wreaths look best when the design flows in one direction. Grouping materials creates more impact than scattering them evenly like confetti at a harvest festival.
If you want a classic full wreath, distribute your large elements around the entire circle. If you want a trendy look, cluster them to one side and let the rest of the wreath remain more open. Either approach works, as long as it looks deliberate.
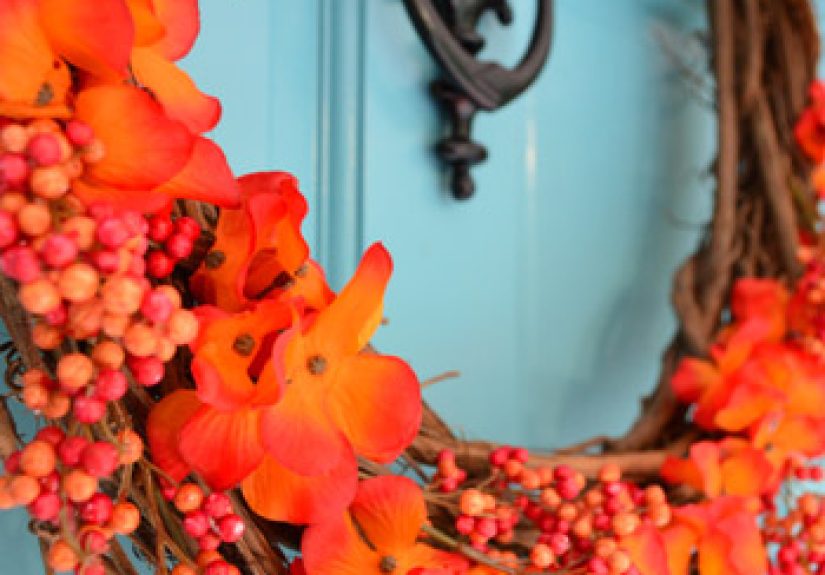
Step 4: Add Layers of Texture
This is where your wreath stops being “a circle with stuff on it” and becomes actual decor. Layer in medium-size pieces next: smaller leaves, pinecones, berry stems, wheat sprigs, eucalyptus, or dried flowers. Use floral wire when possible for anything heavier, and reserve hot glue for lighter embellishments or final touch-ups.
A good rule is to mix at least three different textures. For example:
- Soft texture: ribbon, faux flowers, felt leaves, moss
- Natural texture: twigs, acorns, pinecones, wheat
- Structural texture: branches, curled leaves, dried stems, pumpkins
Layering is what makes a front door wreath for fall feel rich and finished. Tuck thin stems under larger pieces, overlap leaves slightly, and angle items so the eye moves around the shape. If everything is stuck on flat and facing one direction like it’s posing for a passport photo, the wreath may look stiff. Varying depth creates life.
Step 5: Fill Gaps Without Overcrowding the Design
Once your main elements are in place, step back and look for empty spots. Gaps are normal. Tiny gaps add breathing room. Giant bald patches, however, make the wreath look unfinished. Fill those with moss, extra greenery, smaller berries, or mini leaves.
The key is restraint. Not every hole needs to be stuffed. Sometimes the wreath looks better when a little of the grapevine or hoop still shows. You are making seasonal decor, not trying to hide evidence.
Step 6: Add the Ribbon or Bow
Ribbon can completely change the mood of your wreath. Burlap feels rustic. Velvet feels elegant. Plaid says cozy cabin energy. A wide orange or rust ribbon screams fall in the friendliest possible way.
You can use ribbon in three main ways:
- As a hanging loop
- As a statement bow
- As subtle tails woven into the design
If you’re making a bow, use wired ribbon if possible. It holds its shape better and looks polished with less fuss. Attach the bow after the main design is done so you can place it where it actually helps the composition rather than where it simply landed during the crafting chaos.
Step 7: Secure Everything Properly
This is the part people rush, then regret when a decorative pumpkin rolls away like it just quit the project. Check every larger piece and make sure it is either wired tightly or glued thoroughly. For outdoor wreaths, especially on windy porches, floral wire is your best friend. Hot glue alone is sometimes not enough for heavy pieces.
Gently shake the wreath before hanging it. If anything wiggles in a suspicious way, reinforce it now. Future You will appreciate this when the weather gets dramatic.
Easy Fall Wreath Variations to Try
1. Classic Leaf and Pinecone Wreath
Use a grapevine base, faux maple leaves, pinecones, berry stems, and a plaid bow. This is timeless, beginner-friendly, and hard to mess up unless you somehow glue the bow upside down.
2. Dried Flower Autumn Wreath
Start with a hoop or straw form and use dried flowers, wheat, bunny tails, and eucalyptus. The look is airy, elegant, and ideal for neutral homes that do not want a giant orange explosion on the front door.
3. Pumpkin Patch Wreath
Add mini faux pumpkins and gourds with moss and leaves. This works especially well for a porch decorated from September through Thanksgiving.
4. Foraged Natural Wreath
Gather fallen branches, acorns, grasses, and pinecones. This version is budget-friendly and charming. Just make sure anything you forage is dry and clean before it joins your masterpiece.
5. Minimalist Modern Fall Wreath
Use a gold hoop, one cluster of dried stems, muted florals, and a slim ribbon. It feels sophisticated, calm, and quietly superior in the way minimalist decor often does.
Common Mistakes to Avoid
- Using too many colors: Limit your palette so the wreath looks cohesive.
- Gluing before planning: Lay everything out first.
- Ignoring scale: Oversized pumpkins on a tiny hoop can look awkward.
- Making it too symmetrical by accident: A little variation looks more natural.
- Forgetting outdoor durability: Choose sturdier materials if the wreath will face sun, wind, or rain.
- Overfilling the design: Full is nice; crowded is stressful.
How to Hang a Fall Wreath
If you’re hanging your wreath on a front door, choose a method that suits the surface. Over-the-door wreath hangers are quick and easy. Ribbon secured from the top of the door works beautifully for wood doors. Adhesive hooks or strips are useful for a no-damage option, and magnetic hangers can work well on glass or metal surfaces. If your wreath has scratchy materials on the back, add felt pads to protect the door.
For an outdoor display, try to hang the wreath in a somewhat protected spot if possible. Direct weather can shorten the life of natural materials and fade certain faux elements over time. A covered porch gives your DIY wreath the best shot at surviving the season looking fabulous instead of tired and slightly offended.
How to Store and Refresh Your Wreath
When fall ends, do not shove your wreath into a random closet corner like a seasonal secret. Store it in a wreath box, a large plastic bag, or a sturdy container that helps it keep its shape. If it’s a faux wreath, fluff the leaves and bow before storing. If it includes delicate dried elements, wrap it loosely in tissue paper.
To refresh a wreath next year, replace crushed ribbon, reglue loose accents, and add one or two new elements. A little update goes a long way. Your wreath does not need a full identity crisis every autumn.
Final Thoughts on Making a Fall Wreath
Learning how to make a fall wreath is less about following strict rules and more about understanding balance, texture, and style. The best wreaths look collected, layered, and welcoming. They reflect the season, but they also reflect you. Whether your taste leans rustic, modern, playful, or polished, there’s a version that can work beautifully with your home.
Start simple. Trust your eye. Step back often. And remember: if one leaf is crooked, one bow tail is dramatic, or one pumpkin insists on stealing the spotlight, that is not failure. That is character. Autumn, after all, is not a season known for subtlety.
Real Experiences and Lessons From Making a Fall Wreath
One of the most helpful things about making a fall wreath is that the experience teaches you more than a supply list ever could. The first time many people try a wreath, they assume it will take twenty minutes and a cheerful attitude. Then an hour later, they are surrounded by ribbon scraps, loose pinecones, and exactly one glue stick that somehow disappeared while still in their hand. That is completely normal. A fall wreath project tends to look messy in the middle, but that does not mean it is going badly. In fact, most beautiful wreaths go through an awkward stage where they resemble a confused scarecrow accessory before finally coming together.
Another common experience is realizing that less often looks better. Beginners usually buy every decorative stem in sight because each one feels necessary in the craft store. But once they begin arranging the wreath, they notice that too many competing elements flatten the design. The most successful wreaths usually come from editing. When you remove one extra pumpkin, swap a loud ribbon for a softer one, or keep one side a little more open, the whole project suddenly looks more expensive and more intentional.
Many crafters also discover that texture matters even more than color. A wreath with leaves, berries, dried grass, and a few pinecones feels richer than one made from only bright orange flowers. That layered texture is what gives a DIY fall wreath depth. It is also what makes people walk up to your front door and do that little impressed nod, as if they are now judging their own seasonal decor choices.
Weather is another teacher. A wreath that looks perfect indoors may behave very differently on an exposed front door. Wind can loosen bows, direct sun can fade fabric, and heavy natural materials can sag if they were attached with glue alone. After one season, most people learn to wire the heavy pieces, secure the hanging loop well, and think practically about placement. It is not glamorous advice, but neither is chasing a rogue faux pumpkin across the porch.
Perhaps the best part of the experience is that wreath-making becomes easier and more personal each year. The first wreath is usually about following instructions. The second is about confidence. By the third, people start experimenting with dried oranges, moody ribbons, foraged branches, muted florals, or family traditions. Some make wreaths with kids. Some host wreath-making nights with friends. Some quietly enjoy the ritual of updating the front door when the air turns crisp. Over time, the wreath becomes more than decor. It becomes a seasonal marker, a creative habit, and a small way to make home feel warm, welcoming, and unmistakably fall.


