
Table of Contents >> Show >> Hide
- Why Make a Planet Model?
- What You’ll Need
- How to Make a Planet Model in 14 Steps
- 1. Decide What Kind of Planet Model You Want to Build
- 2. Choose Whether You’re Making One Planet or the Whole Solar System
- 3. Pick a Simple Scale
- 4. Gather and Sort Your Materials
- 5. Prepare the Base or Display Structure
- 6. Sketch the Layout Before Gluing Anything
- 7. Paint the Sun First
- 8. Make and Paint the Inner Planets
- 9. Add the Asteroid Belt if You Want Extra Credit Energy
- 10. Paint the Outer Planets with Bigger Visual Details
- 11. Build Saturn’s Rings
- 12. Let Everything Dry Completely Before Assembly
- 13. Attach the Planets in Order
- 14. Label, Check, and Present It Like a Pro
- Best Tips for Making Your Planet Model Look Better
- Common Mistakes to Avoid
- How to Make Your Project More Impressive
- Final Thoughts
- Experiences Related to Making a Planet Model
- SEO Tags
If you have ever looked at a school project list and thought, “Sure, I can build a tiny version of the solar system before dinner,” welcome to the club. The good news is that making a planet model is absolutely doable, even if your craft closet looks like it was raided by raccoons. With a few basic supplies, a little paint, and just enough patience to let glue dry without poking it every 12 seconds, you can build a planet model that looks sharp, teaches real science concepts, and earns plenty of proud nods from teachers, parents, or anyone who enjoys miniature worlds.
This guide walks you through how to make a planet model in 14 clear steps. It covers materials, planning, painting, assembly, and display tips so your finished project looks intentional instead of “I made this at 11:47 p.m. and emotionally support-glued it together.” Whether you are building a solar system display for class, a hanging mobile for a bedroom, or a tabletop model for a science fair, these steps will help you create something neat, informative, and fun.
Why Make a Planet Model?
A planet model is more than a craft project with great lighting potential. It helps you learn the order of the planets, compare their relative sizes, and understand why space is so mind-bendingly huge. It also turns abstract science into something you can hold, paint, label, and proudly place on a table while saying, “Yes, that striped one is Jupiter. Thank you for noticing.”
For students, a solar system model can reinforce lessons about the rocky inner planets, the giant outer planets, the asteroid belt, planetary colors, and orbital order. For parents and teachers, it is one of those rare projects that mixes creativity with actual educational value. For everybody else, it is an excellent excuse to fling a little blue paint on a foam ball and call it Earth.
What You’ll Need
- Foam balls, modeling clay, papier-mâché balls, or ping-pong balls in different sizes
- A large piece of cardboard, foam board, poster board, or a wire hanger for a mobile
- Acrylic or tempera paint
- Paintbrushes in small and medium sizes
- Black paint or black construction paper for a space background
- Wooden skewers, toothpicks, string, or fishing line
- Glue or hot glue (with adult help if needed)
- Scissors
- Markers or paint pens for labels
- Card stock for name tags and fact labels
- Optional extras: glitter, cotton for clouds, small beads for moons, and cardboard rings for Saturn
If your teacher wants a simple planet model, you can keep things basic. If they want a full solar system model, you can go all in with labels, orbit lines, and enough sparkle to make Saturn jealous.
How to Make a Planet Model in 14 Steps
-
1. Decide What Kind of Planet Model You Want to Build
Before you touch the paint, choose your format. A flat poster model is easiest for younger students. A tabletop 3D model looks impressive and is still manageable. A hanging mobile is eye-catching, but it takes more balancing and string work. Pick the version that matches your time, materials, and energy level.
-
2. Choose Whether You’re Making One Planet or the Whole Solar System
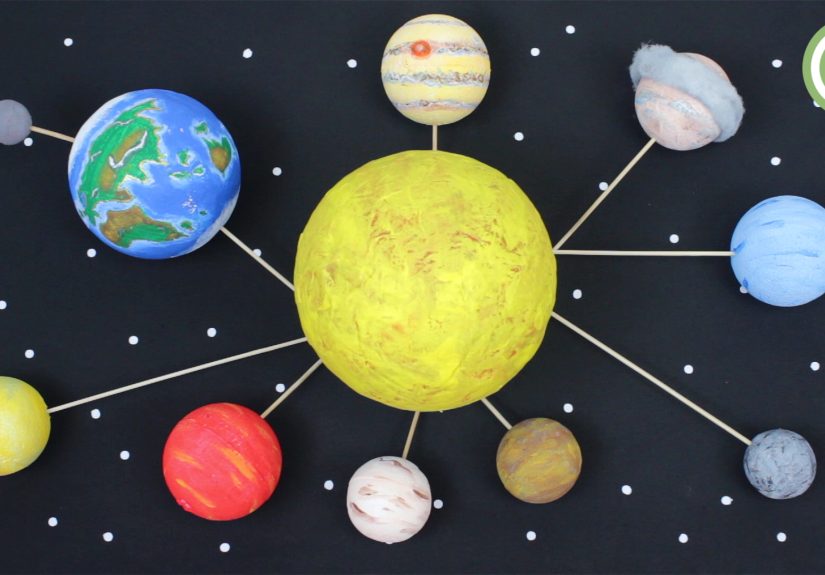
The title may say planet model, but many school assignments really mean a solar system model. If you are making one planet, you can focus on texture, color, rings, and labels. If you are making the whole set, plan for the Sun plus the eight planets in order: Mercury, Venus, Earth, Mars, Jupiter, Saturn, Uranus, and Neptune.
-
3. Pick a Simple Scale
You do not need NASA-level math to make a good project. Just choose a rough size system that makes visual sense. Use the largest ball for the Sun, a slightly smaller size for Jupiter and Saturn, medium balls for Uranus and Neptune, and the smallest balls for Mercury, Venus, Earth, and Mars. The goal is not perfect astronomical accuracy. The goal is to show clear differences without needing a football field to display the project.
-
4. Gather and Sort Your Materials
Lay everything out before you start. Group your balls by size, check that you have enough paint, and keep paper towels nearby. This step sounds boring, but it saves you from stopping halfway through Earth because you forgot blue paint or used your only small brush to stir glue like a mad scientist.
-
5. Prepare the Base or Display Structure
If you are making a poster or board model, paint the background black or cover it with black paper. You can add white specks for stars, but do not overdo it unless your goal is “planet model meets disco ceiling.” If you are making a mobile, set up the hanger or support frame first so you know how much room you have for each planet.
-
6. Sketch the Layout Before Gluing Anything
Lightly draw where the Sun and planets will go. If it is a board model, leave more space between the outer planets than you think you need. Jupiter and Saturn tend to hog visual real estate. If it is a hanging model, plan where each string will hang so your planets do not collide like bumper cars in space.
-
7. Paint the Sun First
Start with the Sun because it sets the color mood for the whole project. Use bright yellow, orange, and a touch of red for warmth and dimension. A flat yellow circle works in a pinch, but blending colors makes it look more alive. The Sun is the center of the show, so let it be dramatic. It has earned that right.
-
8. Make and Paint the Inner Planets
Now work on Mercury, Venus, Earth, and Mars. Mercury usually looks best in gray tones with a rocky texture. Venus can be creamy yellow or pale tan. Earth needs blue oceans, green or brown land, and a few white cloud streaks. Mars should be rusty red, reddish brown, or orange-red. These planets are small, so keep details bold and simple instead of trying to paint every crater known to humanity.
-
9. Add the Asteroid Belt if You Want Extra Credit Energy
Between Mars and Jupiter, you can add a simple asteroid belt using tiny pebbles, beads, dots of paint, or bits of crumpled paper. This is optional, but it makes the display feel more complete. It also quietly tells your teacher, “I did not come here to do the bare minimum.”
-
10. Paint the Outer Planets with Bigger Visual Details
Jupiter should have bands or stripes in tan, cream, brown, and orange shades. You can add a red oval to suggest the Great Red Spot. Saturn looks great in pale gold, beige, and light brown. Uranus is often shown as a pale blue-green. Neptune is usually a deeper blue. These planets are larger, so they benefit from layered colors, soft blending, and visible banding.
-
11. Build Saturn’s Rings
Saturn without rings is like pizza without cheese: technically possible, emotionally confusing. Cut a thin ring shape from cardboard, craft foam, or sturdy paper. Paint it in pale gold, tan, or gray, then glue it around the planet once both pieces are dry. If you want to get fancy, you can also add a subtle ring to Uranus, but Saturn is the must-have star here.
-
12. Let Everything Dry Completely Before Assembly
This step is where many planet models go from “promising” to “smudged swamp.” Give the paint enough time to dry before gluing, hanging, or labeling. If you rush, Earth becomes a blue fingerprint, Jupiter loses its stripes, and Saturn starts looking like it survived a weather event. Dry time is not laziness. It is strategy.
-
13. Attach the Planets in Order
Once dry, glue the planets to the board or attach them with string to a mobile. Keep them in the correct solar system order. If you are working on a flat display, you can draw orbit lines around the Sun for a cleaner educational look. If you are using skewers or dowels for a standing model, anchor them firmly so the larger planets do not tip the entire project into cosmic disaster.
-
14. Label, Check, and Present It Like a Pro
Add names under each planet and include one quick fact if your teacher wants more detail. Then check spelling, color placement, and planet order one last time. Wipe away glue strings, touch up paint chips, and make sure nothing is hanging sideways unless it is supposed to. A clean final presentation often makes the difference between “nice project” and “wow, you really crushed this.”
Best Tips for Making Your Planet Model Look Better
Use Texture Sparingly
A little texture helps. Too much texture makes every planet look like it was dipped in oatmeal. Mars can handle some roughness. Mercury can look cratered. Jupiter should stay smoother so its bands stand out.
Keep Colors Bold, Not Perfect
This is a model, not a satellite image contest. Aim for recognizable colors and features. Earth should read as Earth immediately. Saturn should clearly have rings. Jupiter should look big and striped. If people can identify the planet without reading the label, you are doing great.
Think About Display Size Early
One of the most common mistakes is making the planets too large for the display board. Another is making them so small that Neptune looks like a lost sprinkle. Dry-fit everything before final assembly so your space project does not run out of space. That would be deeply ironic.
Common Mistakes to Avoid
- Putting the planets in the wrong order
- Using too much glue and creating shiny glue lakes
- Skipping dry time and smearing painted details
- Making all the planets the same size
- Forgetting Saturn’s rings
- Leaving off labels and assuming everyone will just know Neptune on sight
How to Make Your Project More Impressive
If you want your planet model to stand out, add a title card, clean labels, and short facts for each planet. You can also include a brief note explaining that models often show relative size or relative distance, but not both perfectly at the same time on a small display. That tiny sentence makes your project sound thoughtful and science-savvy.
Another smart move is to keep the design neat. Straight labels, balanced spacing, and tidy paint edges go a long way. A project does not have to be expensive to look excellent. It just has to look like you planned it on purpose.
Final Thoughts
Learning how to make a planet model is one of those rare assignments that can actually be fun. It mixes art, science, and problem-solving in a way that feels creative instead of tedious. You get to compare planets, play with color, and turn a giant concept into something visual and memorable. Best of all, when it is done, you have a project that looks cool and teaches something real.
So gather your paint, grab your foam balls, and build your own tiny corner of the universe. Just remember: no matter how complicated the project feels at first, it is still easier than building an actual planet.
Experiences Related to Making a Planet Model
One of the most interesting things about making a planet model is that the experience almost never goes exactly the way you imagine at the beginning. On paper, it sounds simple: gather supplies, paint a few balls, glue them down, and suddenly you have the solar system on a poster board. In real life, it usually becomes a funny mix of creativity, trial and error, tiny victories, and at least one moment when somebody holds up a wet foam ball and asks, “Does this look more like Mars or a meatball?” That is part of the charm.
For many students, the first real surprise is scale. People know Jupiter is bigger than Earth, but once they begin sorting materials, they realize how tricky it is to show size differences in a small project. If all the balls are close in size, the model loses impact. If the biggest planets are too large, the board runs out of room fast. That planning stage teaches an important lesson: science models are about making smart visual choices, not just copying pictures.
Another common experience is discovering that painting planets is harder and more fun than expected. Earth seems easy until you try to paint tiny continents with a brush that suddenly feels the size of a broom. Jupiter’s stripes can turn muddy if the paint is too wet. Saturn’s ring may slide sideways while drying and briefly make the planet look like it is wearing a giant hat. Those little mishaps usually become the stories people remember most. They also help students learn patience, especially when they realize that letting paint dry is not optional.
Parents and teachers often notice that planet model projects create a different kind of focus. Kids who are restless during ordinary homework may spend a surprising amount of time debating the exact shade of Neptune or carefully placing labels in the correct order. There is something satisfying about building a model with your hands. It turns memorization into action. Instead of just reading planet names, students physically place Mercury near the Sun, put Mars after Earth, and give Saturn its famous rings. That hands-on process makes the information stick.
There is also a real sense of pride in finishing the model. Even a simple version can feel impressive because it transforms a huge, abstract topic into something visible and personal. Once the planets are attached and the labels are in place, the project suddenly looks like more than craft supplies. It looks like a finished idea. That moment matters. It gives students confidence and makes science feel less distant and more approachable.
In the end, the experience of making a planet model is not just about the final display. It is about problem-solving, experimenting, laughing at mistakes, and learning through the process. Yes, you end up with a school project. But you also end up with a better feel for how the solar system is organized and a memorable little journey through paint, glue, and space-themed determination.


