
Table of Contents >> Show >> Hide
- Before You Patch: Size Up the Damage (and the Wall Behind It)
- Tools and Materials Cheat Sheet
- Small Stuff: Dings, Nail Holes, and Screw Pops
- Medium Holes: The “Doorknob Special” (About 1/2 Inch to 6 Inches)
- Large Holes: When Your Drywall Needs a Real Plan (and Some Backing)
- Mudding Like a Pro: The “Three Coats, Not One Big Pancake” Rule
- Sand, Prime, Paint: How to Avoid the “Patch Halo”
- Troubleshooting: Common Drywall Patch Problems (and Fixes)
- Real-World Drywall Patching Experiences (500-ish Words of Lessons You Can Steal)
- Conclusion
Drywall is the unsung hero of your home: it holds up your paint, hides your wires, and quietly forgives
that time you tried to “find a stud” with a drill bit and pure optimism. Eventually, though, every wall
collects battle scarsnail holes, anchor craters, doorknob blowouts, and the occasional “mystery hole”
that appears after you move furniture and pretend you didn’t see it.
The good news: patching drywall is absolutely DIY-friendly once you match the repair method to the hole
size. The better news: a great patch is basically invisible. The best news: you’ll stop staring at that
spot every time you walk past it like it owes you money.
Before You Patch: Size Up the Damage (and the Wall Behind It)
Drywall repair is 30% materials and 70% choosing the right approach. The hole tells you what to do:
- Tiny holes and dings (pinholes, nail holes, small dents): spackle or lightweight joint compound.
- Small holes (roughly up to 1/2 inch): spackle or a quick compound fill, usually no tape needed.
- Medium holes (about 1/2 inch to 6 inches): mesh patch or a “California/butterfly” patch.
- Large holes (bigger than ~6 inches, or any hole with crushed edges): cut back and install a drywall plug with backing support.
Safety first, always: before you cut or screw anything, peek inside the hole with a flashlight.
If you see wires, pipes, or signs of water damage (staining, softness, crumbling), pause and deal with the
cause first. Repairing a hole is satisfyingrepairing the same hole again next month is a hobby you did not ask for.
Check Your Drywall Thickness (So Your Patch Sits Flush)
Most walls are 1/2-inch drywall; many ceilings are 5/8-inch. If you’re doing a large patch, use the same thickness.
A mismatch can create a “speed bump” you’ll never unseeespecially under bright side lighting.
Tools and Materials Cheat Sheet
You don’t need a contractor van full of gear. Here’s the basic toolkit that covers almost every drywall patch:
- Putty knives: 4–6 inch (small repairs) and 10–12 inch (feathering larger areas)
- Spackle (for tiny holes) and/or joint compound (for broader feathering)
- Setting-type compound (“hot mud”) for deep fills or faster turnarounds (optional)
- Sandpaper or sanding sponge: 120–150 grit, plus a dust mask
- Utility knife and drywall saw (for medium/large holes)
- Drywall screws and a drill/driver (for large patches)
- Backer material: scrap wood strips or drywall repair clips (for large holes)
- Tape: paper tape or fiberglass mesh tape (as needed)
- Primer (non-negotiable for invisible paint touch-ups)
- Paint and matching roller/brush (matching texture matters more than people think)
Small Stuff: Dings, Nail Holes, and Screw Pops
These are the “easy wins” of drywall repair. If you do them right, you’ll spend more time waiting for
compound to dry than actually working.
Method 1: Spackle for Nail Holes and Tiny Dings
- Prep the spot. Scrape away loose paper fuzz with a putty knife. Lightly sand if the edges are raised.
- Fill in thin layers. Press spackle into the hole, then scrape it nearly flush. (A common mistake is leaving a blob. Blobs become bumps.)
- Let it dry completely. Dry time depends on product and thicknessthin is faster.
- Sand lightly. Feather the edges so you can’t feel a ridge when you run your fingers over it.
- Prime and paint. Primer prevents “flashing” (that dull or shiny patch that screams “I was repaired”).
Why this works: spackle is designed for small surface repairs. It dries relatively fast and
generally shrinks less for tiny fills, which helps it stay smooth instead of sinking into the hole later.
Method 2: Fixing Nail Pops (Those Annoying Little Circles)
Nail pops happen when drywall fasteners shift and push against the paint film. The fix isn’t just cosmeticyou want it to stay fixed.
- Drive the pop back in. If it’s a nail, tap it slightly below the surface. If it’s a screw, tighten it.
- Add support. Place a drywall screw about 1–2 inches above and below the pop into the stud to reduce movement.
- Skim with joint compound. Apply a thin coat, let dry, then add a second coat feathered wider.
- Sand, prime, paint.
Pro tip: If the drywall paper is torn, seal that torn paper with primer or a sealer before mudding.
Otherwise, the paper can bubble and create a texture you didn’t order.
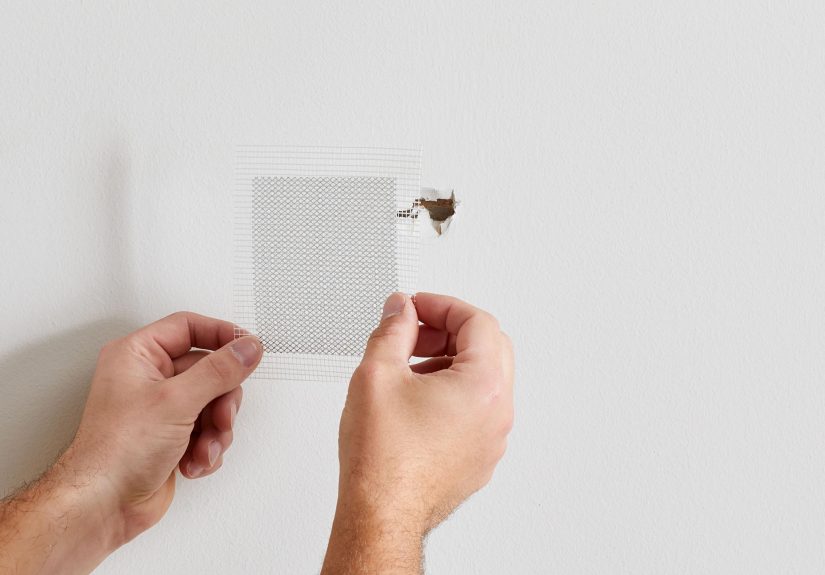
Medium Holes: The “Doorknob Special” (About 1/2 Inch to 6 Inches)
Medium holes are where people either become drywall heroes… or create a lumpy “pancake” that requires a second patching project.
Two methods dominate here: mesh patches and the California (butterfly) patch.
Method 1: Self-Adhesive Mesh Patch (Fast, Beginner-Friendly)
This works best when the surrounding drywall is still solid (not crushed or crumbling).
- Clean and flatten. Cut away jagged edges and remove loose gypsum dust.
- Stick on the patch. Center it over the hole and press firmly so it bonds tight.
- First coat (press-in coat). Using a 6-inch knife, force compound through the mesh, then smooth outward.
- Second coat (wider feather). After drying, apply a wider coat using a 10–12 inch knife.
- Third coat (optional but often makes it invisible). Feather even wider to blend with the wall plane.
- Sand lightly. You’re shaping, not excavating.
- Prime and paint.
Why thin coats matter: joint compound shrinks as it dries. Thin coats dry faster, shrink more evenly,
and are easier to sand without gouging.
Method 2: The California (Butterfly) Patch (Strong, No Stud Needed)
The California patch is a clever trick: you use the drywall’s front paper as a built-in “flange” to bridge the gap.
It’s great for medium holes when you want a cleaner, more rigid repair than a mesh patch.
- Square up the hole. Cut a neat square/rectangle around the damage (clean geometry is your friend).
- Cut a drywall patch bigger than the hole. About 2 inches larger on each side is a solid starting point.
- Create the “butterfly.” Score the drywall on the back and snap off gypsum so the front paper remains intact as a border.
- Test fit. The gypsum core should fit the hole; the paper flange should overlap the wall surface.
- Mud the hole edges. Apply compound around the opening, then press the patch in.
- Skim and feather. Cover the paper flange with joint compound in thin coats, feathering wider each time.
- Sand, prime, paint.
Where people go wrong: they leave the patch “proud” (sticking out). Your goal is a flush plane.
If your patch is too thick, you’ll be forced to feather an enormous area to hide the bump.
Large Holes: When Your Drywall Needs a Real Plan (and Some Backing)
For big holes, the wall needs structure. Compound alone is not a structural beamno matter how many coats you apply.
The reliable approach is: cut to clean edges, add backing, screw in a new drywall piece, then tape and finish.
Step-by-Step: Classic Backed Drywall Patch
-
Make the opening clean.
Cut the damaged area into a square or rectangle. If you can expand the hole to land edges on studs, even better. -
Add backing support.
Slide two wood strips (or drywall backer strips) behind the wall, one on each side of the opening.
Screw through the existing drywall into the wood to clamp it in place. -
Cut your drywall patch.
Measure the opening and cut a new piece to fit with small, consistent gaps (tight is good; jammed is not). -
Screw in the patch.
Drive drywall screws through the new patch into the backing. Set screw heads slightly below the surface without tearing paper. -
Tape the seams.
Apply tape over the joint (paper tape or fiberglass mesheither can work when used correctly). -
Apply compound in coats.
Coat 1 embeds the tape. Coat 2 widens. Coat 3 feathers. Each coat gets wider and thinner at the edges. -
Sand and check with light.
Shine a flashlight sideways across the patch. Side lighting reveals ridges before your paint does. -
Prime and paint.
Prime the patch area, then paint to match the wall finish and texture.
Why backing matters: a large patch without support can flex when the wall expands/contracts,
which can crack the finish. Backing turns the patch into part of the wall instead of a floating island.
Mudding Like a Pro: The “Three Coats, Not One Big Pancake” Rule
If drywall repair had a motto, it would be: thin coats, wider each time. A smooth patch is about feathering
the edges so the wall surface transitions graduallyyour eye hates sudden changes in plane, especially in glossy paint.
Choosing Compound: Spackle vs. Joint Compound vs. Setting-Type (“Hot Mud”)
- Spackle: Best for tiny holes and shallow dents. Fast, convenient, great for quick touch-ups.
- Ready-mix joint compound: Easier sanding and longer working time; ideal for feathering and finish coats.
-
Setting-type compound: Chemically sets (rather than only drying by evaporation). Great for deep fills and faster progress,
but often harder to sanduse it strategically, not for every final coat.
Practical strategy: use setting-type compound to “pre-fill” deep voids (it shrinks less and firms up),
then switch to lightweight joint compound for your final feather coats (your future self will thank you when sanding).
Feathering 101 (A.K.A. How to Avoid Patch Ridges)
- Hold your knife at a slight angle and apply more pressure on the outer edge to taper the compound.
- Widen your repair zone as the hole gets larger. Medium patches often need a 10–12 inch feather radius to disappear.
- Don’t chase perfection on Coat 1. Coat 1 is for structure. Coat 2 and 3 are for beauty.
- Let it dry fully between coats. Sanding damp compound leads to tearing and pilling.
Sand, Prime, Paint: How to Avoid the “Patch Halo”
A patch can be perfectly smooth and still show through paint. That’s usually because joint compound and spackle are more porous than
painted drywallso they absorb paint differently and change sheen. This is the dreaded “flashing” effect, and it’s why primer matters.
Best Practices for a Truly Invisible Finish
- Remove dust. Wipe the area with a damp cloth or vacuum with a brush attachment.
- Prime the repair. Use a drywall primer or quality multipurpose primer to seal porosity.
- Match sheen and texture. Flat hides sins; semi-gloss spotlights them. Try to use the same paint line and sheen as the existing wall.
- Blend the paint. Spot painting can work, but if your wall has strong light or noticeable roller texture, painting a larger section (or the whole wall) often looks best.
Texture tip: If your wall has orange peel or knockdown texture, a perfectly smooth patch will stand out.
You may need to recreate texture (spray texture, texture roller, or a light skim/knockdown technique) before priming.
Troubleshooting: Common Drywall Patch Problems (and Fixes)
“My patch cracked.”
Usually caused by movement (no backing), thick compound layers, or skipping tape where it’s needed. Fix it by widening the repair:
lightly V-groove the crack, apply tape if appropriate, then add thin feather coats and prime/paint.
“It’s bulginglike the wall grew a bump.”
That’s often a proud patch or too much compound buildup. Sand the high spot carefully (don’t shred the paper),
then apply a wider, thinner feather coat to level the plane.
“I can see the patch after painting.”
Typically flashing or mismatched texture. Prime the area (again, yes, even if you used ‘paint-and-primer-in-one’),
then repaint using the same roller nap and technique as the rest of the wall.
Real-World Drywall Patching Experiences (500-ish Words of Lessons You Can Steal)
Drywall repair looks easy on paper: fill, sand, paint, done. In real homes, the wall has opinionslighting changes,
textures vary, and the “tiny little hole” somehow becomes a project with its own playlist. Here are the most common
experiences DIYers report, plus what actually helps.
1) The “I filled it, why did it sink?” moment.
This is classic shrinkage. Joint compound and spackle can shrink as they dry, especially when applied thick.
The fix is counterintuitive: apply less at a time. A thin first coat that dries fully, followed by a second skim coat,
will stay flatter than one heroic scoop. If you’re filling something deeper than a shallow dent, a setting-type compound for the first
fill can reduce the “crater returns” effect, and then you can finish with an easier-sanding compound.
2) The “It looked perfect… until I turned on the lamp.”
Side lighting is ruthless. A patch can look smooth head-on and still show ridges at night when a nearby lamp throws light across the wall.
Pros check repairs with a flashlight held at a low angle for exactly this reason. If you spot a ridge, don’t panichit it with a quick sand,
wipe dust, then add a very thin, wide feather coat. Think of feathering like fading a haircut: abrupt lines are obvious; gentle transitions disappear.
3) The “Why is my paint a different color here?” mystery.
Often it’s not colorit’s sheen. Unprimed compound absorbs paint differently, so the finish looks duller (or sometimes shinier) than surrounding wall.
Even when the paint can matches, the patch reads as a separate “zone.” Priming is the boring step that makes the magic happen. DIYers who skip it
frequently end up repainting twice. The most satisfying feeling in drywall repair is watching the patch vanish after primer goes on.
4) The anchor-hole trap.
Plastic anchors can leave ragged edges and torn paper. A common experience is filling the hole, sanding it smooth, and then noticing a slightly fuzzy
ring where the paper tore. Sealing torn paper before mudding (or before final coats) prevents bubbling and keeps the surface crisp. Also, if you remove
an anchor and the hole is bigger than expected, treat it like a small-to-medium patchsometimes a mesh patch is faster than trying to “convince” spackle
to bridge a gap it doesn’t want.
5) The texture mismatch surprise.
Smooth patches on textured walls are like wearing dress shoes with gym shorts: technically allowed, but everyone notices.
DIYers often find that the patch is invisible until paint goes on, because paint highlights texture differences.
If your wall has orange peel or knockdown, plan a quick texture step before priming. It’s easier to match texture “good enough”
than to feather compound wider and wider trying to hide a smooth island in a bumpy sea.
Bottom line: most drywall disasters aren’t disastersthey’re just a reminder that walls reward patience. Thin coats, wide feathering, and primer
are the unglamorous trio that makes your repair look like it never happened.
Conclusion
Patching drywall isn’t about fancy toolsit’s about using the right method for the hole size and finishing with patience.
For tiny holes, spackle and a light sand are usually enough. For medium holes, a mesh patch or California patch gets you strength without major surgery.
For large holes, backing support and a properly screwed-in drywall plug keep everything solid and crack-resistant.
Remember the golden rules: clean edges, thin coats, feather wide, sand gently, and always prime before paint.
Do that, and your wall will go back to looking innocentuntil the next doorknob makes a run for freedom.


