
Table of Contents >> Show >> Hide
- Get to Know Gladiolus
- When and Where to Plant Gladiolus
- Preparing the Soil
- How to Plant Gladiolus Corms Step by Step
- Everyday Care: Watering, Feeding, and Staking
- Succession Planting and Harvesting for Cut Flowers
- End-of-Season Care and Overwintering
- Common Gladiolus Problems (and Easy Fixes)
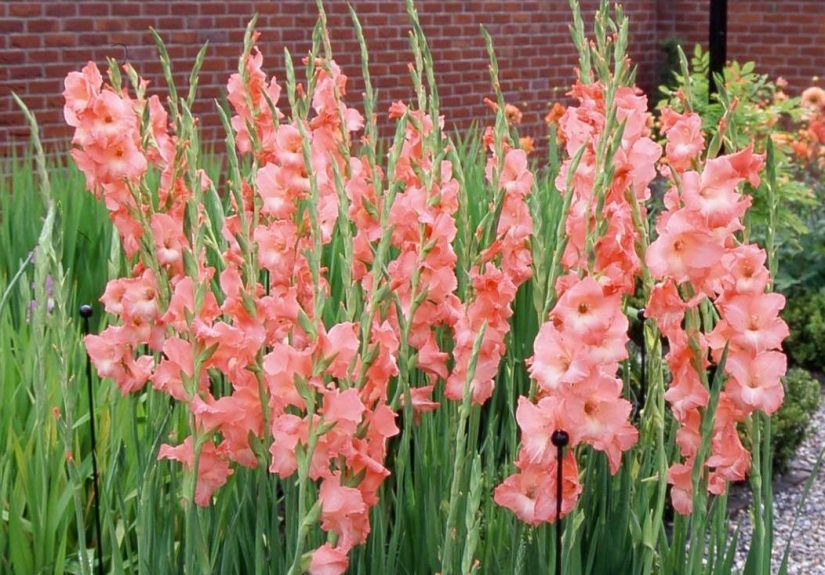
- Design Ideas: Making Gladiolus Look Amazing
- Real-World Gladiolus Growing Experiences and Tips
- Bring Home the Summer Drama
If you want flowers that look like they’re giving a standing ovation in your garden, gladiolus are it. These tall, elegant “sword lilies” shoot up in late summer with columns of blooms in every color you can imaginefrom soft pastels to screaming neon. The best part? Planting and growing gladiolus is much easier than their dramatic look suggests. With a little planning, the right planting depth, and some end-of-season care, you can enjoy armloads of cut flowers and glowing garden borders every year.
Get to Know Gladiolus
Gladiolus grow from cormsbulb-like storage organs that sit underground and fuel those towering flower spikes. Most modern hybrids are grown as summer-flowering tender bulbs. In warm regions (roughly USDA zones 8–10), they can often overwinter in the ground. In colder climates, they’re treated as lift-and-store tender bulbs: you dig them up in fall and replant in spring.
What they like is pretty simple:
- Full sun: At least 6–8 hours of direct sunlight for strong stems and abundant bloom.
- Well-drained soil: Gladiolus hate sitting in water. Think loose, crumbly soilnot heavy, wet clay.
- Moderately fertile conditions: Too much rich nitrogen leads to floppy foliage and fewer flowers.
Most varieties grow 2–5 feet tall and bloom about 60–100 days after planting, depending on the cultivar. That long “runway” is why timing and succession planting matter if you want color all summer.
When and Where to Plant Gladiolus
Best Planting Time
Gladiolus corms go into the ground in spring after danger of frost has passed and the soil has warmed to at least the low 50s°F. In many parts of the United States, that’s April to May; in cooler climates, it might be closer to late May or early June.
To stretch your bloom season, don’t plant all your corms on the same day. Instead:
- Plant a batch every 1–2 weeks for about 6 weeks.
- Stop planting in mid-summer so they still have time to bloom before frost.
Choosing the Right Spot
Pick a location that offers:
- Full sun most of the day. A little light afternoon shade is okay in very hot areas, but deep shade means weak stems.
- Good drainage. If water pools after rain, it’s not the right place. Gladiolus are prone to rot in soggy soil.
- Protection from strong winds. A fence, hedge, or taller plants can act as a windbreak and help keep tall spikes upright.
Many gardeners tuck gladiolus into the back of a mixed border or devote a separate bed as a cutting garden. In front yards, a narrow strip along a fence can turn into a mini flower factory all summer.
Preparing the Soil
Before you plant, give those corms a welcoming home. Think of it as fluffing the guest bed before visitors arrive.
- Loosen the soil 8–10 inches deep with a shovel or garden fork.
- Amend heavy clay with compost and a bit of coarse sand or fine gravel to improve drainage.
- Light, sandy soils benefit from extra compost to hold moisture and nutrients.
- A slightly acidic to neutral pH (around 6.0–7.0) is ideal for good growth.
Avoid overdoing fertilizer at this stage. If you like, mix in a small amount of a balanced, slow-release bulb or flower fertilizer according to the label. Too much nitrogen encourages foliage at the expense of flowers.
How to Plant Gladiolus Corms Step by Step
Ready to plant? Here’s a simple, repeatable process that works for most gardens.
-
Sort your corms. Choose firm, plump corms without moldy spots. Larger corms generally produce stronger stems and bigger flower spikes.
-
Mark your rows or groups. Gladiolus look great planted in clumps of 7–10 instead of lonely single soldiers. You can also plant in rows if you’re aiming for a cut-flower production line.
-
Dig planting holes or a trench. As a rule of thumb, plant corms about 2–3 times their height. For standard gladiolus, that usually means 4–6 inches deep. Deeper planting helps keep stems upright.
-
Space the corms. Place them about 4–6 inches apart. In cutting beds, rows can be 12–24 inches apart, depending on how easy you want it to be to walk between them.
-
Pointy side up. The growing point should be facing up. It’s like a little beakif the corm looks like it has a hat, the hat goes up.
-
Cover and water in. Backfill with soil, gently firm it, then water thoroughly to settle everything in and eliminate air pockets.
-
Mulch lightly. Once the soil has warmed, add a 1–2 inch layer of organic mulch (shredded bark, compost, or straw) to help keep soil evenly moist and reduce weeds.
Planting Gladiolus in Containers
No big backyard? Gladiolus can still be your summer drama queens in pots.
- Choose a container at least 12–16 inches deep with good drainage holes.
- Fill with a high-quality potting mix (not heavy garden soil).
- Plant corms a bit closerabout 3–4 inches apartand 4–6 inches deep.
- Water regularly; containers dry out faster than in-ground beds.
- Because pots are more exposed, you’ll almost certainly need stakes or a support ring for taller varieties.
Everyday Care: Watering, Feeding, and Staking
Watering
Once planted, gladiolus appreciate consistent moisture, especially while they’re sprouting and forming flower spikes.
- Aim for about 1 inch of water per week from rain or irrigation.
- Water deeply rather than with frequent, shallow sprinkles. Deep watering encourages strong root systems.
- Avoid waterlogged soil. If the area stays wet, consider improving drainage or planting in raised beds.
Fertilizing
Gladiolus aren’t heavy feeders, but a little nutrition goes a long way:
- Use a balanced or slightly low-nitrogen fertilizer (for example, something like 5-10-10) at planting time.
- Apply another light feeding when plants are about 6 inches tall, and a final one when flower spikes first appear.
- Always water after fertilizing to move nutrients into the root zone and protect roots from burn.
Staking and Support
Tall gladiolus spikes can lean or topple in wind or heavy rain, especially with big, showy blooms.
- Install stakes or a flower support grid soon after planting so you don’t accidentally spear corms later.
- Use soft ties, twine, or even old pantyhose to lightly secure stems to stakes in a figure-eight loop.
- In cutting beds, many gardeners run horizontal twine between stakes to create a “corridor” of support for the whole row.
Succession Planting and Harvesting for Cut Flowers
If you love fresh flowers indoors, gladiolus will quickly become your best friends.
Succession Planting
To keep flowers coming:
- Plant a small batch of corms every 7–14 days over 4–6 weeks.
- Mix early, midseason, and late-blooming varieties if you want a really long show.
Cutting Gladiolus for Vases
For the longest vase life:
- Cut spikes when the lowest one or two florets are open and the rest are still in bud.
- Use clean, sharp pruners and cut in the cool of morning.
- Leave at least 4–6 leaves on the plant so it can recharge the corm for next year.
- Immediately place stems in a bucket of lukewarm water, then recut the stems at an angle indoors before arranging.
End-of-Season Care and Overwintering
What you do after blooming determines whether your gladiolus are a one-summer fling or a long-term relationship.
In Warm Climates (Zones 8–10)
In mild winter areas, many gardeners simply:
- Allow the foliage to mature and yellow naturally after bloom.
- Cut back the dead leaves at ground level.
- Apply a 2–4 inch mulch layer in late fall to moderate soil temperature and protect corms.
In these zones, gladiolus often come back as perennials, though some gardeners still lift and store the best corms to reduce disease buildup and control spacing.
In Colder Climates (Zones 7 and Below)
Gladiolus corms can’t handle deep freezing. To save them for next year, you’ll need to lift and store them:
-
Wait for foliage to yellow and die back. This usually happens a few weeks after bloom, often in early fall. The leaves feed the new corm forming on top of the old one.
-
Dig carefully. Use a garden fork or spade to loosen soil a few inches away from the plant, then lift the clump. Remember that corms typically sit about 4–6 inches deep.
-
Detach and clean. Shake off loose soil. Remove the old shriveled corm from the bottom and keep the firm new one plus any decent-sized “cormels” (baby corms) if you want to grow more plants over time.
-
Cure the corms. Spread them out in a warm, dry, well-ventilated spot (around 70–80°F) for 2–3 weeks until the outer skin is dry and papery.
-
Store properly. After curing, trim foliage and roots. Place corms in mesh bags, paper bags, or shallow boxes lined with dry peat moss, sawdust, or shredded paper. Store in a cool (around 35–45°F), dry, frost-free place such as a basement or unheated closet.
-
Check monthly. Toss any corms that turn mushy, moldy, or wrinkled beyond saving.
In spring, inspect stored corms. Plant only the plump, healthy ones and discard the rest.
Common Gladiolus Problems (and Easy Fixes)
Pests
- Thrips: Tiny insects that can scar flowers and leaves, causing streaky petals and distorted blooms. Reduce their impact by rotating planting areas, destroying infected corms, and removing plant debris at season’s end. In heavy infestations, gardeners sometimes use insecticidal soap or other labeled treatments.
- Aphids: These sap-suckers cluster on tender stems and buds. A strong blast of water, insecticidal soap, or encouraging natural predators like lady beetles usually keeps them in check.
Diseases
- Corm rot and root rot: Often tied to poorly drained soil or overwatering. The fix is cultural: better drainage, proper spacing, and discarding any suspect corms.
- Botrytis (gray mold): This thrives in cool, damp, overcrowded conditions. Improve airflow, avoid overhead watering late in the day, and remove affected foliage.
Good hygieneclean tools, crop rotation, removing spent foliagegoes a long way toward keeping your gladiolus healthy.
Design Ideas: Making Gladiolus Look Amazing
Because they’re tall and narrow, gladiolus are garden design MVPs when it comes to adding vertical interest.
- Back-of-the-border drama: Plant glads behind lower perennials like coneflowers, daisies, and salvias so their spikes rise like colorful exclamation points.
- Color blocks: Mass a single color for a modern look, or mix soft pinks and whites for a romantic feel.
- Cutting garden rows: Dedicate a simple rectangular bed to rows of gladiolus, zinnias, and sunflowers. It might not win a landscape design award, but your vases will be full all summer.
- Container statements: Plant gladiolus in large pots flanking an entryway or patio, mixing them with trailing annuals at the base.
Real-World Gladiolus Growing Experiences and Tips
Books and guides are great, but gardeners learn a lot by trial, error, and “well, I won’t do that again.” Here are some experience-based tips that can save you a season or two of frustration.
Plant Deeper Than You Think
Many first-time growers are nervous about planting corms too deep, so they barely cover them. The result? Tall plants that flop over at the first gust of wind. In practice, most gardeners find that the deeper end of the recommended rangearound 5–6 inches for full-size varietiesdelivers much sturdier stems. If your soil is loose and well-drained, don’t be afraid to go a little deeper.
Don’t Skimp on Sun
Gladiolus will technically survive in part sun, but they’ll lean, stretch, and produce fewer flowers. People who tuck them into slightly shaded corners often end up disappointed and decide “glads just don’t work here.” Move them to the sunniest spot you have, even if it feels a bit exposed, and you’ll likely see a huge difference in bloom quality.
Stakes First, Plants Second
It’s very tempting to wait until stems are tall and starting to bend before adding stakes. The problem is that you then have to jab supports into the ground right next to your cormsand it’s surprisingly easy to damage them without realizing it. Experienced growers often install a simple grid or line of stakes at planting time. The plants grow up through the support, and you avoid the mid-season tangle of stems, twine, and muttered regrets.
Succession Planting Is Worth the Effort
Planting glads every week or two can feel fussy compared to a one-and-done spring planting. But gardeners who try it once quickly see the payoff: instead of a single giant flush of blooms and then nothing, you get a steady stream of spikes over two to three months. If that sounds like too much to manage, mark three weekends on your calendarearly, mid, and late springand plant a third of your corms each time. Even that simple schedule makes a big difference.
Label, Label, Label
When you’re planting corms that all look like slightly different brown discs, it’s easy to tell yourself, “I’ll remember where the purple ones are.” You won’t. After the foliage dies back in fall, every spot looks the same. Use sturdy plant tags or write on popsicle sticks with a weatherproof marker. Future youespecially the version trying to design color-coordinated beds next yearwill be grateful.
Overwintering Isn’t as Scary as It Sounds
Many gardeners in colder climates avoid gladiolus because they think lifting and storing corms is complicated. In reality, it’s more like curing onions than performing surgery. Once you’ve done it oncedig, dry, trim, storeyou’ll realize it’s a straightforward fall chore that can be done in an afternoon. A cardboard box, some paper bags, and a cool basement shelf are often all you need.
Grow Your Own “Free” Glads from Cormels
When you dig up your plants, you’ll often find little bead-like baby corms (cormels) attached to the main corm. Many gardeners used to toss these without thinking. But with patience, you can plant cormels in a separate nursery bed and, after a year or two, end up with a whole new generation of blooming-sized corms. It’s a slow but satisfying way to expand your collection almost for free.
Accept That Not Every Corm Is a Keeper
Even with perfect care, a few corms will rot, shrivel, or show signs of disease each year. Experienced growers treat this as normal turnover, not a personal insult. The key is to be ruthless: if a corm looks suspicioussoft spots, mold, or a sour smelldiscard it. Saving one questionable corm isn’t worth risking a bed full of problems next season.
Plan for Cutting From the Start
If you love fresh flowers indoors, plant more gladiolus than you think you “need” in the garden. A common experience is that gardeners hesitate to cut spikes because they’re the main show in the border. The solution is a simple cutting row somewhere less visible. That way, you can harvest armloads of blooms without leaving your main beds looking like they’ve had a bad haircut.
Bring Home the Summer Drama
Gladiolus are the floral equivalent of fireworksbold, colorful, and impossible to ignore. But unlike fireworks, you can enjoy them for weeks at a time, in your garden and in vases around the house. By choosing a sunny, well-drained spot, planting corms at the right depth and spacing, watering consistently, and taking a few simple steps to overwinter them where needed, you’ll set yourself up for success year after year.
Whether you’re growing a neat row of glads for summer bouquets or tucking them into mixed borders for vertical color, these spectacular flowers reward even modest effort. Start with a handful of corms this spring, and you may find yourself planning an entire gladiolus cutting garden by next year.


