
Table of Contents >> Show >> Hide
- Understanding a Dislocated Shoulder
- Important Safety Rules Before You Strap the Shoulder
- Supplies You May Need
- How to Strap a Dislocated Shoulder: 9 Steps
- Step 1: Get medical help first
- Step 2: Keep the person still and calm
- Step 3: Check circulation and sensation
- Step 4: Support the forearm in a natural position
- Step 5: Create a sling under the forearm
- Step 6: Add padding for comfort
- Step 7: Secure the upper arm with a broad wrap
- Step 8: Recheck fingers, comfort, and fit
- Step 9: Ice the shoulder and follow medical instructions
- What Not to Do When Strapping a Dislocated Shoulder
- After the Shoulder Is Treated: Recovery Basics
- When to Call a Doctor Again
- Practical Example: Strapping at a Sports Field
- Practical Example: Strapping at Home
- Common Mistakes People Make
- Experience Section: Real-Life Lessons About Strapping a Dislocated Shoulder
- Conclusion
A dislocated shoulder is one of those injuries that can turn a normal afternoon into a dramatic medical documentary in about three seconds. One minute someone is reaching, falling, tackling, lifting, or showing off a questionable “watch this” move; the next, the shoulder looks wrong, hurts badly, and refuses to behave like a shoulder.
Before we go any further, here is the big safety headline: if you suspect a shoulder is dislocated, do not try to pop it back in. That is not bravery. That is how you accidentally irritate nerves, blood vessels, ligaments, tendons, or nearby bone. The safest job for a bystander, coach, parent, teammate, or very calm friend is to support the arm, limit movement, reduce swelling, and get medical help.
So what does “strapping a dislocated shoulder” actually mean? In a first-aid context, it usually means supporting and immobilizing the injured arm with a sling, wrap, or shoulder immobilizer until a healthcare professional evaluates it. After a doctor reduces the shoulder, meaning places the upper arm bone back into the socket, the shoulder may also be held in a sling or brace during early healing. This guide explains how to strap a dislocated shoulder in nine careful steps, with a focus on comfort, safety, and common sense.
Understanding a Dislocated Shoulder
The shoulder is the most mobile joint in the body, which is wonderful when you are swimming, throwing, climbing, dancing, or reaching the top shelf. Unfortunately, all that mobility comes with a tradeoff: the shoulder is also easier to dislocate than many other joints.
A shoulder dislocation happens when the head of the upper arm bone, called the humerus, comes out of the shoulder socket. The injury often occurs after a fall, sports collision, car accident, hard pull, or awkward twist. Some people also develop repeat dislocations because the supporting tissues around the shoulder have been stretched or injured before.
Common signs of a shoulder dislocation
A dislocated shoulder may cause intense pain, visible deformity, swelling, bruising, weakness, numbness, tingling, or inability to move the arm normally. The person may hold the arm close to the body because even tiny movements feel like the shoulder has filed a formal complaint.
Because shoulder dislocations can happen with fractures, nerve irritation, or blood vessel injury, professional evaluation matters. Strapping is not a cure. It is a temporary support method while waiting for care or following a medical provider’s instructions.
Important Safety Rules Before You Strap the Shoulder
Before touching tape, cloth, or a sling, pause and check the situation. If the person has severe pain, an obvious shoulder deformity, numb fingers, blue or pale skin, heavy bleeding, signs of shock, trouble breathing, or a head, neck, or spine injury, call emergency services right away.
Do not pull the arm. Do not twist it. Do not ask the injured person to “test it.” Do not follow a random social media video that begins with, “My buddy does this all the time.” The goal is to keep the arm in the position that is most comfortable and prevent further movement.
If rings, watches, or tight bracelets are on the injured side, remove them if this can be done easily and without moving the shoulder. Swelling can make jewelry difficult to remove later.
Supplies You May Need
You do not need a fully stocked athletic training room to support a dislocated shoulder. Useful supplies include a triangular bandage, clean towel, scarf, long-sleeved shirt, elastic wrap, medical tape, safety pins, padding, and an ice pack wrapped in a towel. If a commercial sling or shoulder immobilizer is available, even better.
The simplest and safest setup is often a sling combined with a broad wrap around the torso, sometimes called a swathe. The sling supports the forearm; the swathe helps keep the upper arm close to the body.
How to Strap a Dislocated Shoulder: 9 Steps
Step 1: Get medical help first
If the injury is new and the shoulder may be out of place, arrange urgent medical care immediately. Strapping should happen while waiting for help, during transport, or after a clinician has already treated the shoulder and recommended immobilization.
This step comes first because a dislocated shoulder is not just a “wrap it and walk it off” injury. A healthcare professional may need to examine the shoulder, check nerve and blood flow, order imaging, reduce the dislocation, and decide how long immobilization is needed.
Step 2: Keep the person still and calm
Have the injured person sit or stand in the position that causes the least pain. Many people naturally hold the forearm across the body. Let them do that. The body often finds the least terrible option faster than a committee of nervous helpers.
Encourage slow breathing. Sudden movement can make pain worse, and panic can cause muscle tightening. Calm support is surprisingly powerful first aid. Speak clearly, keep the area uncrowded, and avoid unnecessary touching.
Step 3: Check circulation and sensation
Before strapping, look at the injured arm and hand. Are the fingers warm? Is the color normal? Can the person gently wiggle the fingers? Do they feel numbness, tingling, or unusual weakness?
If the hand is cold, pale, blue, numb, or increasingly weak, treat it as urgent. These symptoms may suggest blood vessel or nerve involvement. Do not delay care by trying to perfect the world’s most beautiful sling.
Step 4: Support the forearm in a natural position
Place a folded towel, jacket, or triangular bandage under the forearm without lifting or forcing the arm. The elbow is usually bent at about 90 degrees, but comfort matters more than geometry. If 90 degrees causes pain, do not insist on it. This is first aid, not a protractor contest.
The hand should sit slightly higher than the elbow when possible. That position can help reduce swelling in the hand and wrist. Keep the upper arm close to the body.
Step 5: Create a sling under the forearm
Using a triangular bandage, scarf, or long piece of cloth, slide the wide part under the forearm. Bring one end up behind the neck and the other end up in front of the shoulder on the uninjured side. Tie the ends at the side of the neck, not directly on the spine, and pad the knot if needed.
The sling should support the wrist and hand as well as the forearm. If the wrist droops out like it missed the invitation, adjust the cloth so the hand is supported. The goal is to let the fabric carry the arm’s weight instead of the injured shoulder.
Step 6: Add padding for comfort
Place soft padding between the injured arm and the body if there is space and it does not increase pain. A folded towel can prevent rubbing and help the arm rest more comfortably. Add padding under the neck strap if it digs into the skin.
Comfort is not a luxury here. Pain can cause guarding, guarding can create more tension, and tension can make everything feel worse. Good padding turns a rough emergency sling into something the injured person can tolerate until proper treatment is available.
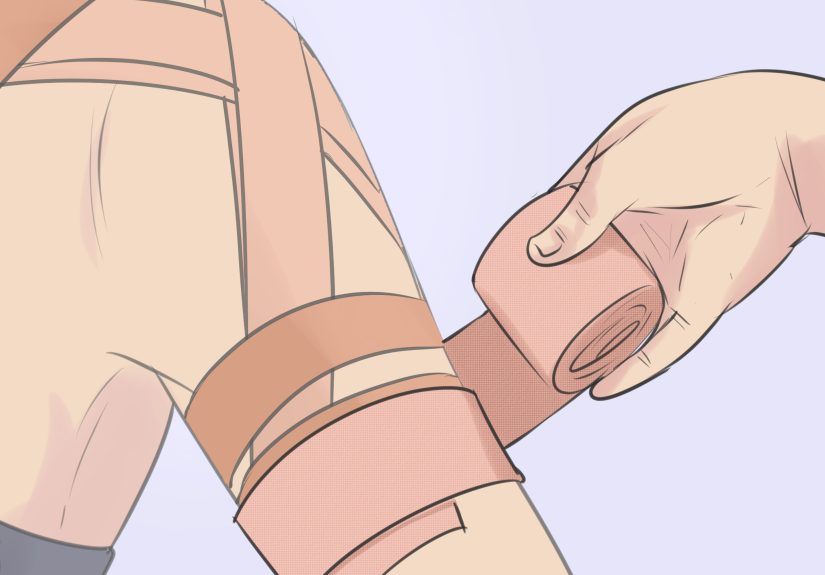
Step 7: Secure the upper arm with a broad wrap
Once the forearm is supported, use a broad elastic wrap, towel, or second triangular bandage around the chest and injured upper arm. This is the “strap” part many people imagine. Wrap across the upper arm and torso to hold the arm close to the body.
Keep the wrap snug but not tight. It should reduce shoulder movement, not squeeze the ribs like a medieval fashion experiment. Avoid placing pressure directly over the injured shoulder joint. Do not wrap so tightly that breathing feels restricted.
Step 8: Recheck fingers, comfort, and fit
After strapping, check the hand again. Fingers should remain warm and normally colored. The person should still be able to gently move the fingers. Ask whether numbness, tingling, or pain has increased.
If the wrap causes more pain, loosen it. If the hand becomes cold, pale, blue, numb, or swollen, remove or loosen the strapping and seek urgent help. A sling should support the injury, not create a new problem that wants its own appointment.
Step 9: Ice the shoulder and follow medical instructions
Apply an ice pack wrapped in a towel to the shoulder area for short periods, commonly 15 to 20 minutes at a time. Do not place ice directly on bare skin. Ice can help with pain and swelling while waiting for medical care or during early recovery if recommended by a provider.
After treatment, follow the healthcare provider’s instructions about sling use, medications, sleep position, bathing, exercises, and follow-up appointments. Some people need only a short period of immobilization. Others need a longer recovery plan, physical therapy, or additional care if the shoulder is unstable or repeatedly dislocates.
What Not to Do When Strapping a Dislocated Shoulder
Knowing what not to do is just as important as knowing the nine steps. Do not try to reduce the shoulder yourself unless you are a trained medical professional in an appropriate setting. Do not force the arm into a “normal” position. Do not massage the shoulder aggressively. Do not apply heat immediately after a fresh traumatic injury unless a clinician advises it. Do not let the person return to sports or heavy lifting just because the sling feels secure.
Also, do not use narrow tape directly around the shoulder and chest as the main support. Thin tape can irritate the skin, compress soft tissue, and fail to immobilize the arm well. A broad sling and swathe are usually more comfortable and safer for temporary support.
After the Shoulder Is Treated: Recovery Basics
Once the shoulder is back in place, pain often improves quickly, but that does not mean the injury is finished. The ligaments, capsule, muscles, and tendons around the joint may be stretched or torn. That is why doctors often recommend a sling or immobilizer for a period of time, followed by gradual rehabilitation.
Physical therapy may focus on restoring range of motion, strengthening the rotator cuff, improving shoulder blade control, and reducing the risk of another dislocation. Athletes, active workers, and people with repeat instability may need a more structured plan.
Sleeping with a strapped shoulder
Sleeping can be awkward after a shoulder dislocation. Many people are more comfortable lying on their back or slightly upright in a recliner, with pillows supporting the injured arm. Avoid sleeping on the injured side. Keep the sling on if your provider tells you to wear it at night.
Daily activities while wearing a sling
Getting dressed, showering, typing, and making breakfast can suddenly feel like advanced engineering. Loose shirts, front-opening tops, slip-on shoes, and prepared meals can make life easier. Move slowly, keep the arm supported, and ask your healthcare provider which movements are allowed.
When to Call a Doctor Again
After a shoulder dislocation, contact a healthcare professional if pain worsens, swelling increases, the hand becomes numb or cold, the sling causes skin sores, fever appears, or the shoulder feels like it may slip out again. Also seek guidance before returning to contact sports, overhead lifting, swimming, throwing, or gym workouts.
A repeat dislocation is more likely in some people, especially younger athletes and those with shoulder instability. Proper rehab is not the glamorous part of recovery, but it is often the part that keeps the shoulder from turning into a recurring guest star in your medical history.
Practical Example: Strapping at a Sports Field
Imagine a basketball player falls hard after a rebound and immediately grabs their shoulder. The shoulder looks uneven, pain is intense, and the player cannot move the arm. A coach should stop play, keep the athlete still, call for medical help, and avoid trying to “fix” the joint.
While waiting, the coach can support the forearm with a towel or triangular bandage, tie a sling around the neck on the uninjured side, and use a broad wrap to hold the arm close to the torso. The coach should check the fingers before and after strapping and apply wrapped ice near the shoulder. The athlete should not return to the game, even if adrenaline starts whispering nonsense.
Practical Example: Strapping at Home
Now imagine someone slips on wet steps and lands on an outstretched arm. The shoulder is painful and looks out of place. A family member should call urgent care or emergency services, help the person sit comfortably, and support the injured arm with a scarf or towel.
A second towel can be wrapped around the upper arm and chest to reduce movement. The family member should avoid pulling the arm through a sleeve, avoid lifting the elbow, and avoid driving if pain is severe or the person feels faint. The safest destination is professional medical care.
Common Mistakes People Make
Using tape like a magic spell
Athletic tape can support mild strains in some situations, but a suspected dislocated shoulder needs immobilization and medical evaluation. Tape alone is not enough. It may also hide swelling or make circulation checks harder.
Making the sling too low
If the wrist hangs below the elbow, the shoulder may feel more strain. Adjust the sling so the forearm is supported and the hand sits slightly elevated when possible.
Wrapping too tightly
A tight wrap can restrict breathing or reduce circulation. The person should be able to breathe normally, and the hand should stay warm and normally colored.
Skipping follow-up care
Once pain improves, it is tempting to declare victory and move on. Bad idea. Follow-up care helps confirm healing, guide rehab, and reduce the risk of future instability.
Experience Section: Real-Life Lessons About Strapping a Dislocated Shoulder
People who have dealt with shoulder dislocations often describe the same first lesson: everything feels urgent, but rushing makes things worse. The most helpful person in the room is rarely the loudest. It is usually the calm person who says, “Let’s keep your arm supported and get help.” That attitude matters because pain can make the injured person scared, tense, and more likely to move suddenly.
One common experience is that an improvised sling works better than expected when it is done gently. A hoodie, scarf, towel, or triangular bandage can support the forearm well enough for temporary care. The key is not fancy equipment. The key is avoiding unnecessary shoulder movement. A soft towel under the wrist, a knot padded near the neck, and a broad wrap around the torso can make a dramatic difference in comfort.
Another lesson is that the injured person’s preferred position should be respected. Helpers sometimes want the arm to look symmetrical or “correct,” but the body may choose an awkward-looking position because it hurts less. Trying to straighten the arm for appearance is not helpful. Support the position found, secure it carefully, and let medical professionals handle the joint.
People also learn quickly that the sling needs frequent checking. A sling that felt fine five minutes ago may become uncomfortable as swelling increases or muscles tighten. The fingers tell an important story. If they become cold, pale, blue, numb, or more swollen, the wrap may be too tight or the injury may need faster attention. Checking the hand is a small habit with big value.
In sports settings, the biggest mistake is underestimating the injury after the first wave of pain settles. Athletes are famously talented at saying, “I’m good,” while clearly being not good at all. A strapped shoulder is not permission to return to play. It is a temporary safety measure. Returning too soon can turn a single dislocation into repeated instability, longer rehab, or even surgery.
At home, the challenge is often logistics. Getting into a car, changing clothes, or lying down can be surprisingly difficult. The best experience-based advice is to keep things simple: loose clothing, slow movements, pillows for support, and no heroic reaching. If a shirt must be removed, take it off the uninjured side first and avoid dragging fabric over the injured shoulder. When dressing, put the injured arm in first only if a clinician says movement is safe and pain allows it.
Finally, many people discover that recovery is not just about wearing a sling. The sling protects the shoulder early, but rehab restores confidence. Gentle exercises, when approved by a provider, help prevent stiffness and rebuild strength. The shoulder may feel vulnerable at first, especially during sleep or daily tasks, but a careful plan usually beats guesswork. In short: strap it gently, check it often, get medical care, and let recovery be boring. Boring recovery is underrated. Boring recovery is beautiful.
Conclusion
Learning how to strap a dislocated shoulder is really learning how to protect the injury until proper medical care takes over. The safest approach is simple: do not force the joint back in, keep the arm supported, use a sling and broad wrap to limit movement, check circulation, apply wrapped ice, and follow professional instructions.
A shoulder dislocation may look like a one-joint problem, but it can involve muscles, ligaments, nerves, blood vessels, and bone. That is why careful support matters. Done correctly, temporary strapping can reduce pain, prevent extra movement, and make the trip to medical care less miserable. Done recklessly, it can make a bad day worse.
When in doubt, choose caution. Shoulders are useful. They help us lift groceries, hug people, throw balls, reach shelves, and dramatically point at things across the room. They deserve better than guesswork.


