
Table of Contents >> Show >> Hide
- What Is a Hopper in Minecraft?
- Materials Needed to Make a Hopper
- How to Use a Hopper in Minecraft: 14 Steps
- Step 1: Craft a Hopper
- Step 2: Place the Hopper on the Ground
- Step 3: Understand Hopper Direction
- Step 4: Use Sneak Placement to Connect to Containers
- Step 5: Connect a Hopper to a Chest
- Step 6: Pull Items from a Chest Above
- Step 7: Build a Basic Automatic Furnace
- Step 8: Add a Side Hopper for Fuel
- Step 9: Chain Hoppers Together
- Step 10: Use Hoppers Under Farms
- Step 11: Lock a Hopper with Redstone
- Step 12: Read a Hopper with a Comparator
- Step 13: Use Hopper Minecarts for Faster Collection
- Step 14: Test Your Hopper System Before Expanding
- Common Hopper Uses in Minecraft
- Common Hopper Mistakes and How to Fix Them
- Practical Examples of Hopper Builds
- Advanced Tips for Better Hopper Systems
- Personal Experience: What Using Hoppers Teaches You About Minecraft Automation
- Conclusion
Note: This is original, publication-ready educational content based on current Minecraft hopper mechanics for standard survival gameplay in Java and Bedrock-style play.
If Minecraft had a plumbing department, the hopper would be its hardest-working employee. This small, funnel-shaped block moves items, collects drops, feeds furnaces, empties containers, powers item sorters, and quietly makes your base feel like it has hired a tiny logistics manager. Learning how to use a hopper in Minecraft is one of the first real steps toward automation, and once you understand it, you will never look at random chest clutter the same way again.
A hopper is a redstone-related utility block that can collect items from above and move them into another inventory, such as a chest, furnace, barrel, dispenser, dropper, brewing stand, composter, or another hopper. It can also pull items from containers placed above it. In simple terms: items go in, items come out, and you get to stop manually dragging stacks around like a medieval warehouse worker.
This guide explains how to craft a hopper, place it correctly, connect it to containers, use it with furnaces, lock it with redstone, build basic item transport systems, and avoid common mistakes. By the end, you will know not only the 14 practical steps for using a Minecraft hopper, but also how to think like a builder who designs clean, useful, low-stress automation.
What Is a Hopper in Minecraft?
A hopper is a five-slot inventory block used to collect and transfer items. Its wide top can receive dropped items, while its small nozzle points toward the block where it will send items. If the nozzle points into a chest, the hopper will push items into that chest. If a chest sits above the hopper, the hopper can pull items down from the chest. That one idea powers thousands of Minecraft farms, storage systems, auto-smelters, and redstone contraptions.
The main keyword here is simple: how to use a hopper in Minecraft. But the real secret is direction. A hopper does not magically guess where you want items to go. It points where you place it. Put it the wrong way, and your clever automatic farm becomes modern art with iron.
Materials Needed to Make a Hopper
Before using a hopper, you need to craft one. The hopper recipe is beginner-friendly, but it does require iron, so you will need to do a bit of mining first.
You Need:
- 5 iron ingots
- 1 chest
- 1 crafting table
To craft a chest, place eight wooden planks around the outside slots of a crafting table, leaving the middle empty. To get iron ingots, mine iron ore, smelt raw iron in a furnace, and collect the ingots. Once you have the materials, you are ready to build the block that will save your future self a suspicious amount of clicking.
How to Use a Hopper in Minecraft: 14 Steps
Step 1: Craft a Hopper
Open a crafting table. Place the chest in the center slot. Then place iron ingots in a V shape around it: one on the left middle, one on the right middle, one on the bottom middle, and two in the upper left and upper right slots. The result is one hopper.
This recipe matters because hoppers are not usually something you find lying around in the world. You craft them, and if you plan to build a storage system, furnace array, or automatic farm, you will probably need several. Translation: start loving iron.
Step 2: Place the Hopper on the Ground
Select the hopper in your hotbar and place it on a block. When placed normally on the ground, the hopper’s nozzle points downward. This means it will try to move items into a container below it, if one exists.
You can right-click or use the interaction button to open the hopper’s inventory. It has five slots, which is not much for long-term storage, but that is not the point. A hopper is not a warehouse. It is a conveyor belt wearing a bucket costume.
Step 3: Understand Hopper Direction
Direction is the most important hopper rule. The narrow end of the hopper shows where items will be pushed. If the nozzle points down, items go down. If it points sideways into a chest, barrel, furnace, or another hopper, items go sideways.
Many beginner hopper problems happen because the hopper is facing the wrong direction. If your items are not moving, crouch down, stare at the nozzle, and ask the ancient Minecraft question: “Where are you even pointing, little buddy?”
Step 4: Use Sneak Placement to Connect to Containers
When placing a hopper against a chest, furnace, barrel, dispenser, or other interactive block, hold the sneak key while placing it. On most keyboards, this is Shift by default. Sneaking prevents you from opening the container and lets you attach the hopper instead.
This is essential for side connections. For example, if you want a hopper to feed items into the side of a furnace or into the back of a chest, sneak-place the hopper while aiming at that block. Without sneak placement, you may just open the chest and feel personally betrayed.
Step 5: Connect a Hopper to a Chest
The simplest hopper setup is a hopper feeding into a chest. Place a chest first. Then sneak-place the hopper while aiming at the chest. The hopper nozzle should point into the chest. Drop items onto the hopper or place items into its inventory, and they will move into the chest.
This is perfect for collecting drops from farms. Put a hopper under a spot where items land, connect it to a chest, and let it gather eggs, crops, mob drops, or other resources. Congratulations: you have invented “not picking things up manually.” It is a beautiful technology.
Step 6: Pull Items from a Chest Above
A hopper can pull items from a container directly above it. Place a chest on top of a hopper, and the hopper will slowly draw items from the chest into itself, then push them in the direction its nozzle faces.
This is useful when you want a chest to act as an input container. For example, you can place a chest above a hopper that leads into a furnace. Put raw food, ore, or sand in the top chest, and the hopper will feed the furnace automatically.
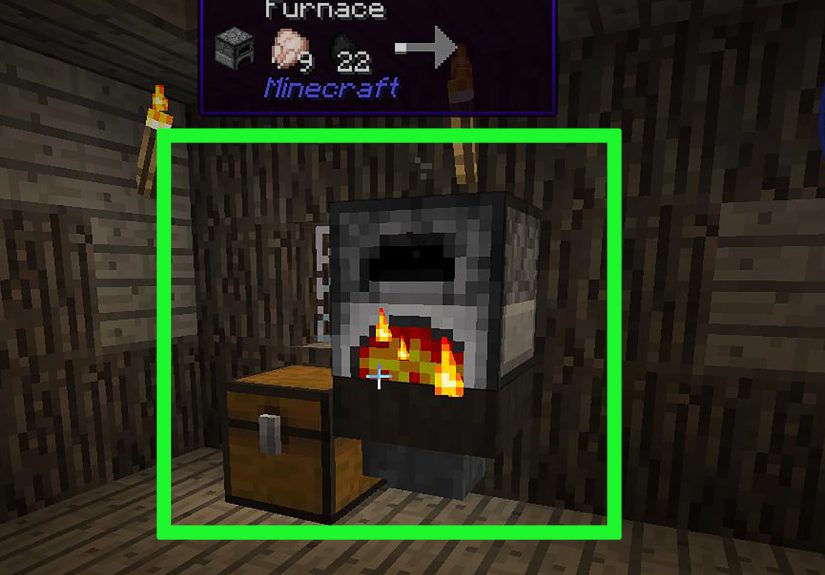
Step 7: Build a Basic Automatic Furnace
One of the best beginner hopper builds is an automatic furnace. Place a chest at the top for smeltable items, a hopper beneath that chest feeding into the top of a furnace, and another hopper under the furnace feeding into an output chest.
The top hopper places smeltable items into the furnace’s input slot. The bottom hopper removes finished items and sends them into the chest below. Add fuel manually, or build the next step for a fully automated smelting setup.
Step 8: Add a Side Hopper for Fuel
To automate fuel, place a chest beside the furnace and connect a hopper from that chest into the side of the furnace. Furnaces treat hopper input differently depending on where the hopper enters. Items from the top generally go into the smelting slot, while fuel entering from the side goes into the fuel slot.
Now you can place coal, charcoal, bamboo, dried kelp blocks, or other fuel in the side chest. Your furnace will keep working as long as it has input, fuel, and space for output. It is not flashy, but it is one of the most useful survival machines you can build early.
Step 9: Chain Hoppers Together
Hoppers can feed into other hoppers. This allows you to create item pipes that move resources across short distances. Place one hopper facing into another, then another, and so on. Items will travel through the chain until they reach the final container.
Horizontal hopper lines are useful for compact storage rooms and farm outputs. Vertical hopper stacks can move items downward easily. Moving items upward requires different systems, such as droppers, water elevators, or bubble columns, because hoppers do not push items upward by themselves.
Step 10: Use Hoppers Under Farms
Hoppers are excellent for automatic farms. A classic example is a chicken egg collector. Place chickens above a hopper, connect the hopper to a chest, and eggs will be collected automatically. The same idea works for crop farms, cactus farms, bamboo farms, and mob farms where drops fall onto collection points.
If drops scatter over a wide area, use water streams to push items toward one hopper, or place multiple hoppers under the collection zone. Just remember that hoppers can cause lag if you use huge numbers of them carelessly on a server, so build smart rather than covering the entire planet in funnels.
Step 11: Lock a Hopper with Redstone
A powered hopper stops moving items. This is called locking the hopper. You can power it with redstone dust, a lever, a redstone torch, a block receiving redstone power, or other redstone components.
This feature is incredibly useful. A locked hopper can pause an item stream, hold materials until a machine is ready, or help control an item sorter. When the redstone signal turns off, the hopper resumes moving items. Think of it as a traffic light for your stuff.
Step 12: Read a Hopper with a Comparator
A redstone comparator can measure how full a hopper is. The more items inside the hopper, the stronger the comparator signal becomes. This is the foundation of many item sorters and storage monitors.
For a basic item sorter, a hopper is filled with a specific filter item and filler items. A comparator detects when an extra matching item enters, then sends a redstone signal that briefly unlocks another hopper below, allowing the item to pass into the correct chest. It sounds like wizardry until you build it once. Then it becomes wizardry with labels.
Step 13: Use Hopper Minecarts for Faster Collection
A hopper minecart is crafted by combining a hopper and a minecart. It can collect items while moving along rails and is especially helpful under farms where items may land across a wide area. Hopper minecarts can also pull items through some blocks, depending on the setup, which makes them popular in farms and furnace arrays.
Use hopper minecarts when stationary hoppers are too slow, too expensive, or too awkward to place. For example, a hopper minecart running under a row of crops or furnaces can distribute or collect items more efficiently than a long line of individual hoppers.
Step 14: Test Your Hopper System Before Expanding
Before building a giant automatic storage room, test one small module. Drop a few items into the input chest. Watch where they go. Check hopper direction. Confirm that redstone is not accidentally locking anything. Make sure the output chest has space.
This tiny test saves enormous frustration. Redstone machines often fail because of one rotated hopper, one powered block, one missing chest, or one filler item with the wrong name. Minecraft automation rewards patience. It also punishes overconfidence with 4,000 pieces of cobblestone in the wrong chest.
Common Hopper Uses in Minecraft
Automatic Storage
Hoppers can move items from farms into chests, barrels, or sorting systems. This is useful for mob farms, crop farms, tree farms, kelp farms, and mining storage areas. Instead of dumping everything manually, you create one input point and let the system handle the rest.
Auto-Smelting
An automatic furnace setup uses hoppers to insert raw materials, insert fuel, and remove finished products. This works with furnaces, blast furnaces, and smokers. Blast furnaces are faster for ores and metal-related items, while smokers are faster for food. A basic hopper furnace is one of the most practical survival builds in the game.
Item Sorting
With hoppers, comparators, redstone dust, repeaters, torches, and chests, you can build automatic item sorters. These systems separate items into different chests based on filter items. They are popular in large survival bases because they turn inventory chaos into organized peace.
Composter Automation
Hoppers can feed compostable items into composters and remove bone meal from them. This is excellent for farms that produce excess seeds, wheat, crops, or plant materials. Instead of throwing extra seeds into lava like a dramatic farmer, you can turn them into bone meal.
Brewing and Utility Blocks
Hoppers can interact with brewing stands, droppers, dispensers, and other inventory-based blocks. This allows players to build potion systems, item launchers, farm controls, and more advanced redstone contraptions.
Common Hopper Mistakes and How to Fix Them
The Hopper Is Facing the Wrong Way
If items are not entering the chest, check the nozzle. Break the hopper with a pickaxe and place it again while sneaking and aiming at the target container.
The Hopper Is Powered
If a hopper suddenly stops moving items, look for redstone power nearby. A lever, torch, powered block, or redstone line may be locking it.
The Container Is Full
Hoppers cannot push items into a full chest. Add more storage, connect more chests, or clear space.
The Wrong Input Side Is Used
Furnaces use different sides for different slots. Top input is for smeltable items, side input is usually for fuel, and bottom output removes finished items. If your auto-smelter is acting strange, check which side each hopper connects to.
The Filter Items Are Wrong
In item sorters, filler items should be named and unique so they do not accidentally enter the system as normal items. If your sorter breaks, inspect the filter hopper carefully.
Practical Examples of Hopper Builds
Beginner Egg Collector
Place a chest, attach a hopper to it, and put chickens above the hopper in a small pen. Eggs fall into the hopper and move into the chest. It is simple, cheap, and surprisingly satisfying.
Starter Auto-Smelter
Place an output chest at the bottom, a hopper on top of that chest, a furnace on top of the hopper, another hopper on top of the furnace, and an input chest on top. Add a side hopper and fuel chest for full automation. This setup is perfect for cooking food, smelting iron, or making glass.
Mob Farm Collection Chest
At the bottom of a mob farm, place hoppers where drops land. Connect them to chests. Add slabs, carpets, or safe access points depending on your design. The hopper system collects drops while you focus on not being surprised by skeletons with suspicious accuracy.
Simple Item Pipe
Use a row of hoppers to move items from one room to another. This is useful when a farm output is not directly beside your storage area. Keep the pipe short when possible, because each hopper adds cost and can affect performance in large builds.
Advanced Tips for Better Hopper Systems
Use barrels when you need compact storage that can open even with blocks above them. Use water streams for moving large amounts of items over long distances, then use hoppers only at pickup points. Use hopper minecarts when collecting from wide farm areas. Use comparators when you need to detect item levels. Use redstone locks when you need precise control.
For servers or large worlds, avoid leaving thousands of hoppers constantly checking for items if you do not need them. Cover unused hopper tops with containers or design systems that rely on water streams and fewer hopper pickup points. Efficient design is not just good engineering; it keeps your world from turning into a slideshow with cows.
Personal Experience: What Using Hoppers Teaches You About Minecraft Automation
The first time most players use a hopper, they usually expect it to be simpler than it is. You craft the block, place it near a chest, throw items at it, and then stare in confusion when nothing happens. That moment is practically a Minecraft graduation ceremony. The hopper is not difficult, but it teaches one of the most important lessons in the game: placement matters.
My favorite way to learn hoppers is by starting with a tiny auto-smelter. It is small enough to build in survival without needing a huge iron farm, but useful enough that you feel the reward immediately. Put ore in the top chest, coal in the side chest, and walk away. When you come back and find finished ingots in the bottom chest, the game suddenly feels different. You are no longer just surviving. You are designing systems.
Another great experience is building a hopper-based egg farm. It may not be glamorous, but it is funny and effective. Chickens wander around above a hopper, eggs drop into a chest, and you slowly realize that Minecraft automation often begins with something ridiculous. That is part of the charm. One minute you are punching trees; the next minute you are managing poultry logistics with iron funnels.
Hoppers also teach patience. When you build an item sorter, the first version may fail. Maybe the hopper points down instead of sideways. Maybe your filler items are not renamed. Maybe a redstone torch powers the wrong block. Maybe one item slips into the wrong chest and your storage room becomes a crime scene made of rotten flesh and cobblestone. These mistakes are normal. In fact, they are the real tutorial.
The best approach is to test slowly. Build one slice of a sorter before building twenty. Send five items through before dumping an entire mining trip into the input chest. Label your chests. Keep extra blocks nearby. Use temporary glass or open spaces so you can see what is happening inside the machine. A visible machine is easier to debug than a sealed machine that sits there silently judging you.
Once you understand hoppers, you start seeing your base differently. That furnace wall could become automatic. That farm could collect itself. That mob grinder could feed into a storage line. That messy chest monster near your bed could become a sorted storage room. Hoppers turn Minecraft from a game of manual chores into a game of systems, and that is why they remain one of the most useful blocks ever added.
The biggest lesson is this: do not overbuild too early. A simple hopper into a chest is often enough. A clean auto-smelter is better than a giant furnace array you do not understand. A small item sorter for your most common resources is more useful than a massive storage system that eats all your iron and your weekend. Start small, learn the flow, and expand when the system makes sense.
In the end, using a hopper in Minecraft is about more than moving items. It is about learning how the game thinks. Inputs, outputs, signals, containers, timing, and direction all come together in one humble block. Master that block, and you unlock a new level of building confidence. Also, your chests get cleaner, which is basically emotional healing for Minecraft players.
Conclusion
Learning how to use a hopper in Minecraft gives you access to some of the most helpful automation tools in the game. With one hopper and one chest, you can collect drops. With a few hoppers and a furnace, you can automate smelting. With redstone and comparators, you can build item sorters, storage systems, and clever machines that make your base feel alive.
The key ideas are simple: craft the hopper with five iron ingots and a chest, place it in the correct direction, sneak-place it against containers, remember that redstone power locks it, and test every system before expanding. Once these basics click, hoppers become less mysterious and much more fun.
Whether you are building your first chicken egg collector or planning a giant automatic storage room, the hopper is your quiet little helper. It will not fight mobs, mine diamonds, or compliment your roof design, but it will move items all day without complaining. In Minecraft, that is basically employee of the month.


