
Table of Contents >> Show >> Hide
- Why Skillet Focaccia Works So Well
- What You’ll Need
- No-Knead Skillet Focaccia: Step-by-Step
- Skillet Size Notes (10-inch vs. 12-inch)
- Topping Ideas That Won’t Betray You in the Oven
- Troubleshooting: Common Focaccia Problems (and Fixes)
- Serving Ideas
- Storage and Reheating
- FAQ
- Real-World Skillet Focaccia Experiences (The “What Actually Happens” Section)
If you’ve ever wanted homemade bread without turning your kitchen into a flour-dusted CrossFit gym, skillet focaccia is your new best friend.
It’s the no-knead, high-reward loaf that delivers crispy, golden edges (thank you, olive oil), a soft and airy middle, and those iconic dimples that
practically beg to catch pools of salty, herby goodness.
This recipe is designed for a cast-iron skillet focaccia vibe: rustic, deeply browned, and sturdy enough for sandwichesbut still tender enough to tear
apart with your hands like a movie character who has no time for plates. The dough comes together with a spoon, then time does most of the work.
You’ll get big flavor from fermentation (overnight in the fridge is ideal), plus the option to add a simple brine for a glossy, salty top that tastes like
it came from an Italian bakery with better lighting than your apartment.
Why Skillet Focaccia Works So Well
A hot skilletespecially cast ironacts like a gentle frying pan for the bottom crust. With enough olive oil in the pan, the dough “shallow-fries” as it bakes,
creating that signature crisp edge and deeply golden base. Meanwhile, a high-hydration dough (lots of water relative to flour) creates steam in the oven,
helping the crumb inflate into those beautiful, irregular bubbles.
And the best part? “No-knead” doesn’t mean “no structure.” Time builds gluten slowly, and a couple of simple folds (no counter mess, no wrestling match)
help the dough hold onto gas, so it rises up instead of spreading out like a tired pancake.
What You’ll Need
Equipment
- 10-inch cast-iron skillet (a 12-inch works toosee notes)
- Large mixing bowl
- Rubber spatula or wooden spoon
- Kitchen scale (highly recommended) or measuring cups
- Plastic wrap, lid, or reusable cover
Ingredients
- All-purpose flour: 400g (about 3 1/3 cups)
- Water (warm, not hot): 320g (about 1 1/3 cups)
- Instant yeast: 2g (about 1/2 teaspoon) or active dry yeast (see note)
- Fine salt: 8g (about 1 1/2 teaspoons)
- Honey or sugar (optional but helpful): 10g (about 2 teaspoons)
- Extra-virgin olive oil: 60–90g total (about 1/4 to 1/3 cup), divided
- Flaky salt: for finishing
- Rosemary: 1–2 teaspoons chopped or 1–2 sprigs, optional
Optional Brine (Highly Recommended for a Glossy, Salty Top)
- 80g (about 1/3 cup) warm water
- 5g (about 1 teaspoon) kosher salt or 3/4 teaspoon fine sea salt
No-Knead Skillet Focaccia: Step-by-Step
Step 1: Mix the Dough (5 minutes)
- In a large bowl, whisk the flour and salt together. If using instant yeast, you can whisk it in here too.
-
Add the warm water and honey (if using). Stir with a spoon or spatula until no dry flour remains.
The dough will look shaggy and stickythis is correct and also a little rude, but we’ll forgive it. - Drizzle in 1 tablespoon (about 15g) olive oil and fold it through the dough. (Don’t overdo oil in the dough; most of the magic comes from the pan and the top.)
If using active dry yeast: dissolve it in the warm water with the honey/sugar and let it sit 5 minutes until foamy, then mix into the flour.
Step 2: Rest + Quick Folds (30–45 minutes total, mostly hands-off)
- Cover the bowl and let the dough rest for 15 minutes.
-
Wet your hand, grab one edge of the dough, stretch it up, and fold it over itself. Rotate the bowl and repeat 3–4 times (one “round” of folds).
Cover and rest 15 minutes. - Repeat one more round of folds. Cover the bowl again.
These folds aren’t kneading. Think of them as giving the dough a pep talk: “You can hold bubbles. I believe in you.”
Step 3: Choose Your Schedule
-
Overnight (best flavor & easiest handling):
Let the dough rise at room temperature for 1 hour, then refrigerate 12–24 hours. -
Same-day (still great):
Let the dough rise at room temperature until doubled and airy, 3–4 hours depending on kitchen temperature.
Step 4: Oil the Skillet Like You Mean It
-
Pour 2–3 tablespoons (30–45g) olive oil into a 10-inch cast-iron skillet.
Tilt to coat the bottom and sides. (This is not the moment for restraint.) - Scrape the dough into the skillet. Flip it once so both sides get shiny with oil.
-
Cover and let it proof until puffy and relaxed, 1–2 hours at room temperature.
If it’s cold in your kitchen, it may take longer. Dough hates being rushed.
Step 5: Preheat + Dimple (and optionally Brine)
- Place a rack in the middle of the oven and preheat to 450°F.
-
Drizzle another 1 tablespoon olive oil over the dough. Oil your fingers, then press straight down to create deep dimples across the surface.
Try not to tear all the way throughdimples should be confident, not violent. -
Optional brine: Stir the brine ingredients until dissolved. Pour it evenly over the dimpled dough so it settles into the little valleys.
Yes, it looks like too much liquid. No, you didn’t ruin it. This is the trick. -
Sprinkle with rosemary (if using) and a generous pinch of flaky salt.
Add toppings now (see ideas below).
Step 6: Bake
-
Bake for 20–25 minutes, until the top is deeply golden and the edges look audibly crispy.
If your focaccia is pale at 20 minutes, give it a few morecolor equals flavor. -
Cool in the skillet for 10 minutes, then carefully lift it out (a spatula helps).
Move to a rack so the bottom stays crisp.
Skillet Size Notes (10-inch vs. 12-inch)
A 10-inch skillet makes a thicker, tall-and-pillowy focacciagreat for sandwich slabs.
A 12-inch skillet yields a slightly thinner bread with more crust per bite (also excellent).
If using 12-inch, you can keep the same dough for a thinner result or scale up by 25% for more height.
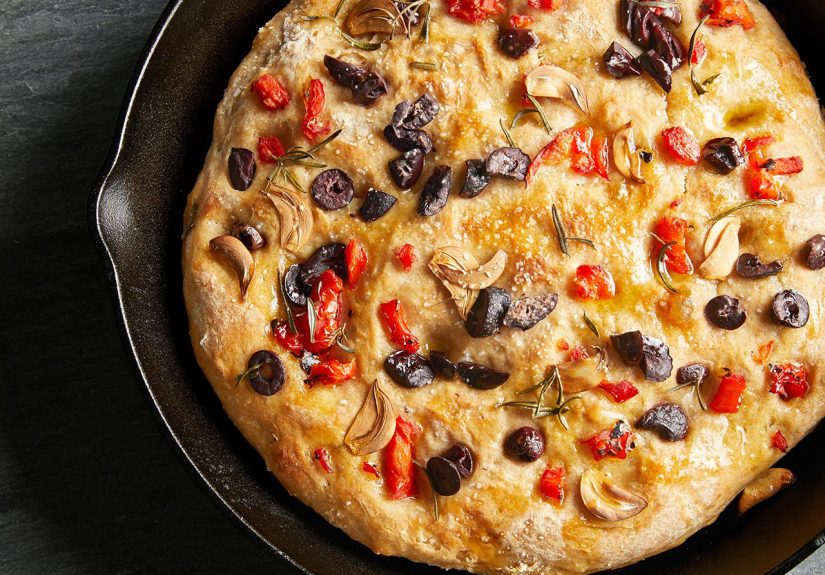
Topping Ideas That Won’t Betray You in the Oven
Focaccia toppings are fun until they burn. The rule: lightly oil anything that might dry out, and press toppings gently into the dough so they don’t sit up
like tiny sacrificial offerings.
- Classic rosemary + flaky salt (always a win)
- Cherry tomatoes + garlic (press tomatoes cut-side up for less sogginess)
- Olives + lemon zest (bright, salty, snackable)
- Caramelized onions (sweet and savory, especially with thyme)
- Everything bagel seasoning (because chaos tastes good)
- “Garden” focaccia with thin veggies arranged like art (pretty and deliciousjust slice thin so they roast, not steam)
Troubleshooting: Common Focaccia Problems (and Fixes)
My dough is super sticky
Good. High-hydration dough is sticky by nature. Oil your hands, use a spatula, and let time do its job.
Chilling overnight also makes the dough easier to handle.
It didn’t rise much
Check your yeast (is it old?), your water temperature (lukewarm is best), and your proofing environment (cold kitchens slow everything down).
Give it more timeespecially in the skillet proofuntil it looks puffy and airy.
It’s dense instead of airy
Usually this is under-proofing or too much flour (especially if using cups). Use a scale if possible.
Also avoid adding a lot of olive oil directly to the doughmost of the richness should come from the pan and the finishing oil.
It stuck to the pan
A skillet focaccia wants a truly generous oil layer. Don’t skimp. If your skillet is older or rough, line the bottom with parchment for insurance.
The top is dry
Add more olive oil before baking, and consider the brine. Dimples are not just cutethey’re functional little oil pools.
Serving Ideas
- Sandwich bread: slice horizontally and fill with turkey, mozzarella, arugula, and pesto
- Soup sidekick: serve with tomato soup or creamy white bean soup
- Snack mode: dip in olive oil + balsamic + cracked pepper
- Breakfast: toast a slice and top with eggs or ricotta + honey
Storage and Reheating
Focaccia is best the day it’s baked, but it reheats beautifully. Store leftovers in an airtight container at room temperature for 1–2 days.
For longer storage, freeze slices (wrap well) for up to 2 months.
To reheat: place in a 375°F oven for 8–12 minutes until warm and crisp. A toaster oven also works.
Microwave reheating is technically possible, but it turns the crust sadlike a puppy watching you leave for school.
FAQ
Is it really “no-knead” if we do folds?
Yes. Folds are gentle structure-building without the full kneading routine. Think “minimal effort, maximum payoff.”
You can even skip the folds if you do an overnight cold fermentation, but they improve height and bubble structure.
Can I use bread flour?
Absolutely. Bread flour can increase chew and structure. If you switch to bread flour, you may need a splash more water because it absorbs more.
What if I only have dried rosemary?
Use itjust go lighter. Dried herbs are more concentrated and can taste woody if you overdo it.
Can I make it dairy-free?
This recipe is naturally dairy-free unless you add cheese toppings. Olive oil handles the richness.
Real-World Skillet Focaccia Experiences (The “What Actually Happens” Section)
Skillet focaccia has a funny way of becoming your default “I need bread but I also need a life” recipe. The first time most people make it,
there’s a brief moment of doubt when the dough looks like a sticky science project. It clings. It stretches. It refuses to become a tidy ball.
Then, hours later, it transforms into a glossy, bubbly cloud in a skillet, and suddenly you’re acting like you invented bread.
One of the most practical wins is how forgiving the timeline can be. If you mix the dough at night, it’s ready to bake the next day with almost no effort.
If your schedule goes sideways (because life loves plot twists), the dough can hang out in the fridge longer and still bake up beautifully.
That makes this recipe perfect for busy weekdays: mix after dinner, refrigerate, bake the next afternoon or evening, and you’ve got fresh bread without
doing complicated math or owning a stand mixer.
The skillet stage is where the “experience” really shows. When you first transfer the dough into the oiled pan, it might not spread to the edges.
That’s normal. Dough needs a little nap before it’s ready to be stretched. If you try to force it right away, it springs back like it’s insulted.
But if you wait 15–20 minutes, it relaxes and starts to ooze outward. That’s the moment you learn the secret of focaccia: most of the technique is
simply knowing when to stop touching it.
Dimpling is also oddly joyful. It’s the rare bread step that feels like stress relief instead of homework. If you’ve got siblings, friends, or family around,
this is the part where “helpers” magically appear, because pressing fingerprints into dough is apparently irresistible.
The bonus: those dimples aren’t just aesthetic. They hold olive oil and brine, which means every bite gets seasoned from the top down.
The first time you use the brine method, it looks like you made a mistakelike your focaccia is taking a salty bath before school picture day.
Then it bakes into a glossy, crisp, flavorful top that makes plain “salt on top” feel underdressed.
Toppings are where real life gets creative. You start simplerosemary and flaky salt. Next time, you add cherry tomatoes.
Then you discover that olives, onions, and thin-sliced garlic make your kitchen smell like a tiny, delicious bakery.
Eventually, you’ll probably attempt an artistic vegetable “garden” focaccia because the internet convinced you it’s easy.
It is doablejust remember to slice veggies thin and lightly oil them, or they’ll steam and soften instead of roasting.
And if a topping looks like it might burn? Press it into the dough a bit and give it a light oil coating. Focaccia is generous,
but it’s not a firefighter.
The final experience: the sound. When you lift the bread out and hear that faint crackle from the bottom crust, you’ll know you did it right.
Even if the shape is a little lopsided, even if the dimples are chaotic, even if you accidentally made a “dimple canyon” with one overenthusiastic poke
it’s still going to taste amazing. Skillet focaccia is rustic bread, not a beauty pageant. Crisp edges, airy crumb, salty top, olive oil perfume:
it’s basically a guaranteed crowd-pleaser, and it somehow makes even a regular Tuesday dinner feel like you planned something.


