
Table of Contents >> Show >> Hide
- Why a Painted Number Canvas Works (Even If You’re “Not Crafty”)
- Before You Start: Pick the Number and the Style Story
- Supplies and Tools
- Step-by-Step: Pottery Barn Inspired Painted Number Canvas Tutorial
- 1) Prep the canvas (aka: set yourself up for success)
- 2) Paint the background in “layered whites,” not one flat white
- 3) Find center and mark your layout (crooked is not a “vibe” here)
- 4) Make your number stencil (three easy options)
- 5) Apply and secure the stencil (the “no-bleed” setup)
- 6) Paint the number with a light hand (less paint = sharper edges)
- 7) Peel the stencil at the right time
- 8) Distress it (tastefully) for that “found it at an antique market” look
- 9) Seal the canvas (optional, but smart)
- Design Details That Make It Look Store-Bought
- Variations You Can Try (Same Technique, Different Personality)
- Common Problems (and Easy Fixes)
- Cost Breakdown: DIY vs. Buying
- Extra: Real-World Experiences and Lessons (So You Don’t Learn the Hard Way)
- Conclusion
- SEO Tags
There are two kinds of people in the world: those who can casually stroll through Pottery Barn and
not fall in love with one perfectly simple piece of wall art… and the rest of us, who immediately
start doing mental math like, “Okay, if I skip coffee for 47 years, I can afford that canvas.”
The good news: you can absolutely recreate that classic, cozy, “I have my life together” Pottery Barn vibe
with a painted number canvaswithout needing a second mortgage or a suspiciously wealthy aunt.
This tutorial walks you through a clean, neutral, lightly distressed painted number canvas that looks
intentional, elevated, and genuinely store-bought.
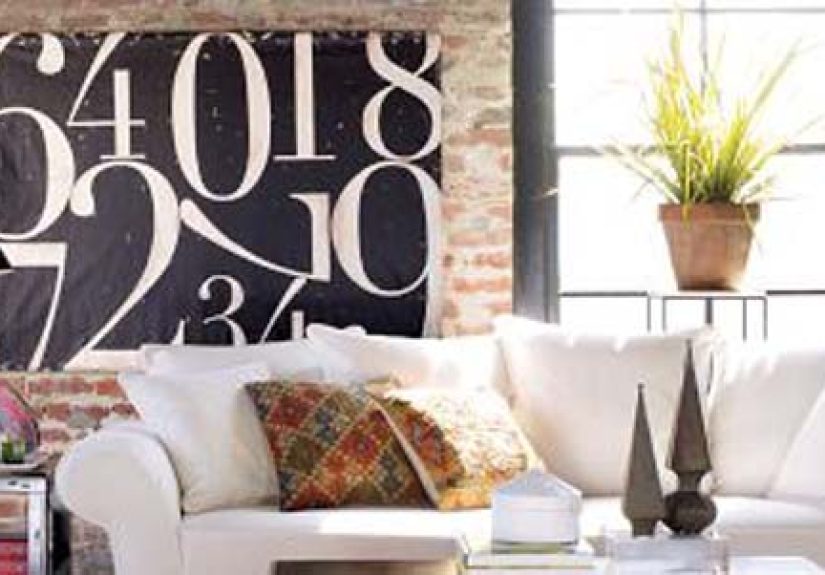
Why a Painted Number Canvas Works (Even If You’re “Not Crafty”)
A big painted number is basically the little black dress of home decor: minimal, bold, and it goes with
everything. In design terms, it gives you contrast (dark number, light background),
scale (oversized = statement), and negative space (breathing room that makes
a wall feel calmer). In real-life terms, it makes your home look curatedlike you definitely own matching
hangers and your junk drawer is “organized chaos” rather than “archaeological dig.”
This project is also forgiving. Slight texture? Adds character. Tiny imperfections? Congratulations, you’ve
achieved “artisan.” A little distressing? Suddenly everything is “vintage-inspired.” It’s a DIY where the
mistakes can be rebranded as style.
Before You Start: Pick the Number and the Style Story
The number can mean something (house number, wedding year, lucky number, jersey number) or absolutely nothing
at all. “7” doesn’t have to symbolize enlightenmentit can just look cool over your console table.
The key is deciding the vibe:
- Classic Pottery Barn: warm whites, subtle streaks, crisp black number, light distressing.
- Modern farmhouse: brighter white, heavier distressing, maybe a slightly rougher edge.
- Coastal-neutral: creamy whites with a whisper of driftwood/tan undertone and soft sanding.
- Industrial: charcoal background, off-white number, minimal distressing.
For the most Pottery Barn-inspired look, stick to a warm neutral background and a strong, simple numeral with a
traditional typeface feel. You want “timeless” not “math worksheet chic.”
Supplies and Tools
Core supplies
- Canvas (16×20, 18×24, or 20×30 are sweet spots for statement wall art)
- Acrylic craft paint: antique white (or warm off-white) + bright white + black (or soft black)
- Stencil for your number (store-bought stencil, printed template, vinyl cutout, or Cricut/Silhouette)
- Painters tape or low-tack stencil tape
- Foam brush, stencil brush, or small high-density foam roller
- Fine-grit sandpaper (around 220) or a sanding block
- Pencil, ruler, and a level (or at least a very confident eyeball)
Optional upgrades (high impact, low drama)
- Mod Podge or decoupage medium (for texture and a more distressed, layered finish)
- Old book pages/newspaper (for subtle texture under paint)
- Clear sealer or acrylic varnish (matte or satin looks most “furniture store”)
- Craft knife (for cutting a paper stencil cleanly)
- Graphite paper (for tracing your number perfectly)
Step-by-Step: Pottery Barn Inspired Painted Number Canvas Tutorial
1) Prep the canvas (aka: set yourself up for success)
If you’re using a brand-new canvas, you can jump right into paint. If you’re upcycling an old canvas,
paint over the old design with a base coat (or two) until it’s fully covered.
Optional texture trick: For a more rustic, layered look, apply decoupage medium and smooth
down torn book pages or newspaper across the canvas. Overlap pieces slightly. Let it dry completely.
This creates subtle texture that looks amazing once it’s painted and lightly sandedlike your canvas has
a backstory and maybe a tiny passport.
2) Paint the background in “layered whites,” not one flat white
Pottery Barn-style neutrals typically look rich because they’re not a single, perfect coat. Start with a warm
off-white (think antique white). Paint the entire canvas and let it dry.
Next, dip into a brighter white and apply it looselynot wall-paint perfect. Use random,
light strokes or a dry-brush style application so some of the warm base peeks through. The goal is subtle
variation: soft streaks, gentle depth, and that “I paid for this” finish.
If your brush strokes look a little dramatic, don’t panic. Most of it calms down once it dries, and a light
sanding later will blend everything into a soft, worn-in look.
3) Find center and mark your layout (crooked is not a “vibe” here)
Measure your canvas and lightly mark the center point. Use a ruler (and ideally a level) to sketch a faint
vertical and horizontal guideline. You’re not drawing a blueprint for NASAjust giving yourself a reference so
the number lands exactly where it should.
If you’re doing a multi-digit number (like 12 or 2026), lightly map the overall width first so it’s balanced.
A centered “2” is friendly. A “2” drifting toward the edge is… unsettling.
4) Make your number stencil (three easy options)
-
Option A: Print-and-cut: Type your number in a word processor, enlarge it, print, then cut it
out carefully with a craft knife. For thicker paper, cardstock works well. - Option B: Store-bought stencil: The fastest route. Choose a bold numeral stencil with clean edges.
-
Option C: Vinyl cutout (Cricut/Silhouette): Cut your number from stencil vinyl or removable vinyl.
This gives the crispest lines, especially for traditional serif fonts.
Font tip for a Pottery Barn-inspired feel: choose a classic, readable typefacesomething with
structure. Traditional serif fonts often look the most “catalog chic.”
5) Apply and secure the stencil (the “no-bleed” setup)
Place your stencil using the guidelines you marked. Tape it down firmly, especially around edges and any
inner “floating” pieces (like the center of an 8 or 0). If your canvas has a soft, bouncy surface, slide a
book or a piece of wood under the canvas fabric to create a firm backing while you stencil.
Press down edges as you go. Think of it as tucking in a bedsheet: if you skip the corners, chaos will find you.
6) Paint the number with a light hand (less paint = sharper edges)
Use black acrylic paint (or a softened black like charcoal). The secret to crisp stencil lines is
very little paint. Load your brush/foam applicator and dab most of it off onto a paper plate
or paper towel. Your brush should feel almost dry.
Apply paint with a straight up-and-down dabbing motion (not sweeping side-to-side). Build color slowly with
2–3 light layers instead of one thick coat. Thick paint is where bleeding happensand then you’ll be using the
phrase “happy accident” in a tone that isn’t happy at all.
7) Peel the stencil at the right time
Remove the stencil while the paint is still slightly wet. Pull it back slowly at a low angle. This helps keep
edges clean and prevents paint from forming a raised ridge that tears when it dries.
If you see a tiny bleed, let it dry completely before fixing it. Then touch up with a small artist brush and
your background color. Nobody will ever know. (And if they do, you don’t need that kind of negativity in your life.)
8) Distress it (tastefully) for that “found it at an antique market” look
Once everything is dry, lightly sand edges and a few random areas. Focus on corners, outer frame edges,
and places that would naturally wear over time. If you added book pages underneath, sanding reveals hints of
texture and story without screaming “I glued a phone book to this.”
Want a softer, more elevated distress? Sand gently over the white background to blend brush strokes, but don’t
go hard on the number. You’re aiming for “heritage home,” not “haunted barn.”
9) Seal the canvas (optional, but smart)
If this will hang in a high-traffic area (hallway, entry, kid zone, “my dog thinks walls are optional” zone),
add a sealer. A matte or satin finish usually looks most Pottery Barn-inspired.
Apply sealer in thin coats and let it dry between layers. If using a spray sealer, use light passes and keep
the can moving so you don’t get drips or weird glossy patches. Let the canvas cure fully before hanging it.
Design Details That Make It Look Store-Bought
Choose the “right black”
Pure jet black can look harsh on a warm neutral background. If you want a slightly softer, more expensive look,
mix a tiny bit of white into black to create a deep charcoal, or choose a “soft black.” It reads as black from
across the room, but up close it looks intentional and cozy.
Keep spacing generous
Pottery Barn-style decor often feels calm because it gives elements room to breathe. Leave a comfortable margin
around the numberespecially at the top and bottom. If the numeral is too big, it can look like it’s trying to
escape the canvas.
Add subtle texture, not clutter
The magic is in the surface: layered whites, gentle sanding, a whisper of paper texture, and maybe one or two
faint pencil lines that got “accidentally” sanded into a charming relic. Texture reads as craftsmanship.
Extra embellishments can read as craft fair (unless that’s your vibeand then, own it).
Consider framing (or at least a clean edge)
A simple wood frame instantly upgrades the whole piece. If you’re not framing, paint the canvas edges neatly
so it looks finished from every angle. That tiny detail is the difference between “DIY project” and
“artisan wall art.”
Variations You Can Try (Same Technique, Different Personality)
- House number canvas: Perfect for an entrywayadd a subtle stripe behind the number for depth.
- Year canvas: Wedding year, graduation year, or “the year I finally learned to fold fitted sheets.”
- Oversized single digit: Bold and graphic for modern spaces or minimalist decor.
- Layered stencil effect: Paint a shadow in gray slightly offset behind the black number.
- Metallic touch: Add a tiny dry-brushed hint of antique gold on edges for warmth.
- Kids’ room version: Use the same neutral base but swap black for navy or forest green.
Common Problems (and Easy Fixes)
Problem: Paint bled under the stencil
Fix: Let it dry. Touch up the edge with background paint using a small brush. Next time, use less paint and
press the stencil edges down more firmly.
Problem: The number looks streaky
Fix: Add a second light coat using the same dab method. Stenciling is a “build it slowly” sport.
Problem: The background looks flat and boring
Fix: Add a thin dry-brushed layer of brighter white and lightly sand once dry. Depth is created in layers,
like lasagnaonly less delicious.
Problem: It’s slightly crooked
Fix: If it’s tiny, you might be the only one who sees it. If it’s truly noticeable, you can repaint the
background section and stencil again. (This is why we love acrylic paint: it forgives and forgets.)
Cost Breakdown: DIY vs. Buying
A Pottery Barn-inspired painted number canvas can look high-end, but the DIY version is typically budget-friendly:
- Canvas: often inexpensive, and garage-sale canvases are a goldmine
- Acrylic paint: small bottles go a long way
- Stencil: reusable (or DIY printed template)
- Optional sealer: one can covers multiple projects
Translation: you can make one statement piece for the price of a couple of throw pillows. And unlike throw pillows,
this one won’t end up on the floor every time someone sits down.
Extra: Real-World Experiences and Lessons (So You Don’t Learn the Hard Way)
The first time I tried a painted number canvas, I approached it with the confidence of someone who had watched
exactly one 12-second craft video and thought, “Yes. I am ready.” I was not ready. I was merely enthusiastic,
which is not the same thing.
Lesson one: your stencil is not a suggestion. I once taped down three sides and left one
corner “free to live its truth.” That corner immediately lifted like it was waving hello, and the paint bled
underneath in a way that looked less like a crisp number and more like a Rorschach test about my patience.
The fix was simpletouch up with background paintbut the emotional damage was real. Now I tape every edge like
I’m sealing an envelope full of secrets.
Lesson two: “more paint” is never the answer. When you first dab a light coat onto the stencil,
it can look a little faint. Your brain will whisper, “Just add a lot more paint and finish faster.”
Your brain is lying. Build the color slowly. The moment you go thick, you’re basically inviting paint to
crawl under the stencil like it pays rent there.
Lesson three: the background matters more than you think. The number is the star, sure, but the
background is the lighting crew, the wardrobe department, and the reason the whole production looks expensive.
On one project, I used one flat coat of white and wondered why it looked like a school poster.
The next time, I layered warm off-white and bright white, then sanded lightly. Same number, totally different
vibe. Suddenly it looked like it belonged above a beautiful console table… instead of next to a science fair volcano.
Lesson four: distressing is seasoning. A little makes everything better. Too much and you’ve
ruined dinner. I once got carried away with sandpaper and distressed my canvas so aggressively that it looked
like it had survived three moving trucks and a small tornado. Now I sand strategically: corners, edges, and a
few natural-looking spots, then I step back and evaluate from across the room. If it reads as “softly worn,”
I stop. If it reads as “found behind a dumpster,” I repaint and try again.
Lesson five: your room decides the final colors. Warm whites look cozy in a room with warm wood
and soft lighting. In a cooler, modern space with lots of gray, a creamy background can look slightly yellow.
I’ve learned to test a small swatch of my background mix and hold it up on the wall at different times of day.
Morning light is optimistic; evening light is honest.
Finally, the biggest lesson: this project is a confidence builder. Once you’ve made one
Pottery Barn-inspired painted number canvas, you start seeing everything as DIY-able. Plain canvas? Potential.
Old wall art? Makeover candidate. Suddenly you’re the person saying things like, “We don’t need to buy that.
I can make it.” It’s empowering… right up until you’re three projects deep and your dining table becomes a
permanent craft station. (No regrets. Mostly.)
Conclusion
A Pottery Barn inspired painted number canvas is the kind of DIY that punches way above its weight: simple
materials, straightforward steps, and a finished piece that looks polished and intentional. Focus on layered
neutrals, careful stenciling, and light distressing, and you’ll end up with wall art that feels timelesslike
it’s always belonged in your home.
Whether you’re making a house number canvas for your entryway, a meaningful year for a gallery wall, or a bold
single digit purely because it looks cool (valid), the technique stays the same: plan your layout, use light
coats, and let texture do the heavy lifting.


