
Table of Contents >> Show >> Hide
- What You’ll Learn
- Soundproofing vs. Acoustic Treatment: The Mistake Everyone Makes Once
- The 4 Principles That Make DIY Soundproofing Work
- Step 1: Diagnose Your Noise Like a Pro
- Step 2: Quick Wins (Low Cost, High Satisfaction)
- Step 3: Weekend DIY Upgrades That Actually Work
- Step 4: Advanced Soundproofing (When You Want “Wow, It’s Quiet”)
- Common DIY Soundproofing Mistakes (Save Your Wallet, Save Your Soul)
- Sample DIY Plans by Budget (Pick Your Adventure)
- Conclusion: Quiet Is Built, Not Wished For
- Real-World DIY Soundproofing Experiences (The Stuff People Learn Mid-Project)
- 1) The door was the villain the whole time
- 2) Acoustic panels didn’t stop the neighbor’s TV (but they still helped)
- 3) Sealing gaps feels too simple… until you hear the difference
- 4) The first “big upgrade” is usually extra drywall… and it’s heavier than feelings
- 5) Footsteps are humbling (and sometimes require diplomacy)
- 6) The “one wall” approach often turns into “okay… also the outlets… and the vent… and the other wall”
If your “home office” sounds like it’s located inside a drum kit, or your bedroom shares a wall with someone who
believes 2 a.m. is the perfect time to practice motivational speeches… welcome. Soundproofing is one of those DIY
projects that feels like it should be simple (“I’ll just buy some foam!”) and then reality taps you on the
shoulder with a subwoofer.
The good news: you can make a room dramatically quieter with the right strategy, the right materials, and a little
patience. The bad news: you can’t “Pinterest” your way into true sound isolation with a pack of egg-crate foam.
(That foam might help echo, but it won’t stop your neighbor’s bass line from emotionally moving into your living
room.)
This guide walks you through DIY soundproofing the way pros think about it: stopping air leaks, adding mass,
decoupling surfaces, and damping vibrationplus the practical stuff like doors, windows, outlets, and the weird
little gaps sound loves most.
Soundproofing vs. Acoustic Treatment: The Mistake Everyone Makes Once
Let’s clear up the #1 confusion: soundproofing is about blocking sound from entering or
leaving a room. Acoustic treatment is about controlling echo and improving
sound quality inside the room.
Acoustic panels, rugs, curtains, and foam help tame reflections (great for Zoom calls, podcasts, and not sounding
like you’re broadcasting from a tiled bathroom). But if you need to stop noise transfertraffic, neighbors,
footsteps, drums, barkingthen you’re in soundproofing territory.
A helpful way to think about it: acoustic treatment makes the room nicer to listen in; soundproofing makes the
room nicer to live next to.
The 4 Principles That Make DIY Soundproofing Work
1) Seal air gaps (sound is basically a gas with commitment issues)
Sound sneaks through tiny openings: under doors, around window frames, electrical outlets, baseboards, and any
place you feel a draft. If air can pass, sound can passespecially mid and high frequencies like voices and TV.
2) Add mass (heavier barriers block more sound)
Lightweight walls and hollow-core doors are an open invitation for noise. Adding masslike extra drywall, MDF, or
sound-rated materialshelps reduce airborne sound transfer. Mass-loaded vinyl (MLV) is popular because it adds a
lot of weight without being bulky.
3) Decouple surfaces (stop vibration from “walking” through framing)
If drywall is screwed directly to studs, vibration travels through the structure. Decoupling creates a break in
that path using methods like resilient channels, sound isolation clips with hat channel, staggered studs, or
double-stud walls. This is where “serious quiet” comes from.
4) Dampen vibration (turn “ringing” into “meh”)
Damping compounds (commonly applied between two layers of drywall) help convert vibration into tiny amounts of
heat. Translation: less resonance, less buzz, less “why do I hear everything.”
Most successful DIY soundproofing projects combine at least two of these principles. The best
ones combine all four.
Step 1: Diagnose Your Noise Like a Pro
Before you buy anything, answer two questions:
- What kind of noise is it? Airborne (voices, TV, traffic) or impact (footsteps, dropped
objects, chair scraping)? - How is it traveling? Through the wall, through the door, through the ceiling/floor, or
flanking around it (vents, outlets, gaps)?
Quick DIY tests:
- Flashlight test: Turn off the lights, shine a flashlight around the door perimeter. If light
leaks, sound leaks. - Draft test: If you feel airflow at trim or outlets, that’s a sound pathway.
- Clap test: Clap in the room. If it “rings,” you need acoustic treatment (echo control).
If you mainly hear outside noise, you need sound isolation (blocking).
Once you know the path, you can spend money where it matters instead of collecting a decorative foam collage.
Step 2: Quick Wins (Low Cost, High Satisfaction)
These won’t turn your room into a recording studio, but they can make a real dent in everyday noiseespecially
voices and “house sounds.”
Seal the door like you mean it
- Add weatherstripping around the jamb. Look for durable options designed for doors that open
and close often. - Install a door sweep or (better) an automatic door bottom to close the gap
at the threshold. - If your door is hollow-core, upgrading to a solid-core door is one of the biggest
single-step improvements you can make.
This is the “put a lid on the jar” moment. You can have an expensive wall assembly, but a leaky door will still
let noise stroll in like it pays rent.
Seal cracks, seams, and outlets
- Use acoustical caulk (it stays flexible) along baseboards, trim, and small gaps.
- Add foam gaskets behind outlet and switch plates on shared walls.
- For deeper upgrades, consider putty pads around electrical boxes (especially on shared walls).
Window triage (because glass is basically a sound invitation)
- Seal the perimeter of window trim if there are gaps.
- Try heavy, well-fitted curtains to reduce some noise and improve comfort. (They help more
than people expect, but they aren’t magic.) - For better results, consider window inserts or secondary glazing solutions designed to create
an extra air space.
Reduce echo so the room feels quieter
Even when you can’t block the source, reducing reflections can make a space feel calmer:
- Thick area rug + pad (especially on hard floors)
- Soft furnishings (bookcases, upholstered furniture)
- Acoustic panels on large bare walls if echo is a problem
Step 3: Weekend DIY Upgrades That Actually Work
If quick wins are “closing the obvious leaks,” this phase is “adding real structure to your quiet.”
Add insulation in wall cavities (when you can access them)
If you’re opening a wall anyway (remodel, repairs, or you’re simply brave), adding
sound attenuation insulation helps reduce noise transfer through stud bays.
Mineral wool and fiberglass sound attenuation batts are common choices. This won’t fully soundproof a wall by
itself, but it’s a strong supporting playerlike a drummer who actually keeps time.
Add a second layer of drywall (mass upgrade)
Adding another layer of drywall increases mass, which helps block airborne sound. For even better performance,
apply a damping compound between layers. This approach is popular because it doesn’t require
reframingjust careful installation and finishing.
- Leave a small perimeter gap (do not hard-pack drywall into corners).
- Seal the perimeter and penetrations with acoustical caulk.
- Stagger seams between layers when possible.
Consider mass-loaded vinyl (MLV) where it makes sense
MLV is a dense, flexible barrier often sold by weight per square foot (commonly 1 lb or 2 lb).
It can be installed behind drywall or under flooring as part of a sound barrier system. It’s most useful when
you need to add mass without building thickness, but it’s not a standalone miraclethink “ingredient,” not
“entire recipe.”
Upgrade the “weak links” (doors, vents, and shared-wall details)
A common DIY win is turning a noisy hollow door + gaps into a sealed, heavier door assembly:
- Solid-core door
- Perimeter seals (quality weatherstripping)
- Automatic door bottom or tight sweep
- Seal casing gaps (carefully) and use acoustical caulk where appropriate
If sound is coming through HVAC paths, you may need to rethink the airflow route, add lined ductwork sections, or
use sound-rated vent solutions. Don’t block vents entirely unless you enjoy poor air quality and mystery smells.
Step 4: Advanced Soundproofing (When You Want “Wow, It’s Quiet”)
These options are more work, but they’re the biggest upgrades for bedrooms, nurseries, home theaters, music
practice rooms, and serious work-from-home spaces.
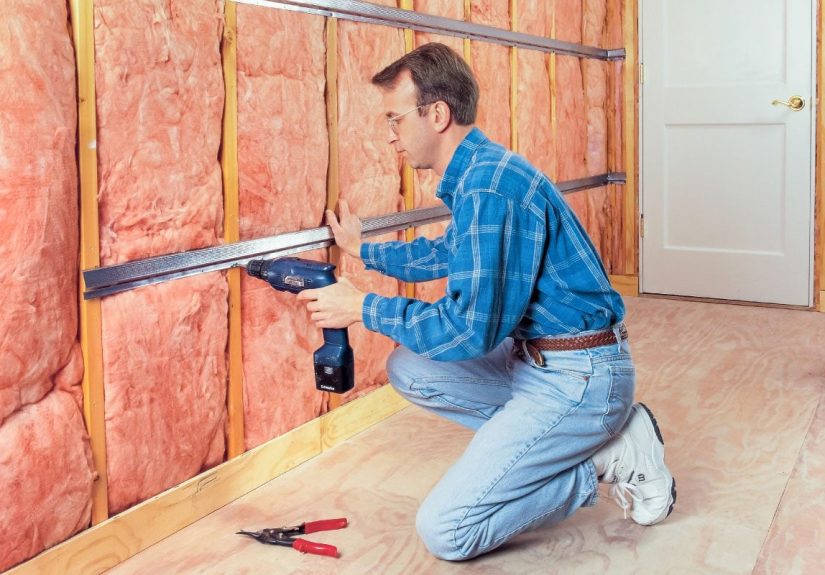
Decouple the drywall with clips + hat channel (or resilient channel)
Decoupling is about reducing direct contact between drywall and studs/joists so vibration doesn’t travel as
easily. A common high-performance approach is sound isolation clips + hat channel, then one or
two layers of drywall (often with damping between layers).
DIY tips that matter:
- Don’t short-circuit the system: Use the correct screws and don’t accidentally fasten drywall
into studs through the channel. - Seal perimeters: Leave a small gap and seal it with acoustical caulk, not rigid filler.
- Plan for outlets: Putty pads or careful detailing help avoid creating “sound holes.”
Build a staggered-stud or double-stud wall (best for shared walls)
If you’re framing from scratch (or doing a major remodel), a staggered-stud wall or
double-stud wall reduces vibration transfer by creating separation between surfaces. Add cavity
insulation, then finish with heavier drywall and good sealing. This is one of the most effective strategies for
blocking voices and everyday living noise.
Soundproof the ceiling for upstairs footsteps
Impact noise is stubborn. If you hear footsteps from above, the best results usually come from a combination:
- Insulation in the joist cavities (helps with airborne component)
- Decoupled ceiling using clips/channel (reduces vibration transfer)
- Heavier ceiling layers (mass) with damping (optional but powerful)
Bonus tip: controlling impact noise at the source (upstairs rugs + pads, underlayment) can be cheaper and more
effective than rebuilding your ceilingassuming you have access to the upstairs space.
Don’t ignore flanking paths (sound loves shortcuts)
Even a great wall can be undermined by flanking routes: ductwork, recessed lights, shared floor cavities, poorly
sealed trim, or a door that might as well be a curtain. When planning a “quiet room,” treat it like a system:
walls, ceiling, floor, door, and openings all matter.
Common DIY Soundproofing Mistakes (Save Your Wallet, Save Your Soul)
Mistake: Buying foam and expecting silence
Foam and many “soundproof tiles” mainly reduce echo. They don’t add meaningful mass or decoupling, so outside
noise still comes through. If your goal is noise reduction between rooms, focus on sealing, mass, decoupling, and
damping first.
Mistake: Leaving gaps (and then acting surprised)
Sound leaks through openings you can barely see. If you add mass but leave a quarter-inch gap under the door, you
built a very expensive soundproof wall… with a mail slot.
Mistake: Creating a “triple-leaf” assembly by accident
Some layered wall approaches can accidentally create multiple air cavities that reduce performance at certain
frequencies. If you’re combining existing drywall, resilient systems, and new layers, research the assembly (or
follow proven build-ups) rather than improvising with blind confidence.
Mistake: Forgetting fire safety and building codes
Some projects require fire-rated drywall, proper sealing methods, and code-compliant detailingespecially in
multi-family buildings. Always check local requirements before changing wall/ceiling assemblies.
Sample DIY Plans by Budget (Pick Your Adventure)
Plan A: $50–$200 (Noticeably Quieter Fast)
- Door weatherstripping + quality sweep
- Acoustical caulk for trim gaps and small cracks
- Outlet gaskets on shared walls
- Rug + pad (or additional soft furnishings)
Best for: bedrooms, home offices, apartments where you can’t open walls.
Plan B: $300–$900 (Weekend Upgrade With Real Results)
- Solid-core door + perimeter seals
- Second layer of drywall on the noisiest wall (optional damping between layers)
- Better window sealing + heavy curtains or inserts (as needed)
Best for: shared walls with voices/TV noise, home office for calls, nursery near living areas.
Plan C: $1,000+ (Serious Sound Isolation)
- Open wall/ceiling cavities + install sound attenuation insulation
- Decouple with clips + hat channel (or a proven resilient channel approach)
- Two layers of drywall with damping between layers
- Seal perimeters, outlets, and penetrations meticulously
Best for: home theaters, music practice rooms, multi-room noise issues, or when you’re done negotiating with sound.
Conclusion: Quiet Is Built, Not Wished For
DIY soundproofing works best when you stop thinking in “products” and start thinking in “paths.” Sound moves
through air gaps, vibrations travel through framing, and weak links (doors and windows) betray even the fanciest
walls.
Start with sealing and door fixes. If you still need more, add mass (extra drywall), then consider damping. For
the biggest jump, decouple walls or ceilings using proven assemblies. And remember: soundproofing is a system. If
you treat it like one, your room can go from “why is everything loud?” to “wait… is it raining?”
Real-World DIY Soundproofing Experiences (The Stuff People Learn Mid-Project)
DIY soundproofing has a funny way of teaching the same lessons to different people in different houses. Below are
some real-world patterns that show up again and againcall them “field notes” from the collective experience of
homeowners, renters, and weekend warriors who discovered that sound doesn’t play fair.
1) The door was the villain the whole time
Many people start by obsessing over walls, then realize the loudest “leak” is a hollow-core door with a half-inch
gap underneath. Once the door gets sealed with proper weatherstripping and a solid sweep (or automatic door
bottom), the room immediately feels calmer. It’s not glamorous work, but it’s the closest thing soundproofing
has to a cheat code. The funny part is how often the reaction is: “That’s it? That was… most of the noise?”
2) Acoustic panels didn’t stop the neighbor’s TV (but they still helped)
A common experience: someone installs acoustic panels expecting the neighbor’s TV to disappear. It doesn’tbecause
echo control and sound isolation are different jobs. But then something surprising happens: the room sounds
better. Calls are clearer. Music sounds tighter. The space feels less chaotic. The outside noise is still there,
but it’s less “sharp” because the room isn’t amplifying everything with reflections. People often keep the panels
anyway, then do real soundproofing steps (sealing, door upgrades, added mass) for the noise transfer.
3) Sealing gaps feels too simple… until you hear the difference
There’s a moment in many projects when a person runs a bead of acoustical caulk along baseboards or around trim
and thinks, “This cannot possibly matter.” Then the room gets noticeably quieter for speech frequencies, because
those tiny cracks were acting like little speaker ports. The lesson: soundproofing rewards boring work. If you
want dramatic results, you often start with un-dramatic tasks: sealing, gasketing, and fixing the places where
air sneaks through.
4) The first “big upgrade” is usually extra drywall… and it’s heavier than feelings
Adding a second layer of drywall sounds straightforward on paper: screw it on, tape, mud, paint, done. In real
life, drywall is heavy, corners aren’t square, and carrying 4×8 sheets makes you rethink every life choice that
led to homeownership. People also learn quickly that details matter: staggering seams, leaving a small perimeter
gap, and sealing edges properly. When it’s done right, the improvement can be impressiveespecially for voices,
TV, and general living noise. When it’s done sloppily, it’s an expensive workout.
5) Footsteps are humbling (and sometimes require diplomacy)
Airborne noise is one thing. Footsteps are another. Many DIYers discover that impact noise behaves like a toddler:
it doesn’t respond to polite requests. Insulation in the ceiling cavity helps a bit, but the biggest changes come
from decoupling the ceiling and/or controlling the noise at the source (rugs, pads, underlayment upstairs).
If you can work on the upstairs floor, do it. If you can’t, clips and channel on the ceiling below can be a
lifesaver. And if you live under someone who does jumping jacks for cardio, you may also need emotional
soundproofing (snacks help).
6) The “one wall” approach often turns into “okay… also the outlets… and the vent… and the other wall”
Sound flanks. It finds alternate routes. People who treat a single wall sometimes notice the noise shifts
instead of sounding like it’s coming through the wall, it sounds like it’s coming through the door, the ceiling,
or an outlet. That isn’t failure; it’s information. It means the main wall is improved, and now the weak link is
elsewhere. The most satisfying projects happen when DIYers accept this early and plan a system: seal openings,
handle the door, address the loudest wall/ceiling, then re-test and adjust.
The big takeaway from these experiences: DIY soundproofing is rarely one magic product. It’s a sequence of smart,
cumulative improvements. And yessometimes it’s also a sequence of trips to the hardware store where you develop a
personal relationship with the aisle that sells caulk.


