
Table of Contents >> Show >> Hide
- Why Arduino Code Gets Slow
- Start With Measurement, Not Guesswork
- Replace delay() With Non-Blocking Timing
- Speed Up Digital I/O
- Make analogRead() Work Smarter
- Keep Serial Output From Slowing Everything Down
- Use Efficient Data Types
- Avoid the Arduino String Trap
- Store Lookup Tables in Flash With PROGMEM
- Write Leaner Loops
- Use Interrupts for Fast Events
- Use Timers for Precision
- Reduce Expensive Math
- Prefer Bitwise Operations for Flags
- Choose Libraries Carefully
- Update Only What Changed
- Know When Hardware Is the Right Answer
- A Practical Speed-Up Checklist
- Experience Notes: What Actually Works When Speeding Up Arduino
- Conclusion
Arduino is famous for making electronics feel friendly. Plug in a board, blink an LED, print a few values to Serial Monitor, and suddenly you are one breadboard away from believing you are Tony Stark with cheaper lighting. But as projects grow, that friendly sketch can start acting like it is running through peanut butter. Sensors lag. Buttons miss clicks. Motors stutter. Displays flicker. Your “smart” robot begins making life choices like a sleepy shopping cart.
The good news? You do not always need a faster board. Before throwing money at the problem like a confused raccoon with a credit card, you can often speed up Arduino with clever coding. The secret is understanding what costs time, what costs memory, and what quietly turns your elegant project into a tiny traffic jam.
This guide breaks down practical Arduino performance optimization techniques: faster digital I/O, smarter timing, leaner memory use, better loops, efficient math, interrupts, direct port manipulation, and code habits that make an 8-bit microcontroller feel surprisingly athletic. We will focus mainly on classic AVR-based boards like the Arduino Uno, Nano, and Mega, while noting where ideas apply to newer boards too.
Why Arduino Code Gets Slow
Arduino’s biggest strength is abstraction. Functions like digitalWrite(), analogRead(), delay(), and Serial.print() are easy to read and beginner-friendly. That is excellent when you are learning. It is less excellent when your sketch needs to respond in microseconds, sample data quickly, or control multiple things at once.
Most “slow Arduino” problems come from one of five causes:
- Blocking code, especially
delay() - Repeated slow function calls inside tight loops
- Too much Serial output
- Inefficient memory use, especially with strings
- Polling everything instead of using interrupts or timers
Arduino code does not become slow because the board is lazy. It becomes slow because every convenience has a price. The trick is knowing when convenience is worth it and when it is time to put on the tiny performance goggles.
Start With Measurement, Not Guesswork
Before optimizing, measure. Guessing where your sketch is slow is like debugging with a blindfold and a dramatic soundtrack. Sometimes the bottleneck is not where you think it is.
Use micros() to time short operations and millis() for longer ones. For example:
This simple method helps reveal whether a function costs a few microseconds, hundreds of microseconds, or enough time for your robot to reconsider its career. On AVR boards, micros() has limited resolution, but it is still useful for comparing approaches.
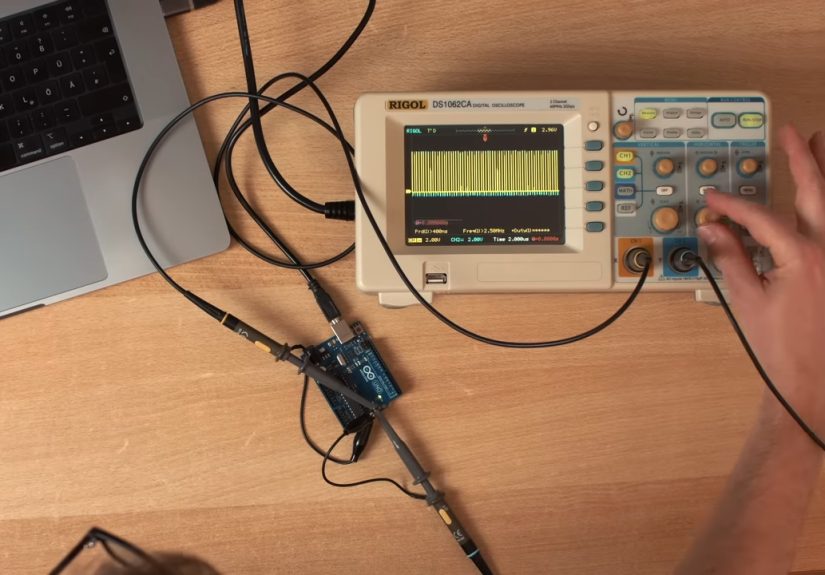
Use a Logic Analyzer or Oscilloscope When Timing Matters
If you are measuring pin toggling, pulse timing, protocols, or motor signals, a logic analyzer is even better. Set a pin high before an operation and low after it, then measure the pulse width externally. That gives you a cleaner view than printing numbers over Serial, because Serial printing itself is slow and can distort results.
Replace delay() With Non-Blocking Timing
The easiest way to make Arduino feel faster is to stop freezing it. The delay() function pauses your sketch. During that pause, your code is not checking buttons, updating displays, reading sensors, or doing anything else useful. It is basically staring into space, politely counting milliseconds.
Instead, use millis() to schedule tasks:
This technique is often called non-blocking code. It lets your sketch multitask without a real operating system. Your Arduino can blink an LED, read a button, check a sensor, and update a display in the same loop without getting stuck in one activity like it forgot the rest of the party.
Speed Up Digital I/O
digitalWrite() is wonderfully readable. It also performs extra work to support different pins, timers, and board configurations. In many projects, that overhead does not matter. If you are blinking a status LED, keep using it. Your LED is not training for the Olympics.
But if you are generating fast pulses, bit-banging a protocol, driving stepper signals, or toggling pins inside a tight loop, digitalWrite() can become expensive. That is where faster methods help.
Use Direct Port Manipulation
On AVR-based Arduino boards, pins are grouped into ports. Instead of calling digitalWrite(), you can write directly to registers like PORTB, PORTC, and PORTD. This can dramatically reduce overhead.
This is fast because it talks directly to the microcontroller. The downside is portability. Code written for an Uno may not work the same way on a Mega, Leonardo, ESP32, or newer Arduino board. Direct port manipulation is like taking the service elevator: fast, powerful, and not where beginners should wander without reading the signs.
Use Fast Digital Write Libraries Carefully
If you want more speed without writing register code everywhere, libraries such as digitalWriteFast can help when pin numbers are known at compile time. These approaches often use macros or inline code to reduce overhead while keeping sketches easier to read.
The rule is simple: use normal Arduino functions until performance becomes a real issue. Then optimize the hot path, not the whole sketch. Rewriting every line in register syntax just to blink an LED faster is how projects become ancient scrolls nobody wants to maintain.
Make analogRead() Work Smarter
On classic ATmega-based boards such as the Uno, Nano, Mini, and Mega, analogRead() takes about 100 microseconds per reading under typical default settings. That means roughly 10,000 readings per second maximum. For temperature, light, knobs, and slow sensors, that is plenty. For audio, vibration, or fast control loops, it may not be enough.
There are several ways to improve analog performance:
- Read only when needed instead of every loop
- Reduce the number of analog channels being scanned
- Use lower-level ADC register settings for advanced projects
- Average fewer samples if responsiveness matters more than smoothness
- Use a faster board or external ADC when the signal truly demands it
Do not blindly chase higher sample rates. Faster ADC settings can reduce accuracy depending on the board and configuration. In embedded work, “faster” and “better” are not always the same sandwich.
Keep Serial Output From Slowing Everything Down
Serial.print() is fantastic for debugging. It is also one of the most common performance traps. Printing text repeatedly inside loop() can slow your sketch, fill buffers, and make timing inconsistent.
Instead of printing constantly, print at intervals:
You can also increase the baud rate, for example from 9600 to 115200, when your setup supports it. Better yet, remove debug printing from performance-critical code once the project is stable. Serial Monitor is a great teacher, but a terrible passenger in a race car.
Use Efficient Data Types
Arduino Uno has limited memory and an 8-bit AVR processor. Choosing the right data type can save RAM, reduce computation, and make code clearer.
Use byte or uint8_t for values from 0 to 255. Use int for moderate whole numbers. Use unsigned long for timing with millis() and micros(). Avoid float unless you need decimal math. Floating-point calculations are slower on small AVR chips because there is no hardware floating-point unit.
Using const for values that never change helps readability and may allow the compiler to optimize. The compiler is clever, but it appreciates clear instructions. Think of it as a very literal assistant that loves numbers and hates ambiguity.
Avoid the Arduino String Trap
The capital-S String class can be convenient, but on small boards it may fragment SRAM over time. That can lead to strange crashes, corrupted text, or behavior that feels haunted. Your Arduino is not possessed; it may simply be running out of clean memory.
Prefer character arrays for fixed text and simple buffers:
For constant text printed to Serial, use the F() macro to keep string literals in flash memory instead of copying them into SRAM:
This is one of the easiest Arduino memory optimization wins. On an Uno with only 2 KB of SRAM, saving a few hundred bytes can be the difference between reliable operation and a microcontroller having a tiny existential crisis.
Store Lookup Tables in Flash With PROGMEM
If your project uses fixed arrays, fonts, waveforms, menu text, calibration tables, or bitmap data, do not waste SRAM on values that never change. Store them in flash memory with PROGMEM.
Reading from PROGMEM requires special functions on AVR, but the memory savings can be huge. This is especially useful for display projects, LED animations, and anything with repeated text or graphics.
Write Leaner Loops
The loop() function runs again and again for as long as the board has power. Anything inefficient inside it gets repeated thousands or millions of times. Small improvements here can matter.
Some useful habits:
- Move setup calculations into
setup() - Cache repeated readings when possible
- Avoid calling the same function repeatedly for the same value
- Keep conditions simple in high-speed sections
- Exit early when there is nothing to do
For example, instead of reading a button three times in one loop, read it once and store the result:
This improves speed and makes the code easier to understand. Readability is performance too, because future-you is a developer with limited patience and possibly snacks nearby.
Use Interrupts for Fast Events
Polling means constantly checking whether something happened. That works for slow inputs, but it can miss fast pulses from encoders, sensors, or communication signals. Interrupts let hardware pause the main code and run a short function immediately when an event occurs.
Interrupt service routines should be short. Do not print to Serial inside them. Do not use long delays. Do not do heavy math. Set a flag, count a pulse, capture a timestamp, then get out. An interrupt routine is not a place to write a novel. It is a place to tap the main program on the shoulder and whisper, “Hey, something happened.”
Use Timers for Precision
For regular timing tasks, hardware timers can be more precise than checking millis() in the main loop. Timers can generate PWM, schedule interrupts, or control output frequencies. Arduino already uses timers internally for functions like millis(), delay(), and PWM on certain pins, so advanced timer work requires care.
Timers are useful for:
- Generating stable frequencies
- Controlling motors or servos
- Sampling sensors at fixed intervals
- Creating precise pulse trains
Timer code can be board-specific, but it unlocks serious performance. Once you understand prescalers, compare registers, and interrupt timing, Arduino starts looking less like a toy and more like a compact embedded system with a friendly USB cable.
Reduce Expensive Math
Math can be surprisingly costly on small microcontrollers. Multiplication is usually fine, division is slower, and floating-point math is slower still on classic AVR chips. You can speed things up by using integer math where possible.
Instead of:
You might use scaled integers:
This gives voltage in millivolts without floating-point math. It is often faster and more predictable. For control systems, LED effects, and sensor thresholds, scaled integers can be more than accurate enough.
Prefer Bitwise Operations for Flags
If you need to store many true-or-false states, use bits instead of full variables. A single byte can hold eight flags.
Bitwise operations are fast and memory-efficient. They also make you feel like you are doing real embedded programming, which is fun until you forget which bit does what. Use clear names or comments. Future-you deserves mercy.
Choose Libraries Carefully
Libraries save time, but some are heavier than others. A display library, sensor library, networking library, or graphics library may include features you do not need. If memory or speed is tight, compare alternatives or configure the library to disable unused features.
Before blaming the Arduino board, check the library behavior. Does it use blocking delays? Does it allocate buffers? Does it print debug messages? Does it update an entire display when only one number changed? A library can be excellent and still not be ideal for your timing requirements.
Update Only What Changed
Many Arduino projects waste time redrawing screens, recalculating values, or resending data that has not changed. A faster strategy is to track state and update only when necessary.
This approach works beautifully for LCDs, OLEDs, LED matrices, menus, and serial dashboards. Your code becomes calmer. Your display stops flickering. Everyone wins, including the poor microcontroller that was previously repainting the universe 500 times per second.
Know When Hardware Is the Right Answer
Clever coding can do a lot, but it cannot break physics. If your Uno cannot sample fast enough, process data quickly enough, or drive enough outputs reliably, consider better hardware. A faster Arduino-compatible board, external ADC, shift register, I/O expander, dedicated motor driver, or hardware peripheral may solve the problem cleanly.
Optimization should not become a heroic struggle against common sense. If a $3 chip saves 300 lines of fragile timing code, buy the chip. Your project deserves stability, not a dramatic final battle with clock cycles.
A Practical Speed-Up Checklist
When an Arduino sketch feels slow, walk through this checklist:
- Remove or reduce
delay() - Time the slow sections with
micros() - Limit Serial printing
- Use
millis()-based scheduling - Read sensors only as often as needed
- Use interrupts for fast external events
- Store constant strings with
F() - Move large constant arrays to
PROGMEM - Avoid unnecessary floating-point math
- Use direct port manipulation only where speed truly matters
This process keeps optimization focused. You do not need to turn every sketch into unreadable wizard code. You need to identify the slow parts and improve them without sacrificing reliability.
Experience Notes: What Actually Works When Speeding Up Arduino
In real Arduino projects, the biggest performance improvements usually come from boring changes. That may sound disappointing, but boring is beautiful when your project suddenly stops lagging. The first major win is almost always removing delay(). Many beginners build projects like a sequence of chores: turn LED on, wait, read sensor, wait, move servo, wait, print value, wait. The board spends most of its life doing absolutely nothing. Replacing that structure with non-blocking timing can make the same hardware feel completely different.
Another practical lesson: Serial output should be treated like a flashlight, not indoor plumbing. Use it when you need to see what is happening, then turn it down. I have seen sketches where the sensor code was fine, the motor code was fine, and the “performance problem” was a flood of Serial.println() calls running every loop. Printing ten lines thousands of times per second is not debugging; it is asking a tiny chip to become a novelist.
Direct port manipulation is powerful, but it should be used surgically. It is perfect for tight timing, fast pulse generation, or parallel output. It is not necessary for every LED, relay, buzzer, or button. The best pattern is to write most of the program in clean Arduino style, then optimize the small section that truly needs speed. That keeps the project readable while still getting the performance benefit where it matters.
Memory optimization also matters more than many people expect. On an Uno, SRAM disappears quickly. A few text menus, some arrays, and a couple of enthusiastic strings can eat memory like popcorn. Using F() for printed strings and PROGMEM for fixed tables can make unstable projects reliable again. When a sketch randomly resets or behaves differently after adding one harmless line, check memory before blaming ghosts, cosmic rays, or your USB cable.
One of the most useful habits is separating tasks by timing. A temperature sensor may need reading once per second. A button might need checking every few milliseconds. A display may only need updating when a value changes. A motor pulse may need microsecond precision. Treating all tasks as equally urgent wastes time. Good Arduino code behaves like a tiny manager with a clipboard: this now, that later, nothing repeated unless needed.
Finally, clever coding is not about showing off. It is about making the project dependable. Fast code that nobody can understand is a future repair bill. Slow code that misses events is not good either. The sweet spot is readable code with optimized critical paths. Use simple functions, clear names, comments where hardware registers are involved, and measurements to prove that each optimization helped. That is how you make Arduino faster without turning your sketch into a haunted crossword puzzle.
Conclusion
To speed up Arduino with clever coding, focus on the real bottlenecks: blocking delays, slow I/O in tight loops, excessive Serial printing, inefficient memory use, and poorly scheduled tasks. Start with measurement, then optimize only where it matters. Use millis() for non-blocking timing, interrupts for fast events, direct port manipulation for critical pin control, and memory-saving tools like F() and PROGMEM.
Arduino performance optimization is not about making every sketch look like secret firmware from a moon lander. It is about writing code that respects the limits of small microcontrollers while still being clean, practical, and maintainable. With a few smart habits, even a humble Arduino Uno can become much more responsive. Not bad for a tiny board that can be powered by a USB cable and a dream.
Note: This article is based on established Arduino documentation, AVR microcontroller behavior, common embedded programming practices, and widely used Arduino optimization techniques, rewritten into original web-ready content.


