
Table of Contents >> Show >> Hide
- Why a Twin House Bed With a Trundle Is the Ultimate Kids-Room Upgrade
- Key Dimensions You Should Decide Before You Cut Anything
- Materials List (U.S. Big-Box Friendly)
- Safety Notes for a Kid-Friendly House Bed
- The Build Plan: Twin House Bed Frame With Trundle
- Trundle Bed Woodworking Plan (Roll-Out Platform)
- Finishing Tips: Make It Look Store-Bought (Without the Store-Bought Price Tag)
- Customization Ideas That Actually Improve the Bed
- Common Mistakes (and How to Avoid Them)
- Budget and Time Reality Check
- Shop-Tested Experience Notes (Extra 500+ Words)
- Conclusion
If you’ve ever looked at a “house bed” online and thought, “Wow… that’s adorable and also somehow costs the same as a used car,” you’re not alone. The good news: you can build a twin house bed frame with a roll-out trundle that looks custom, sleeps an extra human, and doesn’t require you to sell a kidney (just a few weekends, some sawdust, and a mild relationship with wood glue).
This guide is a practical woodworking plan in article form: dimensions that actually make sense, materials you can buy in the U.S. at any big-box store, joinery options from “weekend warrior” to “I own clamps and I’m not afraid to use them,” plus safety notes so your masterpiece doesn’t become a surprise physics lesson at 2 a.m.
Why a Twin House Bed With a Trundle Is the Ultimate Kids-Room Upgrade
A twin house bed frame is basically a bed and a play structure that doesn’t scream “indoor jungle gym.” It creates a cozy nook, makes bedtime feel like an event, and pairs beautifully with Montessori-style spaces (especially if you keep the mattress low). Add a trundle and you get a hidden second sleep surface for sleepovers, cousins, or that one grandparent who insists they’re “fine on anything” (translation: they are not).
Best-use scenarios
- Small bedrooms: one footprint, two sleepers.
- Shared rooms: keep the floor open for play during the day.
- Guest flexibility: roll-out trundle for occasional visitors without a permanent second bed.
- Storage bonus: if you skip the trundle mattress sometimes, the trundle becomes a giant rolling drawer.
Key Dimensions You Should Decide Before You Cut Anything
Let’s keep it real: the fastest way to ruin a “simple DIY bed build” is to cut lumber before confirming mattress size, finished mattress height, and trundle clearance. Measure twice. Cut once. Then measure again because you got excited and forgot what numbers are.
1) Twin mattress fit
A standard U.S. twin mattress is typically about 38″ wide x 75″ long. Your frame’s inside opening should be slightly larger so bedding tucks in without a wrestling match. A common target is 39″ x 76″ inside clearance. If your mattress is a “true 38 x 75,” this gives you breathing room without looking sloppy.
2) Platform slats vs. box spring
Most modern DIY plans go platform-style (slats supporting the mattress) because it’s cleaner and lower. If you plan to use a box spring, you’ll need more interior height and the bed will sit tallersometimes too tall for younger kids. Platform wins for aesthetics, safety, and not needing to buy another expensive rectangle.
3) Slat spacing (yes, it matters)
Mattress brands often specify maximum slat spacing. To satisfy the widest range of foam and hybrid mattresses, aim for 3″ or less between slats. If you’re using a spring mattress, you may be able to go wider, but tighter spacing reduces sagging and squeaks. If in doubt, build it stronger than you think you need. Your future self will be so smug.
4) Trundle clearance
Typical trundle mattresses are thinner (often 6″ to 8″) so they can roll under. Your under-bed clearance must account for: trundle mattress thickness + trundle frame thickness + caster height + bedding. A safe planning number is 10″–12″ minimum clear height from floor to the underside of the main bed rails/slats. If you want a thicker trundle mattress, raise the main bed slightly (but keep overall height kid-friendly).
Materials List (U.S. Big-Box Friendly)
This plan assumes a sturdy, paint-grade build using common dimensional lumber. You can absolutely upgrade to hardwood (poplar/maple) for a smoother finish, but pine and select-grade 2x lumber work great if you choose straight boards and take sanding seriously.
Lumber (typical build)
- Main bed base: 2×6 (or 2×8) for side rails, 2×4 for head/foot rails and center support
- Slat ledgers: 2×2 (or ripped 2×4) to support slats inside the rails
- Slats: 1×4 boards (or 1×3 if your mattress manufacturer allows it)
- House frame: 2×2 or 2×3 for posts and roof rafters (lighter look, plenty strong)
- Optional guardrails/pickets: 1×3 or 1×2
- Trundle box: 1×6 or 1×8 for sides + 3/4″ plywood for the platform base
Hardware & supplies
- Wood glue
- 2 1/2″ construction screws (or structural screws) for main frame connections
- 1 1/4″ screws for slats and plywood
- Pocket hole screws (if using pocket joinery)
- Corner brackets (optional, for extra stiffness)
- Casters: 4–6 heavy-duty swiveling casters for the trundle (at least two lockable is a nice upgrade)
- Wood filler, sandpaper (80/120/180/220 grit), primer/paint or stain + clear coat
Tools
- Miter saw or circular saw with a guide
- Drill/driver + bits (including countersink)
- Optional but lovable: pocket hole jig, brad nailer, orbital sander, router with round-over bit
- Clamps (the correct number is always “one more than you own”)
- Tape measure, square, level
Safety Notes for a Kid-Friendly House Bed
Even though a twin house bed isn’t a bunk bed, it’s still furniture that gets climbed on, jumped on, and treated like a trampoline in training. Build accordingly.
Smart safety practices
- Round over sharp edges: a small router round-over or thorough sanding prevents painful “corner encounters.”
- Use strong fasteners: structural screws or bed-bolt style hardware are worth it if you want a knock-down frame.
- Guardrail logic: if your mattress sits high, consider side rails. Many U.S. safety guidelines for elevated sleep surfaces emphasize rails that sit several inches above the mattress and avoid large openings that could trap limbs.
- Anchor if needed: if you build a tall, decorative roof frame, anti-tip anchoring to wall studs can add peace of mind.
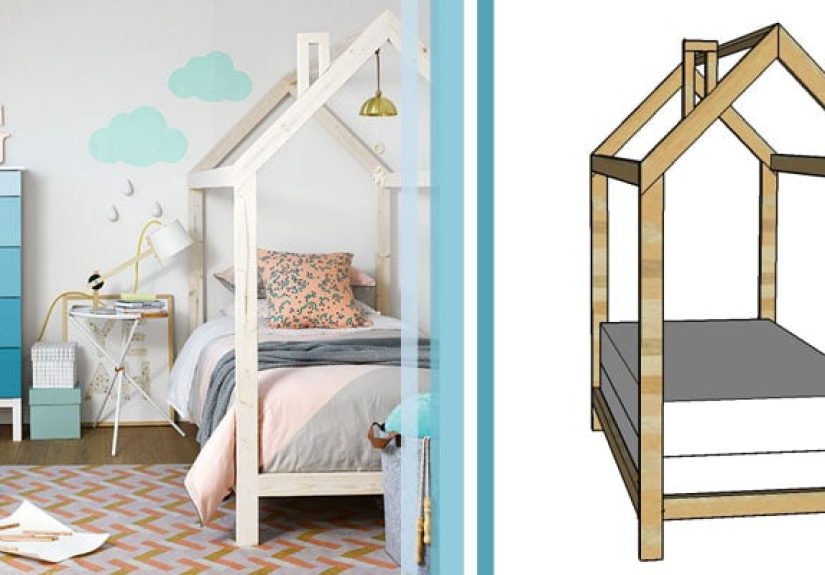
The Build Plan: Twin House Bed Frame With Trundle
Below is a reliable build sequence used across many proven DIY bed designs in the U.S.: build a stiff base first, then add the decorative “house” structure, then build the trundle last so you can fit it precisely to your real-world clearance.
Step 1: Build the main bed base (the part that does the heavy lifting)
- Cut your side rails (2×6 or 2×8) to match your target inside length + thickness of head/foot rails (depending on your joinery). Aim for an inside opening around 39″ x 76″ for a twin.
- Assemble a rectangle: attach head and foot rails between the side rails. For joinery, pick one:
- Beginner: pre-drill + structural screws (add corner brackets inside)
- Intermediate: pocket holes + glue + screws (clean look)
- Advanced/knock-down: bed bolts or bed rail hardware (super sturdy and movable)
- Add a center support: a 2×4 down the middle (lengthwise) dramatically reduces sag and squeaks. Add at least one center leg to the floor (two is even better).
- Install ledgers: attach 2×2 supports along the inside of the side rails to hold slats. Set the ledger height so the mattress top ends up where you want it (lower for younger kids).
Step 2: Add slats (and avoid the “mattress hammock”)
- Cut 1×4 slats to fit the inside width (about 39″).
- Space slats evenly, targeting 3″ or less gaps if your mattress is foam/hybrid.
- Pre-drill and screw slats to the ledgers to reduce movement and noise.
- If you want extra airflow and easy maintenance, leave slats removable but add small cleats to keep them from sliding.
Step 3: Build the “house” frame (cute, but still structural)
The house frame is mostly vertical posts and roof rafters. Keep it proportional so the room doesn’t look like a tiny haunted farmhouse. Unless that’s your vibe.
- Corner posts: attach 2×2 or 2×3 posts at the four corners of the bed base. Use long screws plus glue, or bolts if you want it removable.
- Top plates: connect posts along the long sides with horizontal 2×2/2×3 rails.
- Roof ridge: run a ridge board lengthwise over the center (the “peak”).
- Rafters: add angled rafters from top plate to ridge. A simple 45° look is common, but you can adjust pitch for style.
- Stiffen the frame: add discreet corner braces or use half-lap joints at key intersections if you want extra rigidity.
Step 4: Optional side rails (because kids invent parkour)
If your mattress sits low, you may skip rails. If the sleeping surface is higher, consider adding a rail on at least one side. Keep entry gaps intentional and avoid large openings.
- Simple rail: a single long 1×3 board with sturdy mounting blocks.
- Picket style: vertical slats spaced tightly enough that a child can’t slip through.
- Removable rail: use bolts or threaded inserts so you can remove it when your child is older.
Trundle Bed Woodworking Plan (Roll-Out Platform)
Think of the trundle as a low-profile rolling box with a mattress platform. Build it after the main bed so you can match your exact clearance, caster height, and how uneven your floor is (because floors are never leveljust emotionally).
Trundle sizing
For a twin trundle under a twin, you generally want the trundle footprint slightly smaller than the main bed’s inside opening. A practical target is ~1″–2″ less in width and length than the space it must roll through, especially if you’re adding a front face/handle.
Step-by-step trundle build
- Build a rectangle frame using 1×6 or 1×8 boards. Keep it square (use clamps and a carpenter’s square). Pocket holes make this fast; glue + screws make it strong.
- Add a base: attach 3/4″ plywood to the bottom or set it into a rabbet if you’re feeling fancy. If you’re worried about ventilation, drill a pattern of holes or use slats instead of solid plywood.
- Install casters: 4 is the minimum; 6 rolls smoother (two extra near the middle reduce sag). Use heavy-duty casters so the trundle doesn’t wobble like a shopping cart with a vendetta.
- Add a front panel and handle: a clean face makes the trundle look built-in. Cut finger pulls or add a low-profile handle that won’t snag toes at night.
- Test fit: roll it under, pull it out, repeat. If it scrapes, adjust caster placement or reduce the trundle height before you paint.
Pop-up trundle option (bonus idea)
Some trundle designs “pop up” to nearly match the main mattress height using lift hardware or a folding leg system. It’s a great feature, but it adds complexity and cost. If you want this, plan for extra rigidity in the trundle frame and consider a tested hardware kit.
Finishing Tips: Make It Look Store-Bought (Without the Store-Bought Price Tag)
Finishing is where a DIY bed becomes “custom furniture.” It’s also where you discover you missed a screw hole and now it’s staring at you. Wood filler is your friend. So is patience.
Paint-grade finish (popular for house beds)
- Fill holes and imperfections with paintable wood filler.
- Sand progressively to 180–220 grit for a smooth touch.
- Prime knots (especially pine) to reduce bleed-through.
- Use a durable interior enamel; finish with a low-VOC topcoat if you want extra protection.
Stain + clear coat
- Choose a cleaner wood species (poplar, maple, birch plywood) for more even stain.
- Test stain on offcuts firstbecause stain has trust issues.
- Seal with water-based polyurethane for a kid-room-friendly cure and lower odor.
Customization Ideas That Actually Improve the Bed
Add “windows” or a roof outline
Keep openings decorative and well supported. A simple roof outline (no solid panels) keeps the bed airy and easier to make.
Under-bed storage alternative
Not every family needs a second mattress. Build the same rolling box, but use it as a mega drawer for bedding, stuffed animals, or the growing collection of mystery LEGO pieces.
Make it future-proof
Design the house frame as a removable add-on. When your kid hits the “I am too cool for whimsical architecture” phase, you can remove the roof and keep a clean twin platform bed frame.
Common Mistakes (and How to Avoid Them)
- Wobbly roof frame: add corner braces or upgrade key joints (half-laps, bolts, or thicker stock).
- Squeaks: secure slats, add center support legs, and tighten fasteners after a week of use.
- Trundle won’t roll: use larger casters, add a 5th/6th caster, and ensure the trundle is square.
- Paint looks rough: sand more than you think you need, and use a foam roller for smoother coats.
Budget and Time Reality Check
Pricing varies by region and wood choice, but a typical U.S. build lands around $200–$450 for lumber, screws, casters, and finish. Add more if you choose hardwood or specialty hardware. Time-wise, plan on a couple of weekends if you’re comfortable with tools, plus extra drying time for finish (which is secretly the longest part).
Shop-Tested Experience Notes (Extra 500+ Words)
DIY plans are great on paper, but the real wisdom lives in the tiny surprises: the board that looks straight until it meets another board, the caster that squeaks only when a child is trying to sneak a midnight snack, and the moment you realize your “quick sand” turned into an entire afternoon. Here are experience-based lessons many builders run into when tackling a twin house bed frame + trundle bed woodworking plan.
1) The straightest boards are hiding in the middle of the stack
Dimensional lumber can be excellent, but you have to shop like you’re picking a team for dodgeball: be picky. Sight down the length of each board for bowing and twisting. If you’re building the roof frame from 2x2s or 2x3s, straightness matters even more because thin stock exaggerates curves. Many DIYers find it worth buying a couple extra boards just to select the best ones for the long roof lines and top rails. The “rejects” can become slats, braces, or test pieces for stain and paint.
2) Trundle success is 80% clearance math and 20% caster choice
People often blame their trundle struggles on “bad casters,” but the most common culprit is clearance that’s too tight. Floors aren’t perfectly flat, baseboards stick out, rugs add height, and bedding droops in ways that defy geometry. A practical habit is to mock up the trundle height using scrap wood and the actual casters you plan to install. Roll the mock-up under the bed and pull it out a dozen times. If it catches even once, it will absolutely catch during a sleepover when you’re trying to look like you have your life together.
3) Center support turns “pretty” into “rock solid”
A twin mattress might not seem heavy, but bodies are dynamic (and kids are basically tiny stunt performers). Builders who skip center support often report more squeaks and a “bouncy” feel over time. Adding a center beam and at least one support leg changes everything: it reduces flex, protects slats, and helps the frame stay square. If you want that satisfying, quiet, furniture-store sturdiness, treat the center support like a non-negotiable ingredientlike flour in a cake, not sprinkles on top.
4) Paint and stain don’t forgive rushed sanding
House beds get touched constantly: little hands, feet, blankets, the occasional toy car “test drive.” Smoothness matters. DIYers often find that the best workflow is: sand early, assemble, fill holes, then sand againespecially around joints where glue squeeze-out can leave shiny patches that repel stain. A small round-over on edges makes the bed feel more professional and less like it came from the “sharp corner era.”
5) Make the “house” removable, and your bed will age with your kid
One of the smartest long-term moves is designing the roof and posts as a bolt-on structure. Lots of families love the house look for years, then suddenly hit the “my room is a minimalist vibe now” phase. If the decorative frame unbolts cleanly, your project doesn’t become obsolete; it evolves into a simple, modern platform bed. Builders who plan for modularity up front often say it’s the single best decision they maderight after buying more clamps.
Conclusion
A twin house bed frame with a roll-out trundle is one of those rare DIY projects that checks every box: it’s fun, functional, and genuinely impressive when guests see it. Build the base strong, keep slat spacing mattress-friendly, plan trundle clearance like your sanity depends on it (because it does), and finish it with care. Do that, and you’ll end up with a custom bed that feels charming todayand still works when your kid outgrows the “house” but not the need for a great night’s sleep.


