
Table of Contents >> Show >> Hide
- Why Valentine Tin Cans With Burlap Are So Popular
- Materials You Need
- Safety First: Smooth Those Edges
- How to Make Valentine Tin Cans With Burlap
- Creative Design Ideas for Valentine Burlap Tin Cans
- Color Combinations That Work Beautifully
- Where to Use Valentine Tin Cans With Burlap
- Common Mistakes to Avoid
- Budget-Friendly Tips
- Kid-Friendly and Classroom Variations
- Eco-Friendly Value of Upcycled Valentine Decor
- Experience Notes: What It Is Really Like Making Valentine Tin Cans With Burlap
- Conclusion
Some Valentine’s Day decorations arrive in velvet boxes. Others begin life holding diced tomatoes. That, dear crafty human, is the magic of Valentine tin cans with burlap: they prove romance does not always need a chandelier budget. Sometimes all it takes is an empty can, a strip of rustic fabric, a ribbon, a dab of glue, and the confidence to say, “Yes, this used to contain soup, and now it is adorable.”
This charming DIY project blends farmhouse texture with soft Valentine sweetness. Tin cans offer structure, burlap brings warmth, and heart-shaped details add just enough holiday cheer without making your home look like Cupid crash-landed in the dining room. Whether you want a rustic Valentine centerpiece, a handmade gift holder, a desk organizer, or a mini vase for flowers, burlap-wrapped cans are inexpensive, customizable, and beginner-friendly.
Even better, this project is a win for upcycling. Instead of tossing clean food cans into the recycling bin right away, you can turn them into decorative pieces that feel thoughtful and personal. The finished cans can hold roses, candy, pencils, makeup brushes, faux florals, kitchen utensils, love notes, or tiny wrapped chocolates that mysteriously disappear before February 14. No judgment. Crafting requires fuel.
Why Valentine Tin Cans With Burlap Are So Popular
The appeal of DIY Valentine tin can crafts comes from three things: affordability, flexibility, and charm. A tin can is sturdy, easy to paint, and already shaped like a vase or container. Burlap adds a natural woven look that pairs beautifully with red, pink, ivory, lace, jute twine, wood hearts, and paper doilies. The result feels cozy rather than overly shiny.
Many Valentine decorations lean heavily into glitter, metallic foil, and bright candy colors. Those can be fun, but burlap softens the whole mood. It creates a handmade, farmhouse-inspired style that works in kitchens, entryways, classrooms, offices, and dining tables. If your home decor includes wood trays, white pitchers, mason jars, neutral linens, or vintage pieces, burlap tin cans fit right in like they were invited to brunch.
Materials You Need
You do not need a professional craft room for this project. You need a table, a few basic supplies, and the emotional strength to remove a stubborn can label without muttering dramatic things under your breath.
Basic Supplies
- Clean empty tin cans in different sizes
- Burlap ribbon or burlap fabric
- Hot glue gun or strong craft glue
- Scissors
- Jute twine, lace, or ribbon
- Felt, paper, or wooden heart embellishments
- Acrylic paint or spray primer, if painting the can
- Sandpaper or a metal file for smoothing edges
- Optional: faux flowers, fresh flowers, candy, LED tea lights, tags, buttons, or charms
Choosing the Right Tin Cans
Standard soup, tomato, coffee, vegetable, and fruit cans all work well. Taller cans are ideal for flower arrangements. Shorter cans are cute for candy, tea lights, or desk supplies. Wide cans can become rustic Valentine centerpieces when grouped on a tray with greenery and candles.
Before crafting, wash each can thoroughly with warm, soapy water and let it dry completely. Remove labels and adhesive residue. If a label leaves behind a sticky patch, rubbing alcohol or a little cooking oil can help loosen it. Just clean the can again afterward so glue and paint can stick properly.
Safety First: Smooth Those Edges
Tin can crafts are fun, but sharp edges are not invited to the party. Use a smooth-edge can opener whenever possible. If the rim feels rough, carefully sand it down with fine-grit sandpaper or use a metal file. Adults should handle this step, especially if kids are joining the project.
You can also cover the inside rim with ribbon, duct tape, felt, or a bead of cooled hot glue. This gives the can a finished look and helps protect fingers. A Valentine craft should result in “That is so cute,” not “Where are the bandages?”
How to Make Valentine Tin Cans With Burlap
Step 1: Prepare and Clean the Can
Start by washing the can, removing the label, and drying it completely. Check the rim for sharp spots. Smooth them before moving forward. This prep stage may not feel glamorous, but it makes the finished project safer and cleaner.
Step 2: Paint the Can or Leave It Natural
If you want full coverage, paint the can first. White, cream, blush pink, deep red, charcoal, or soft gray all look beautiful under burlap. Chalk paint gives a matte farmhouse finish, while acrylic paint is easy and budget-friendly. If the metal is very shiny, a light coat of primer helps paint adhere better.
You can also skip paint and let the burlap cover most of the surface. This works especially well when using wide burlap ribbon. For a more rustic style, leave a little metal showing at the top and bottom.
Step 3: Measure and Cut the Burlap
Wrap the burlap around the can and overlap the ends slightly. Cut the strip to size. If your burlap frays, embrace a little texture but trim any wild threads that look like they are trying to escape. For a neater finish, fold the edges under before gluing.
Step 4: Glue the Burlap in Place
Add a vertical line of hot glue to the back of the can, press one end of the burlap onto it, then wrap the burlap around the can. Secure the second end with another line of glue. Keep the burlap snug but not stretched. Burlap has personality; if you pull it too hard, it may warp or fray.
Step 5: Add Valentine Details
Now comes the fun part. Tie jute twine around the middle, layer lace over the burlap, add a satin ribbon bow, or glue on a wooden heart. You can attach a small tag that says “Be Mine,” “Love,” “XOXO,” or “You’re My Favorite Human.” Paper doilies also look sweet against burlap because they contrast rustic texture with delicate pattern.
Step 6: Fill and Style
Once dry, fill your burlap tin can with flowers, candy, pencils, paintbrushes, or Valentine notes. For fresh flowers, place a small glass jar or waterproof liner inside the can before adding water. Tin cans can rust if water sits directly inside them for too long, and rust is not exactly the Valentine vibe.
Creative Design Ideas for Valentine Burlap Tin Cans
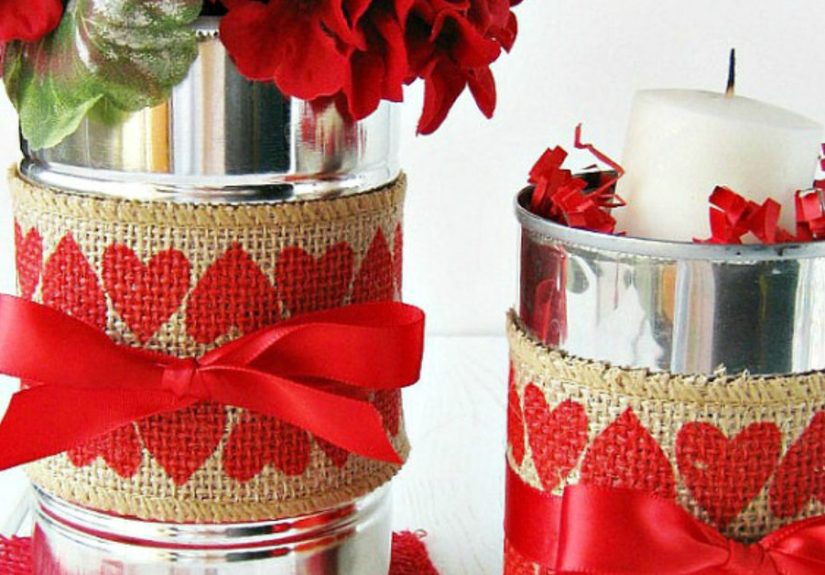
Rustic Flower Vase
Wrap a tall can in burlap, tie it with lace, and add red or pink roses. Baby’s breath, eucalyptus, carnations, tulips, and faux peonies also look lovely. Group three cans of different heights on a wooden tray for a simple centerpiece.
Candy Holder
Use shorter cans for wrapped chocolates, conversation hearts, peppermints, or homemade cookies in treat bags. Add a paper heart label with the recipient’s name. This makes a sweet classroom gift, teacher gift, neighbor surprise, or office desk treat.
Farmhouse Valentine Centerpiece
Paint cans white, wrap the middle with burlap, then add red gingham ribbon. Place them on a tray with faux greenery, wood beads, and small LED candles. The look is cozy, simple, and festive without screaming “seasonal aisle explosion.”
Desk Organizer With Heart Details
Turn cans into holders for pens, scissors, markers, or makeup brushes. Use blush burlap, ivory lace, and tiny felt hearts for a soft, pretty finish. This is especially useful if your desk currently looks like a stationery drawer had a dramatic breakup.
Hanging Tin Can Vase
Punch two small holes near the top of the can, thread wire or sturdy twine through them, and hang the can on a hook, fence, or wall display. Add faux flowers for a long-lasting Valentine decoration. This version works beautifully for covered porches or party backdrops.
Color Combinations That Work Beautifully
Burlap is neutral, which means it plays nicely with many Valentine palettes. Classic red and natural burlap create a warm country look. Pink and ivory feel soft and romantic. Black, white, and red look bold and modern. Dusty rose with cream lace feels vintage. Burgundy with kraft paper tags gives the project a richer, more grown-up style.
If you are decorating for a party, choose two main colors and one accent. For example, use natural burlap, white lace, and red hearts. Keeping the palette tight makes even inexpensive materials look intentional.
Where to Use Valentine Tin Cans With Burlap
These cans are surprisingly versatile. Place them on a mantel, bookshelf, dining table, kitchen island, nightstand, entryway bench, classroom shelf, or office desk. They also work well as party favors or place-card holders. For a Valentine dinner, write guests’ names on heart tags and tie one to each can filled with flowers or sweets.
If you sell handmade items at craft fairs or online, burlap Valentine cans can be offered as small gift containers, rustic vases, or seasonal decor bundles. Keep the finish neat, photograph them in natural light, and show several uses so buyers can imagine them in their own homes.
Common Mistakes to Avoid
The biggest mistake is skipping edge safety. Always check the rim. The second mistake is using too much glue. Hot glue can create lumps under burlap, so apply it in controlled lines. Third, avoid soaking burlap with liquid glue because it may darken or stiffen unevenly.
Another common issue is overdecorating. Burlap already has texture. If you add lace, ribbon, buttons, glitter, paper hearts, charms, flowers, and three bows, the poor can may look like it got dressed in the dark. Choose a focal point and let the design breathe.
Budget-Friendly Tips
Save cans from everyday cooking and collect different sizes. Look for burlap ribbon after fall holidays when rustic decor supplies often go on sale. Reuse ribbon from gift packaging. Cut hearts from felt scraps, old greeting cards, kraft paper, or cardboard. You can even use leftover lace from sewing projects.
For a group craft night, set up a small supply bar with cans, burlap strips, ribbons, hearts, glue, and tags. Let everyone design their own version. It is low-pressure, fun, and much cheaper than buying finished seasonal decor. Plus, everyone leaves with something useful instead of just a vague memory of eating too many cupcakes.
Kid-Friendly and Classroom Variations
For children, prepare the cans in advance by smoothing edges and covering rims. Use craft glue instead of hot glue when possible, or have an adult handle the glue gun. Foam hearts, stickers, paper doilies, yarn, and pre-cut burlap strips make the project easier for small hands.
Kids can decorate cans as Valentine mailboxes, pencil holders, or kindness jars. A kindness jar is especially sweet: students write compliments or encouraging notes and place them inside. Burlap gives the jar a handmade look, while the activity adds meaning beyond decoration.
Eco-Friendly Value of Upcycled Valentine Decor
One of the best things about upcycled tin can Valentine decor is that it gives ordinary packaging a second life. Crafting with reused cans reduces waste, saves money, and encourages creativity. It also reminds us that beautiful decor does not always need to be brand-new. Sometimes the best projects are hiding in the pantry, waiting for their glow-up.
Of course, cans that are not used for crafting should still be recycled according to local guidelines. But when you transform a few into vases, organizers, or gift containers, you create something both practical and personal. That combination is hard to beat.
Experience Notes: What It Is Really Like Making Valentine Tin Cans With Burlap
The first thing you notice when making Valentine tin cans with burlap is how quickly the project changes from “random recycling pile” to “wait, this is actually cute.” At the beginning, the cans look plain and a little suspicious. Then the burlap goes on, and suddenly they have personality. Add lace or twine, and they start acting like they belong in a charming farmhouse kitchen with fresh biscuits cooling nearby.
One practical experience worth sharing is that measuring matters, but perfection does not. Burlap is forgiving. If the cut edge is slightly uneven, a ribbon can cover it. If the overlap is not perfectly straight, place that side toward the back. Crafting is full of little secrets like that. The front gets the applause; the back keeps the evidence.
Hot glue works fast, which is great, but it also means you should test placement before committing. Lay the burlap around the can first, decide where the seam should go, and then glue. If you start gluing without checking, the seam may end up front and center, proudly announcing itself like it paid rent. A small planning moment saves a lot of peeling and re-gluing.
Another lesson: mix textures, not chaos. Burlap plus lace is beautiful. Burlap plus lace plus twine plus one wooden heart is even better. Burlap plus every embellishment in the drawer can become visual confetti. The most attractive cans usually have one strong focal detail, such as a red felt heart, a neat bow, or a handwritten tag.
Fresh flowers make these cans feel special, but faux flowers are easier if the cans will sit out for several weeks. If using fresh flowers, a small jar inside the can is a smart move. It protects the metal, holds water safely, and lets you refresh the flowers without soaking the burlap. For a party, faux stems are less stressful because they do not wilt five minutes before guests arrive.
These cans also make surprisingly thoughtful gifts. A burlap-wrapped tin can filled with chocolates, tea bags, mini cookies, or handwritten notes feels personal without being expensive. It says, “I made something for you,” which is often warmer than “I panic-bought this at checkout.” Teachers, neighbors, coworkers, grandparents, and friends can all appreciate a handmade container filled with something sweet or useful.
The best part is how adaptable the project becomes. One person may make a rustic red-and-burlap vase. Another may create a pink lace pencil holder. Someone else may turn a coffee can into a centerpiece with greenery and heart picks. Same basic idea, totally different results. That flexibility is why Valentine tin cans with burlap remain such a lovable DIY project: they are simple enough for beginners, creative enough for experienced crafters, and charming enough to earn a place on the table.
Conclusion
Valentine tin cans with burlap are proof that the sweetest decorations do not have to be expensive, complicated, or store-bought. With clean cans, safe edges, burlap, ribbon, and a few heartfelt details, you can create rustic Valentine vases, candy holders, centerpieces, desk organizers, and handmade gifts. The project is affordable, beginner-friendly, and easy to personalize for different styles.
Whether your look is farmhouse, vintage, romantic, playful, or minimalist, burlap-wrapped cans can be adjusted with color, texture, and embellishments. They also bring a little eco-friendly satisfaction because you are turning something ordinary into something beautiful. That is basically the crafting version of a love story.


