
Table of Contents >> Show >> Hide
- Why Green Beans Sometimes Taste Like a Chore
- 1) Blistered Garlic-Chile Green Beans with Lemon
- 2) Brown-Butter Green Beans Almondine (with Shallots)
- 3) Roasted Balsamic-Parmesan Green Beans with Shallots
- 4) Make-Ahead Marinated Green Bean Salad with Herbs and Parmesan
- How to Keep Green Bean Sides Exciting Every Time
- 500-Word Kitchen Experience: What Changed When I Stopped Treating Green Beans Like an Obligation
- Conclusion
If green beans have become the “polite vegetable” on your tablethe one everyone respects but nobody texts their friends aboutthis is your intervention. We’re giving green beans a glow-up with four side dishes that are big on texture, bright flavor, and weeknight realism. No mystery ingredients. No culinary gymnastics. Just smart techniques, bold add-ins, and recipes that taste like you tried harder than you actually did.
These dishes are built around what great test kitchens and home cooks agree on: crisp-tender texture beats mush, high heat creates flavor, acid makes vegetables pop, and contrast (crunch + creaminess + salt + brightness) turns “fine” into “please make this again.” You’ll get one stovetop blistered option, one classic-with-attitude almondine, one roasty balsamic sheet-pan winner, and one marinated make-ahead salad that tastes even better the next day.
Let’s retire boring green beans for good.
Why Green Beans Sometimes Taste Like a Chore
Green beans are naturally fresh and grassy, which is greatuntil they get overcooked into olive drab sadness. Most boring green bean sides fail for one of four reasons:
- Overcooking: Texture collapses, flavor flattens.
- No contrast: No acid, no crunch, no rich element.
- Low heat, crowded pan: Steaming instead of browning.
- Under-seasoning: Beans need more salt than people think.
The fix is straightforward: use quick-cook methods, season confidently, and add an accent that does real workgarlic, lemon, toasted nuts, good vinegar, cheese, chile, or crispy crumbs. Green beans are versatile; they just need better company.
1) Blistered Garlic-Chile Green Beans with Lemon
Why this one works
High heat gives you blistered spots and smoky-sweet flavor, while garlic, red pepper flakes, and lemon keep things punchy and bright. This is the side dish equivalent of changing into sneakers before a road trip: practical, fast, and surprisingly fun.
Ingredients (Serves 4)
- 1 lb fresh green beans, trimmed
- 1 1/2 tbsp neutral oil or olive oil
- 2 cloves garlic, thinly sliced
- 1/2 tsp red pepper flakes (adjust to taste)
- 1/2 tsp kosher salt, plus more to finish
- 1/4 tsp black pepper
- Zest of 1 lemon
- 1 to 2 tsp fresh lemon juice
- Optional: 1 tbsp chopped toasted almonds or pistachios
How to make it
- Pat beans dry very well. Moisture is the enemy of blistering.
- Heat a wide skillet over medium-high until hot. Add oil.
- Add beans in a single layer (work in batches if needed). Let them sit for 60 to 90 seconds before tossing.
- Cook 5 to 7 minutes, tossing occasionally, until beans are bright, blistered, and crisp-tender.
- Add garlic and chile flakes; cook 30 to 45 seconds until fragrant.
- Turn off heat, add lemon zest and juice, then season with salt and pepper.
- Top with nuts if using, and serve immediately.
Make-it-yours ideas
- Add 1 tsp soy sauce for a savory edge.
- Use orange zest instead of lemon for sweeter citrus notes.
- Finish with flaky salt for restaurant-style texture.
Best with: roast chicken, salmon, grilled tofu, burgers, or anything that needs a sharp green sidekick.
2) Brown-Butter Green Beans Almondine (with Shallots)
Why this one works
Almondine is a classic for a reason: butter + toasted almonds + tender green beans is timeless. Here, we add shallots for sweetness and brown the butter for a nutty, almost caramel aroma that feels fancy without being fussy.
Ingredients (Serves 4 to 6)
- 1 1/4 lb haricots verts or regular green beans, trimmed
- 2 tbsp kosher salt (for blanching water)
- 4 tbsp unsalted butter
- 1/3 cup sliced almonds
- 1 small shallot, finely minced
- 1 small garlic clove, minced (optional)
- 1 tbsp water (for sauce control)
- 1 tsp lemon juice
- Salt and black pepper to taste
How to make it
- Bring a large pot of well-salted water to a boil. Blanch beans 2 to 4 minutes until bright green and crisp-tender.
- Transfer to ice water for 1 minute, then drain and dry.
- In a skillet over medium heat, melt butter. Add almonds and stir until golden and aromatic, about 2 to 3 minutes.
- Add shallot (and garlic if using), cook until softened.
- When butter turns light brown and smells nutty, add beans and toss to coat.
- Add 1 tbsp water if needed to create a glossy coating. Season with salt, pepper, and lemon juice.
- Serve warm, spooning almond-butter mixture over the top.
Common mistakes to avoid
- Burned almonds: Keep heat moderate and stir often.
- Watery beans: Dry after blanching before hitting the skillet.
- Dull flavor: Don’t skip the final acid (lemon).
Best with: baked fish, roast turkey, pork tenderloin, and holiday menus where one side needs to look elegant in under 20 minutes.
3) Roasted Balsamic-Parmesan Green Beans with Shallots
Why this one works
Roasting at high heat gives green beans edges and sweetness you simply cannot get from steaming. Balsamic adds sweet tang, shallots caramelize, and Parmesan brings savory depth. It’s a sheet-pan side dish with main-character energy.
Ingredients (Serves 4)
- 1 lb green beans, trimmed
- 1 medium shallot, thinly sliced
- 1 1/2 tbsp olive oil
- 1 1/2 tbsp balsamic vinegar
- 1/2 tsp kosher salt
- 1/4 tsp black pepper
- 1/3 cup finely grated Parmesan
- Optional: 1 tsp Dijon mustard
- Optional finish: lemon zest or chopped parsley
How to make it
- Heat oven to 425°F (220°C). Line a sheet pan for easy cleanup.
- Toss beans and shallots with oil, balsamic, salt, pepper, and Dijon (if using).
- Spread in a single layer. Roast 14 to 18 minutes, stirring once halfway.
- When beans are browned in spots and tender-crisp, remove pan and sprinkle with Parmesan.
- Return to oven for 1 to 2 minutes, just until cheese melts and lightly clings.
- Finish with lemon zest or parsley.
Pro move
Broil for the final 60 seconds for extra char and crispy cheese edges. Watch closelythis is where “perfect” can become “call the smoke alarm.”
Best with: steak night, roasted chicken thighs, meatloaf, or anytime your main dish is rich and wants a tangy, savory counterpoint.
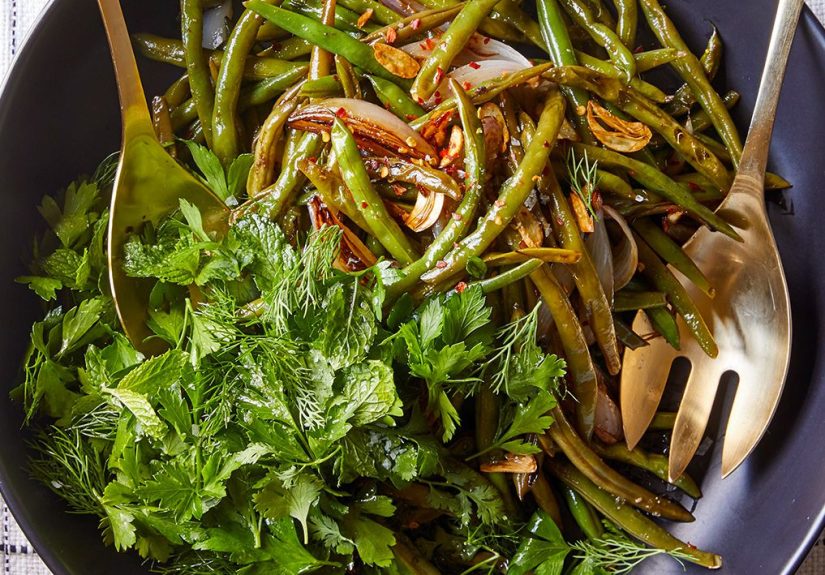
4) Make-Ahead Marinated Green Bean Salad with Herbs and Parmesan
Why this one works
This is the side dish for people who love a calm kitchen. Blanch once, marinate, chill, and let the refrigerator do the heavy lifting. The beans stay vibrant and snappy while the dressing seeps into every bite. It’s excellent at room temperature, tooideal for potlucks and holidays.
Ingredients (Serves 6)
- 1 1/2 lb green beans, trimmed
- 1/3 cup extra-virgin olive oil
- 2 tbsp balsamic or red wine vinegar
- 1 tsp Dijon mustard
- 1 small garlic clove, grated
- 1/3 cup finely grated Parmesan
- 2 tbsp chopped basil or parsley (or both)
- 1 tbsp chopped mint (optional but excellent)
- 1/2 tsp kosher salt, plus more to taste
- 1/4 tsp black pepper
- Optional: pinch red pepper flakes
How to make it
- Blanch beans in salted boiling water for 2 to 3 minutes. Shock in ice water, then drain and dry well.
- Whisk oil, vinegar, Dijon, garlic, Parmesan, salt, pepper, and red pepper flakes.
- Toss beans with dressing and herbs in a large bowl.
- Cover and marinate at least 1 hour, ideally overnight.
- Taste before serving and adjust acid/salt. Add extra Parmesan for dramatic effect.
Make-ahead timeline
- Up to 24 hours ahead: Blanch and marinate beans.
- Before serving: Refresh with a squeeze of lemon and a pinch of salt.
Best with: grilled meats, picnic spreads, sandwiches, and buffet-style meals where hot sides are already competing for oven space.
How to Keep Green Bean Sides Exciting Every Time
1) Buy smarter
Choose beans that are firm, smooth, and bright green. Skip limp, scarred, or wrinkled ones. Fresh beans should snap, not bend like yoga instructors.
2) Use salt strategically
Season the cooking water and finish with a little extra salt at the end. Beans absorb more flavor than most people expect, especially after blanching.
3) Respect heat and space
Blistering and roasting need room. If the pan is crowded, beans steam and soften instead of browning. Batch-cook if necessary.
4) Add contrast
Think in texture and flavor layers:
- Crunch: almonds, breadcrumbs, seeds
- Brightness: lemon, vinegar
- Richness: butter, Parmesan, olive oil
- Kick: chile flakes, pepper, mustard
5) Don’t overdo cook time
Great green beans are usually crisp-tender, not mushy. Stop cooking when they’re vividly green and still have a little bite.
500-Word Kitchen Experience: What Changed When I Stopped Treating Green Beans Like an Obligation
I used to cook green beans out of guilt. You know that feeling: you look at the plate and think, “This needs something green,” then toss beans into a pan and hope for the best. They were fine. Respectable. Nutritional. Also forgettable. Nobody fought for seconds. Nobody asked for the recipe. The beans were basically background music.
Then one weeknight, everything changed because I was in a mood and had exactly twelve minutes before dinner needed to happen. I cranked the skillet heat higher than usual, added dry beans instead of damp ones, andmost importantlyleft them alone long enough to blister. That first sizzle-and-char moment smelled like I actually knew what I was doing. I finished with lemon zest, garlic, and a tiny hit of chile. Suddenly green beans had personality. My family looked up from their plates. That had never happened with the old “steam and pray” version.
After that, I ran a series of mini kitchen experiments like a very unqualified but enthusiastic vegetable scientist. I tested blanching times. I tested roasting temperatures. I tested how much acid was too much acid (answer: there is a line, and I crossed it once with an aggressive vinegar pour that tasted like salad punishment). I learned that the difference between bland and brilliant is often one final touch added at the end: lemon juice, flaky salt, toasted almonds, fresh herbs, or a little Parmesan.
The biggest surprise was how make-ahead green bean salad rescued busy days. I used to believe green beans had to be cooked and served immediately to be good. Not true. When blanched correctly and marinated with a balanced dressing, they get better after resting. Better. That one discovery saved me on holidays, potlucks, and random Tuesdays when work exploded and dinner needed to be low effort.
I also learned that green beans are social chameleons. They can go elegant (brown butter and almonds), cozy (garlic and Parmesan), zippy (chile and citrus), or picnic-friendly (herby marinade). They can stand next to steak, salmon, roast chicken, burgers, or a grain bowl and still make sense. That flexibility turned them from “obligation vegetable” to “default side dish.”
If you’re trying to make vegetables more exciting without turning dinner into a weekend project, green beans are a great place to start. Not because they are trendy, but because they respond immediately to technique. Dry them well. Cook them hot. Add contrast. Taste before serving. Those four habits changed my results more than any fancy tool or rare ingredient ever did.
Now when I buy green beans, I’m not buying a checkbox for nutrition. I’m buying possibilities. Some nights they’re smoky and blistered. Some nights they’re glossy with brown butter and crunchy almonds. Some nights they’re cold, marinated, and waiting in the fridge like a future favor I did for myself. That’s the real upgrade: less boredom, less stress, and a side dish people remember.
Conclusion
Green beans don’t need reinventionthey need intention. With these four side dishes, you can choose your mood: fast and fiery, buttery and elegant, roasty and savory, or make-ahead and bright. Keep the texture crisp-tender, season generously, and finish with something that adds contrast. Once you do, green beans stop being the polite vegetable on the plate and become the dish people talk about in the car ride home.
So yes, absolutely keep green beans in the rotation. Just never cook them like an afterthought again.


