
Table of Contents >> Show >> Hide
- What “free Minecraft server” actually means
- Before you start: what you need
- Step 1: Create a folder for your Minecraft server
- Step 2: Install Java and make sure it works
- Step 3: Download the official Minecraft server file
- Step 4: Run the server once to generate the files
- Step 5: Accept the EULA
- Step 6: Make startup easier on each operating system
- Step 7: Edit server.properties for your world
- Step 8: Join your server
- Step 9: Open the network path for outside players
- Windows, Mac, and Linux tips that save headaches
- How to keep your free Minecraft server running well
- Common problems and quick fixes
- What it is really like to run a free Minecraft server
- Final thoughts
Clean body-only HTML for web publishing
If you have ever thought, “Why pay for a Minecraft server when my computer is sitting right here looking all capable and smug?” good news: you can make a Minecraft server for free on Windows, Mac, or Linux. You do not need a Realms subscription for a basic private Java server, and for a small group of friends, a self-hosted setup can work surprisingly well.
The catch? “Free” does not mean “magical.” It means your own computer does the work. That means you handle the setup, the updates, the occasional firewall tantrum, and the moment your friend says, “Why is the server lagging?” right after releasing 37 chickens into a redstone sorting machine.
This guide walks you through the full process in plain English: how to install Java, download the official server files, run the server on Windows, Mac, and Linux, edit the important settings, and let friends join. You will also get practical advice on performance, troubleshooting, and what it is actually like to run a free Minecraft server long term.
What “free Minecraft server” actually means
When people search for how to make a Minecraft server for free, they usually mean one of two things:
- Running the server on their own computer at home
- Using only official or free tools, without paying for monthly hosting
This article focuses on the first option: a self-hosted Minecraft Java Edition server. That is the classic do-it-yourself route. It is ideal for playing with family or a small friend group, testing a custom world, or finally proving that your base design is “efficient,” not “an overengineered cube with emotional baggage.”
One important note: this setup is for Minecraft: Java Edition. If you are playing Bedrock on consoles or phones, the process is different.
Before you start: what you need
Before building your free Minecraft server, gather these basics:
- A computer running Windows, macOS, or Linux
- Minecraft: Java Edition
- A current Java installation
- A stable internet connection
- A dedicated folder for your server files
It is also smart to know this upfront: the current Minecraft Java release cycle can change Java requirements. At the time of writing, the latest official release notes say Minecraft now requires Java 25. That is why the safest habit is to check the current official server download and release notes before you install anything. Old tutorials love to fossilize outdated Java versions and then act shocked when nothing launches.
Step 1: Create a folder for your Minecraft server
Start by creating a dedicated folder somewhere easy to find, such as:
- Windows:
C:MinecraftServer - Mac:
/Users/yourname/MinecraftServer - Linux:
/home/yourname/minecraft-server
Do not run the server out of your Downloads folder unless you enjoy chaos. The server will generate extra files, logs, world data, and configuration files the first time it runs. Keeping everything in one clean folder makes backups, troubleshooting, and updates dramatically easier.
Step 2: Install Java and make sure it works
The official Minecraft Java server expects Java to run from the command line. That means you should not just install Java and hope for the best. You should confirm your system recognizes it.
Windows setup
Install a current JDK build from a trusted source, then open Command Prompt and run:
If Windows replies with a version number, you are in business. If it says Java is not recognized, your PATH is not configured correctly yet. That sounds scary, but it usually just means Windows does not know where Java lives. Once fixed, you can run the Minecraft server from Command Prompt or a batch file.
Mac setup
On macOS, open the Terminal app and run:
If Java is installed correctly, you will see the version information. If not, install a current JDK and try again. Mac users tend to have a smoother command-line experience here, which is one of those rare moments Mac users may quietly enjoy without turning it into a personality trait.
Linux setup
On Linux, especially Ubuntu-based systems, you can install Java from the package manager and then verify it:
Many Linux users prefer a full JDK rather than only the JRE, and that is perfectly fine too. The key point is simple: if java -version works, you are ready for the server.
Step 3: Download the official Minecraft server file
Next, download the official Minecraft: Java Edition server file and place it in your server folder. Keep the file name simple. If you want less typing, rename it to:
That makes your launch commands cleaner and easier to remember. Your future self will thank you, especially after midnight, when you are trying to restart the server and your brain has switched to decorative mode.
Step 4: Run the server once to generate the files
Now run the server for the first time. This first launch creates the files you need, including the all-important eula.txt and server.properties.
Windows command
Open Command Prompt in the server folder and run:
Mac command
Linux command
Those memory values are a sensible starting point for a small server. If your machine has limited RAM, lower them. If you have more headroom and more players, raise them carefully. Bigger is not always better; giving Minecraft every spare gigabyte on your machine can make the rest of your computer feel like it is trudging through wet cement.
The nogui option skips the graphical interface and runs the server in the terminal, which is usually lighter and more practical.
Step 5: Accept the EULA
After the first run, open eula.txt. You will see this line:
Change it to:
Save the file, then run the same launch command again. Without this step, the server will not start properly. It is the digital version of being asked to read the rules before entering the theme park, except with fewer roller coasters and more creepers.
Step 6: Make startup easier on each operating system
You can keep typing the full Java command every time, but that gets old fast. A simple startup script is better.
Windows: create a BAT file
Create a file called start.bat inside your server folder and paste this:
Double-click start.bat whenever you want to launch the server.
Mac and Linux: create a shell script
Create a file called start.sh and paste this:
Then make it executable:
Run it with:
This is a small quality-of-life upgrade, but it makes your free Minecraft server feel much more like a real setup and much less like a science fair project made at 1:00 a.m.
Step 7: Edit server.properties for your world
The server.properties file controls the behavior of your Minecraft server. Open it in a text editor and look through the options. Some of the most useful settings include:
motd– the message shown in the server listgamemode– survival, creative, adventuredifficulty– peaceful, easy, normal, hardmax-players– player limitpvp– whether players can damage each otherview-distance– how much world data the server sendsonline-mode– account authentication settingallow-flight– useful if you use mods or special server tools
After making changes, save the file and restart the server. Keep your edits modest at first. People often go wild with settings immediately, then spend the next hour wondering why villagers are gone, the world is weird, and PvP started a family feud.
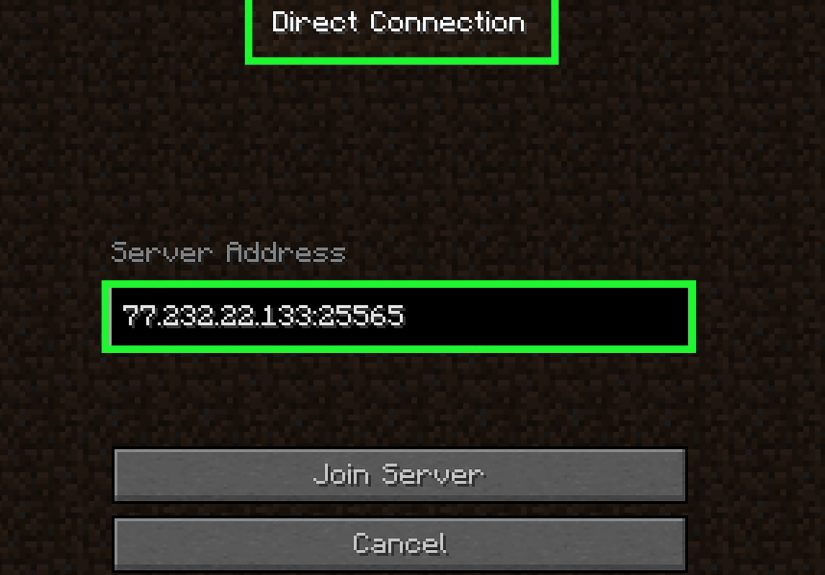
Step 8: Join your server
Once the server is running, open Minecraft Java Edition and click Multiplayer, then Add Server.
Use one of these connection options:
- Same computer:
localhost - Another device on the same network: your local IP address, such as
192.168.1.25 - Friends outside your home: your public IP address or a domain name
If you are only playing at home, you usually do not need port forwarding. If friends outside your local network will join, that changes things.
Step 9: Open the network path for outside players
For friends connecting over the internet, Minecraft’s default Java server port is 25565. You usually need to do two things:
- Allow the Java server through your computer’s firewall
- Forward port 25565 in your router to the computer hosting the server
On Windows, the firewall may ask for permission the first time the server runs. Allow it on the appropriate network profile. On routers, look for settings such as Port Forwarding, Virtual Server, or NAT. Then forward external port 25565 to the internal IP address of your server computer.
This is usually the part where tutorials get vague and whisper “good luck.” In reality, the exact router menus vary by brand, but the concept is always the same: tell the router which machine should receive incoming Minecraft traffic.
Windows, Mac, and Linux tips that save headaches
Windows
Windows is often the easiest place to start because creating a BAT file is simple and most players are familiar with File Explorer. The biggest stumbling block is Java PATH issues. If java -version fails, fix that first before blaming the server jar.
Mac
Mac users should get comfortable with Terminal early. Once you do, running a Minecraft server on Mac is straightforward. Keep the server folder somewhere obvious, and do not move random files around after the world has started.
Linux
Linux is fantastic for stability and long runtimes. It is especially good for an older spare PC or a lightweight home server. If you plan to keep the world online regularly, Linux often becomes the most efficient long-term option.
How to keep your free Minecraft server running well
A free server can still feel smooth if you keep expectations realistic. These habits help:
- Keep the player count appropriate for your hardware
- Start with modest RAM allocation
- Reduce view distance if performance drops
- Restart the server after major configuration changes
- Back up the world folder regularly
- Avoid running heavy background tasks on the host machine
If the server starts lagging, do not immediately blame the internet. Sometimes the real villain is a giant mob farm, an accidental lava machine, or one ambitious friend who decided 11 simultaneous chunk loaders sounded “efficient.”
Common problems and quick fixes
The server will not launch
Check Java first. Then confirm the file name in your launch command matches the actual jar file name.
Friends cannot connect
Make sure they are using the correct address. Local IP and public IP are not interchangeable. Also confirm port forwarding and firewall rules if they are outside your home network.
“Connection refused” or timeout errors
Usually this means the server is not running, the wrong address is being used, or the firewall/router path is still blocked.
The server feels laggy
Lower view distance, reduce simultaneous players, and make sure the host computer is not overloaded.
The world breaks after an update
Always back up your world before major version changes. Never trust a big update with your only copy of a beloved base. Minecraft is charming, but not sentimental.
What it is really like to run a free Minecraft server
There is a specific kind of joy that comes from running your own free Minecraft server. It is part technical win, part digital hospitality, and part chaos management. The first time you see a friend join a world that is being hosted from your own machine, it feels oddly powerful. Not in an “I have conquered infrastructure” way, but in a “look at me, I am the internet now” way.
The experience starts with optimism. You create a folder, install Java, launch the jar, and feel like some kind of elegant systems engineer. Then the server fails because the EULA has not been accepted, or Java is not on PATH, or your firewall decides to act like it has never met you before. This is normal. Hosting a Minecraft server for free is basically a tradition of tiny, solvable problems followed by bursts of victory.
Once the server works, a different kind of experience begins. Friends join. Someone compliments the spawn area. Someone else immediately punches a tree, wanders off, and gets lost forever. One player asks for creative mode “just for building.” Another asks why the chunks are loading slowly. A third person somehow finds a way to turn a peaceful Saturday build session into an economic crisis involving hoppers, lava, and 400 chickens. This is also normal.
What makes self-hosting memorable is that the world starts to feel personal in a way paid hosting rarely does. You know where the files live. You know how the world started. You remember the first launch, the first backup, the first time you edited server.properties, and the exact moment you learned that port forwarding is one of those things nobody explains well until you need it desperately.
There is also a practical satisfaction to it. You begin to understand the difference between local and public IP addresses. You learn why performance is not just about internet speed. You discover that “free” still has a cost in attention, maintenance, and uptime. If your computer sleeps, the server sleeps. If your internet stumbles, the adventure pauses. If you forget backups, your confidence becomes a very fragile resource.
But despite those trade-offs, running a Minecraft server on Windows, Mac, or Linux can be incredibly rewarding. It teaches basic system skills without feeling like homework. It turns command lines into something useful. It gives your group a world that feels handcrafted before anyone even places the first block. And because the server is yours, the tone of the world becomes yours too. Cozy build server? Hardcore survival experiment? Redstone laboratory? Slightly unhinged medieval village with terrible zoning laws? All possible.
The best part is that a free Minecraft server often starts small. Maybe it is just two players. Then it becomes a weekend habit. Then someone adds a castle, someone else digs a rail line, and suddenly there is history in the world. Not just blocks. History. That is why so many people keep coming back to self-hosting even when paid options exist. It is not just about saving money. It is about ownership, flexibility, and the simple thrill of making your own corner of the game actually work.
Final thoughts
Learning how to make a Minecraft server for free is one of those projects that sounds intimidating until you do it once. After that, it becomes a repeatable process: install Java, download the official server jar, run it, accept the EULA, edit your settings, and open access for friends when needed.
Whether you host on Windows, Mac, or Linux, the core idea stays the same. Use the official files, match the current Java requirement, keep your server organized, and treat backups like a non-negotiable life skill. Do that, and your free Minecraft server can go from “temporary experiment” to “the place your friend group keeps returning to every weekend.”


