
Table of Contents >> Show >> Hide
- What Is Mahamri?
- Ingredients You’ll Need
- Equipment That Makes Life Easier
- How to Make Mahamri in 15 Steps
- 1. Warm the coconut milk
- 2. Activate the yeast if needed
- 3. Mix the dry ingredients
- 4. Add the fat
- 5. Combine wet and dry ingredients
- 6. Knead until smooth and elastic
- 7. Let the dough rise
- 8. Punch down and divide the dough
- 9. Roll each portion
- 10. Cut into triangles
- 11. Rest the shaped dough
- 12. Heat the oil properly
- 13. Test one piece first
- 14. Fry in small batches
- 15. Drain, cool slightly, and serve
- Tips for the Best Mahamri
- Common Mahamri Mistakes to Avoid
- How to Serve Mahamri
- How to Store and Reheat Mahamri
- What the Mahamri-Making Experience Feels Like
- Conclusion
- SEO Tags
Mahamri is the kind of fried treat that makes a kitchen smell like victory. It is lightly sweet, warmly spiced, crisp on the outside, and soft and airy inside. If you have never made it before, imagine a doughnut and a pillow had a delicious little triangle-shaped child. That is the vibe.
Popular across East Africa, especially along the Swahili Coast, mahamri is often served with tea, enjoyed at breakfast, or passed around as a snack that disappears suspiciously fast. The dough is usually flavored with cardamom and enriched with coconut milk, which gives it a fragrant, slightly tropical character that plain doughnuts can only dream about. The good news is that you do not need a bakery degree, a mysterious family recipe notebook, or a spiritual connection to hot oil to make it at home. You just need a little patience, a soft dough, and a willingness to fry in batches instead of acting like the pan is hosting an all-you-can-fit party.
This guide walks you through how to make mahamri in 15 steps, with clear instructions, practical tips, and enough detail to help you avoid dense, greasy, or sadly flat results. Whether you want a cozy weekend baking project or a new brunch flex, this mahamri recipe guide is here to help.
What Is Mahamri?
Mahamri is a type of East African fried dough, closely related to mandazi. The version made with coconut milk is often called mahamri, and it is especially loved for its rich aroma and tender bite. Unlike extra-sugary American doughnuts, mahamri is usually only mildly sweet, which makes it versatile. You can eat it with chai, coffee, beans, fruit, or just plain while standing by the stove and pretending you are only “testing one.”
The flavor profile is simple but memorable: flour, sugar, cardamom, coconut milk, and a leavener such as yeast. Some home cooks add a pinch of cinnamon, a bit of butter or oil, or even an egg, but the heart of the recipe stays the same. The goal is a dough that puffs well during frying and creates a light, hollow, fluffy center.
Ingredients You’ll Need
- 3 cups all-purpose flour, plus more for dusting
- 1/3 to 1/2 cup granulated sugar
- 1 teaspoon ground cardamom
- 2 teaspoons instant yeast or active dry yeast
- 1/4 teaspoon salt
- 3/4 to 1 cup warm coconut milk
- 2 tablespoons melted butter or neutral oil
- Neutral oil for frying, such as vegetable or canola oil
You can also add a pinch of cinnamon if you like a warmer spice profile. If your coconut milk is very thick, thin it slightly with a splash of warm water so the dough comes together more easily.
Equipment That Makes Life Easier
- Large mixing bowl
- Rolling pin
- Knife or bench scraper
- Heavy pot or deep skillet
- Thermometer for the oil
- Paper towels or a wire rack
- Slotted spoon or spider
Could you make mahamri without a thermometer? Sure. Should you? Only if you enjoy culinary suspense. A thermometer helps keep the oil steady, which is one of the biggest secrets to fluffy, non-greasy fried dough.
How to Make Mahamri in 15 Steps
-
1. Warm the coconut milk
Start by gently warming the coconut milk until it feels lukewarm, not hot. If it is too hot, it can damage the yeast. If it is too cool, the dough may rise slowly enough to test your emotional resilience. Aim for pleasantly warm, like bathwater for a very spoiled baby.
-
2. Activate the yeast if needed
If you are using active dry yeast, stir it into the warm coconut milk with a little sugar and let it sit for 5 to 10 minutes until foamy. If you are using instant yeast, you can mix it directly into the dry ingredients. Either way, the goal is the same: set up the dough for a good rise and an airy interior.
-
3. Mix the dry ingredients
In a large bowl, whisk together the flour, remaining sugar, cardamom, and salt. This distributes the spice and sweetness evenly, so you do not end up with one magical bite and one bland bite fighting for custody of your taste buds.
-
4. Add the fat
Pour in the melted butter or oil and rub it lightly into the flour mixture with your fingertips. This step adds tenderness and a bit more flavor. It is not strictly dramatic, but it quietly helps your mahamri become softer and more pleasant to eat.
-
5. Combine wet and dry ingredients
Pour the coconut milk mixture into the bowl and stir until a shaggy dough forms. Add a small splash of extra warm water only if the dough looks dry and crumbly. You want a soft dough, not soup and not cement. This is the sweet spot.
-
6. Knead until smooth and elastic
Transfer the dough to a lightly floured surface and knead for about 8 to 10 minutes, or until it feels smooth, supple, and springy. This step matters more than many first-time cooks expect. Good kneading improves structure, helps the dough puff during frying, and contributes to that lovely hollow interior people chase in great mahamri.
-
7. Let the dough rise
Place the dough in a lightly greased bowl, cover it, and let it rise in a warm place until doubled, usually about 1 hour. If your kitchen is cool, it may take longer. Do not rush this. Dough that has not risen properly often makes dense mahamri, which is a little like expecting a cloud and getting a paperweight.
-
8. Punch down and divide the dough
Once the dough has risen, gently punch it down to release excess air. Divide it into 2 to 4 portions, depending on how large you want the mahamri. Smaller portions are easier to roll and shape evenly, which makes frying more consistent.
-
9. Roll each portion
Roll one portion of dough into a circle about 1/4 inch thick. Try to keep the thickness even. If one side is too thin and the other looks like it is preparing for winter, the pieces will fry unevenly.
-
10. Cut into triangles
Use a knife or bench scraper to cut the dough into triangles. This is the classic mahamri shape, though rounds or diamonds also work. The triangular shape is not just charming; it also helps create those recognizable puffed pockets during frying.
-
11. Rest the shaped dough
Place the cut pieces on a lightly floured tray or surface and let them rest for about 10 to 20 minutes. This short second rest helps relax the dough and improves puffing. Think of it as a pre-fry pep talk.
-
12. Heat the oil properly
Pour about 2 inches of oil into a heavy pot or deep skillet and heat it to around 350°F to 365°F. This range works well for fried dough because it allows the outside to brown while the inside cooks through. If the oil is too cool, the mahamri can absorb too much oil. If it is too hot, the outside browns before the center finishes.
-
13. Test one piece first
Before committing a whole batch, fry one piece as a test. It should bubble gently, puff up, and turn golden within a minute or two per side. If it darkens too fast, lower the heat. If it sits there looking confused and pale, raise the heat slightly. Tiny test batches save big disappointments.
-
14. Fry in small batches
Carefully lower a few triangles into the oil without overcrowding the pan. Fry until golden on one side, then flip and fry the other side. You can gently spoon hot oil over the tops or nudge the pieces under the oil for a moment to encourage puffing. Repeat with the remaining dough, letting the oil return to temperature between batches.
-
15. Drain, cool slightly, and serve
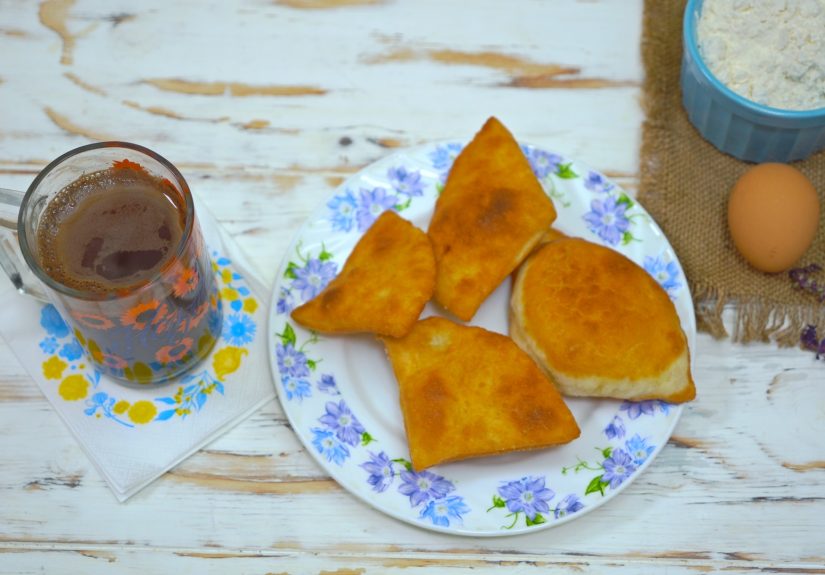
Transfer the fried mahamri to a wire rack or paper towel-lined tray. Let them cool just enough so you do not burn your tongue in a moment of snack-driven impatience. Serve warm or at room temperature with tea, coffee, or a savory side. Congratulations: you made mahamri, and your kitchen now smells like a reward.
Tips for the Best Mahamri
Use soft dough, not stiff dough
A slightly soft dough helps produce a more tender crumb. If the dough is too stiff, your mahamri may fry up heavy rather than airy.
Do not skip the kneading
Kneading is not just busywork. It helps develop the dough so it can trap air and puff properly during frying.
Watch the oil temperature constantly
This is the difference between light and greasy. Use a thermometer and adjust the heat as needed between batches.
Do not overcrowd the pan
Adding too many pieces at once drops the oil temperature, which leads to oily results and uneven browning.
Let the dough rest
The initial rise and the short rest after shaping both matter. They improve texture and help create better lift in the fryer.
Common Mahamri Mistakes to Avoid
- Using hot liquid with yeast: This can kill the yeast and keep the dough from rising.
- Adding too much flour: A dry dough often leads to tough mahamri.
- Frying at low heat: The pieces absorb oil and become heavy.
- Rolling unevenly: Thick and thin spots cook at different rates.
- Skipping the test fry: The first piece can help you fix temperature issues before the full batch.
How to Serve Mahamri
Mahamri is wonderfully flexible. Serve it with hot chai for a classic pairing, or enjoy it with coffee if that is your morning style. It also works with savory dishes, especially bean stews or spiced lentils, because its gentle sweetness balances rich flavors. Some people enjoy it plain, others dust it lightly with sugar, and some split it open and add jam. There is no wrong answer here, only tasty ones.
How to Store and Reheat Mahamri
Once cooled completely, store mahamri in an airtight container at room temperature for a day or two. To freshen them up, warm them briefly in a low oven or air fryer. Avoid sealing them while still hot, or trapped steam may soften the exterior too much. Fresh is best, but next-day mahamri with tea is still a very respectable life choice.
What the Mahamri-Making Experience Feels Like
Making mahamri for the first time is one of those kitchen experiences that starts out calm, gets slightly dramatic in the middle, and ends with you feeling far more accomplished than you expected. At first, it seems simple enough: mix flour, sugar, cardamom, yeast, and coconut milk. Nothing about that sounds particularly wild. Then the dough hits the counter, and you realize you are no longer reading a recipe. You are entering into a brief but meaningful relationship with texture, patience, and hot oil.
The first memorable part is the smell. Even before frying begins, the cardamom and coconut milk make the dough smell warm, sweet, and a little luxurious. It feels like the kind of aroma that belongs in a kitchen where somebody always knows what they are doing. That is encouraging, especially if you are making mahamri while quietly hoping no one notices you checked the recipe twelve times.
Then comes kneading, which can be strangely satisfying. At first the dough may seem rough or sticky, but after several minutes it becomes smoother and more cooperative. That moment is deeply rewarding. It is the culinary version of a plot twist where the difficult character suddenly becomes lovable. When the dough springs back under your hand, you start to believe the final result might actually be excellent.
The rising stage is less exciting on the surface, but it builds suspense. You check the bowl. Then you check it again ten minutes later, even though you know perfectly well yeast does not respond to pressure. Once the dough doubles, it feels like a small miracle produced by flour and faith. Rolling and cutting the triangles is where the process becomes fun again. Suddenly the recipe looks real. It has shape, structure, and a visible future.
Frying is where the real adrenaline kicks in. The first piece goes into the oil, and for a second you are absolutely certain something terrible is about to happen. Then it begins to puff. Maybe not perfectly, maybe not dramatically, but enough to make you grin. That is the instant mahamri becomes addictive to make. Every batch teaches you something: how thick to roll the dough, how much heat the oil really needs, how quickly color develops, and how much self-control it takes not to eat one while the inside is still lava-hot.
By the final batch, most home cooks become bolder. You start flipping with confidence. You know when to adjust the heat. You can tell by the sound of the frying whether things are going well. The kitchen smells amazing, the tray is filling with golden pieces, and suddenly you understand why fried dough holds such emotional power across so many food traditions. It is comforting, tactile, and just a little theatrical.
The best part is serving mahamri while it is still slightly warm. People reach for one, then another, then ask whether there are more. That is the universal sign that the effort was worth it. Even imperfect mahamri has charm, but when a batch comes out crisp outside and fluffy inside, it feels like winning something. Not a trophy, exactly. More like bragging rights with excellent snacks attached.
Conclusion
If you want a homemade fried treat that delivers big flavor without requiring a pastry school diploma, mahamri is an excellent place to start. It combines pantry staples with a few flavorful touches, especially cardamom and coconut milk, and turns them into something that feels festive, comforting, and impressively bakery-like. Follow these 15 steps, pay attention to dough texture and oil temperature, and you will be well on your way to making mahamri that is golden, puffed, and genuinely hard to stop eating.
Note: This article is a fully rewritten, publication-ready synthesis created for web use and cleaned of unnecessary markup.


