
Table of Contents >> Show >> Hide
- Before You Start: Know What Type of Ink Cartridge You Need
- Step 1: Turn On the Printer
- Step 2: Load Plain Paper
- Step 3: Open the Ink Cartridge Access Door
- Step 4: Identify the Empty Cartridge
- Step 5: Remove the Empty Ink Cartridge
- Step 6: Unpack the New Cartridge Carefully
- Step 7: Remove Protective Tape, Clips, or Caps
- Step 8: Insert the New Cartridge into the Correct Slot
- Step 9: Close the Cartridge Access Door
- Step 10: Run Alignment or Calibration
- Step 11: Print a Test Page
- Common Problems After Replacing an Ink Cartridge
- Safety and Handling Tips
- How to Dispose of or Recycle Empty Ink Cartridges
- How Often Should You Replace Ink Cartridges?
- Original vs. Compatible Ink Cartridges
- Experience-Based Advice: What I’ve Learned from Replacing Ink Cartridges
- Conclusion
Replacing an empty ink cartridge sounds like one of those tiny household tasks that should take thirty seconds. Then the printer starts blinking, the carriage hides in the corner like a shy raccoon, and suddenly you are negotiating with a machine that only wanted one thing: fresh ink. The good news is that learning how to replace an empty ink cartridge is easier than it looks once you understand the basic routine.
Most inkjet printers follow a similar process: confirm the correct cartridge, turn on the printer, open the access door, remove the empty cartridge, prepare the new one, click it into place, and run a test print. The exact cartridge shape may vary between HP, Canon, Epson, Brother, and other brands, but the principles are nearly the same. Handle the cartridge carefully, avoid touching the copper contacts or print nozzles, remove all protective tape or clips, and never force anything that does not want to move.
This guide walks you through 11 practical steps for replacing an ink cartridge safely and correctly. It also includes troubleshooting tips, real-world examples, and experience-based advice so your printer does not turn a two-page homework assignment, shipping label, or office memo into a full emotional journey.
Before You Start: Know What Type of Ink Cartridge You Need
Before opening the printer, make sure you have the right replacement cartridge. Ink cartridges are not one-size-fits-all. A cartridge that fits one printer model may look almost identical to another but still fail to lock into place, print properly, or be recognized by the machine.
Check the cartridge number printed on the old cartridge, the printer display, the printer manual, or the manufacturer’s app. For example, many HP printers use numbered cartridges, Canon printers may use FINE cartridges or separate ink tanks, Epson printers often use individual color cartridges, and Brother inkjet printers usually have color-coded slots. Buying the correct cartridge saves time, money, and the deeply unpleasant moment when you realize the new ink does not fit five minutes before a deadline.
Step 1: Turn On the Printer
Start by turning on your printer. This may sound obvious, but many inkjet printers need power to move the cartridge carriage into the correct replacement position. If the printer is off, the cartridge holder may stay locked or hidden inside the machine.
Wait until the printer finishes its startup noises. Printers like to stretch, click, hum, and think about their life choices before cooperating. Do not open the cartridge door while the printer is still starting up unless your printer manual specifically says to do so.
Step 2: Load Plain Paper
Place a few sheets of clean, plain white paper in the input tray. Many printers automatically print an alignment page after a new cartridge is installed. Others may ask you to run a test page or print head alignment from the control panel or software.
Using plain paper is best for alignment because the printer needs a clean surface to check lines, colors, and positioning. Avoid glossy photo paper for this step unless your printer specifically requests it. Save the fancy paper for the family photo, not the printer’s calibration snack.
Step 3: Open the Ink Cartridge Access Door
Open the ink cartridge access door, scanner unit, or front cover, depending on your printer model. On some printers, the cartridge area is under the scanner lid. On others, it is behind a front panel or side cover. Open the door gently and support any raised scanner unit if needed.
Once open, the cartridge carriage should move to the replacement position. Wait until it stops moving completely. Do not reach inside while the carriage is sliding back and forth. It is not dangerous in a dramatic movie way, but it can pinch fingers, damage parts, or make the printer complain.
Step 4: Identify the Empty Cartridge
Check which cartridge needs replacing. Many printers display a message such as “Black ink low,” “Color cartridge empty,” or “Replace cyan.” If your printer uses separate cartridges for black, cyan, magenta, and yellow, replace only the empty or depleted cartridge unless you are installing a full set.
If your printer uses a two-cartridge system, one cartridge may be black and the other tri-color. In that case, the color cartridge may need replacement even if only one color has run out. For example, if the magenta chamber is empty, the whole tri-color cartridge may no longer print color correctly.
Step 5: Remove the Empty Ink Cartridge
To remove the empty cartridge, press the release tab, lift the locking lever, or gently push down on the cartridge, depending on your printer design. The cartridge should loosen and slide out without a fight. If it resists, stop and check the printer’s instructions for your model.
Hold the cartridge by its sides. Avoid touching the copper-colored contacts, gold contacts, electrical contacts, or ink nozzles. These areas help the cartridge communicate with the printer and release ink. Oils from your fingers, dust, or scratches can cause poor print quality, cartridge errors, or detection problems.
Place the empty cartridge on a piece of scrap paper or inside the packaging from the new cartridge. Ink can leak or smear, and while a small ink stain is not the end of the world, it does have a talent for finding white shirts.
Step 6: Unpack the New Cartridge Carefully
Remove the new ink cartridge from its packaging. Keep it upright if the manufacturer recommends doing so. Do not open the cartridge too early; once the protective seal is removed, the cartridge is more exposed to drying, dust, and accidental contact.
Some cartridges have orange caps, plastic clips, pull tabs, or yellow protective tape. Others have vacuum seals or small covers that must be removed before installation. Read the label on the cartridge and look carefully before inserting it. A cartridge installed with protective tape still attached may not print at all.
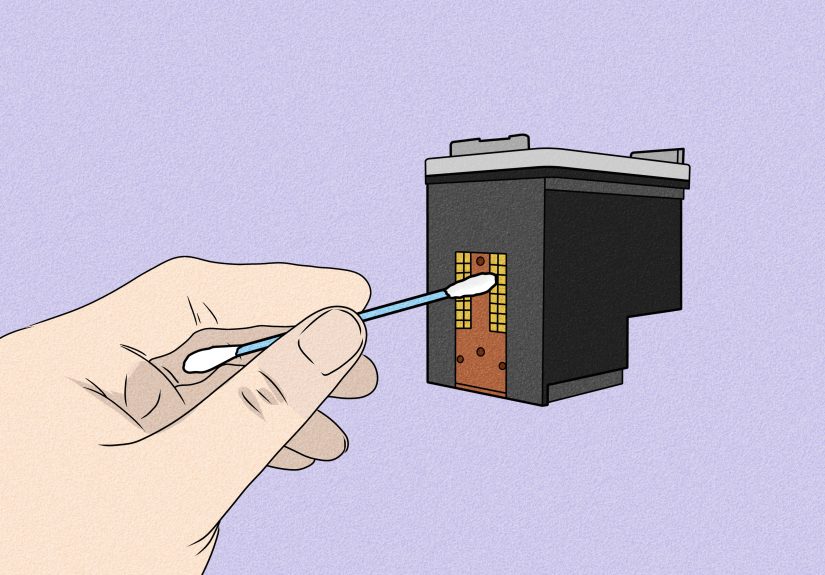
Step 7: Remove Protective Tape, Clips, or Caps
Pull off the protective tape or remove the plastic cap exactly as directed. Usually, you pull a colored tab straight back or twist off a protective piece. Do not remove labels that are not meant to be removed, and do not reattach protective tape after it has been pulled away.
This is one of the most common causes of “new cartridge not printing” problems. If a new cartridge produces blank pages, faded output, or missing colors, the first thing to check is whether all protective material was removed. The second thing to check is whether the cartridge is fully seated. The third thing to check is whether the printer is simply being dramatic, because printers have a gift for that.
Step 8: Insert the New Cartridge into the Correct Slot
Match the cartridge to the correct slot. Black goes into the black slot, color goes into the color slot, and individual color cartridges must match their color-coded positions. Most printers label the slots with icons, letters, or color markings.
Slide the cartridge into the slot at the angle shown by your printer’s design. Press gently until it clicks, locks, or sits firmly in place. Do not force it. If the cartridge does not fit, remove it and check the cartridge number, orientation, and slot. A correctly matched cartridge should feel secure without requiring superhero strength.
Step 9: Close the Cartridge Access Door
After installing the new cartridge, close the access door, scanner unit, or front cover. The printer may make noise as it checks the cartridge and prepares the ink system. Give it a moment. If the printer displays a message, read it carefully instead of immediately pressing every button like you are defusing a cartoon bomb.
If the printer says the cartridge is missing, incompatible, or not recognized, reopen the cover and confirm that the cartridge is fully clicked into place. Also check that all protective tape and clips were removed. Many recognition errors come from a cartridge that is slightly loose or installed in the wrong slot.
Step 10: Run Alignment or Calibration
Many printers ask for cartridge alignment after replacement. This process helps the printer position ink correctly so text looks sharp and colors line up. If your printer automatically prints an alignment page, follow the instructions on the screen. Some models ask you to place the printed alignment page face down on the scanner glass and press a button to scan it.
If the printer does not automatically align, open the printer software on your computer or mobile app and look for options such as “Printer Maintenance,” “Tools,” “Print Quality,” “Align Cartridges,” or “Print Head Alignment.” Alignment is especially important if your printed lines look crooked, colors appear shifted, or text looks fuzzy after installing new ink.
Step 11: Print a Test Page
Print a test page to confirm that the new cartridge works properly. Choose a document with black text and, if you replaced a color cartridge, a small color image or chart. Look for streaks, missing lines, faded colors, or blank sections.
If the print looks good, congratulations. You have defeated the ink cartridge boss level. If the print looks poor, run a nozzle check, print head cleaning, or cartridge cleaning cycle from the printer menu. Do not run cleaning cycles endlessly, because they use ink. Try one or two cleaning cycles, print another test page, and then troubleshoot further if needed.
Common Problems After Replacing an Ink Cartridge
The Printer Says the Cartridge Is Not Recognized
This usually means the cartridge is not seated correctly, the wrong cartridge model was installed, protective material remains attached, or the electrical contacts are not communicating properly. Turn the printer off, wait a moment, turn it back on, and reinstall the cartridge carefully. Check the cartridge number against your printer model.
The Printer Prints Blank Pages
Blank pages often happen when protective tape is still covering the ink outlet or when the cartridge has not been installed firmly. Remove the cartridge, inspect it, and reinstall it. If the cartridge is correct and fully prepared, run a nozzle check or print head cleaning cycle.
The Colors Look Wrong
If colors look strange, one color may be empty, clogged, or installed in the wrong slot. For printers with individual cartridges, confirm that cyan, magenta, yellow, and black are in the correct positions. For tri-color cartridges, replace the cartridge if one color chamber is depleted.
The Printer Leaks or Smears Ink
Small ink marks can happen during replacement, but heavy leaking is not normal. Remove the cartridge carefully, place it on paper, and check whether the cartridge is damaged or incompatible. Avoid shaking most cartridges unless your printer instructions specifically say to shake a certain type. Some Brother black cartridges, for example, may have special preparation instructions, while many other cartridges should not be shaken.
Safety and Handling Tips
Handle ink cartridges gently. Do not touch the nozzles, print head area, copper contacts, or electrical contacts. Do not leave the printer open longer than necessary. Some printers should not sit with a cartridge removed because the print head or ink system can dry out.
If ink gets on your skin, wash it with soap and water. If it gets on clothing, treat it quickly before it sets. Keep cartridges away from young children and pets. Store unopened cartridges in a cool, dry place, away from direct sunlight.
How to Dispose of or Recycle Empty Ink Cartridges
Do not throw empty cartridges away if you have a recycling option nearby. Many office supply stores, electronics retailers, printer manufacturers, and recycling programs accept used ink and toner cartridges. Recycling helps recover materials and keeps unnecessary waste out of landfills.
Place the empty cartridge in the new cartridge’s packaging or a small bag to prevent leaks. Check local recycling rules, manufacturer return programs, or retailer drop-off options. Some programs even offer rewards or store credit, which is the closest an empty cartridge will ever come to paying rent.
How Often Should You Replace Ink Cartridges?
You should replace an ink cartridge when the printer reports it as empty, when print quality becomes unacceptable, or when a cartridge is physically dried out or expired. Low-ink warnings are useful, but they are not always exact. Sometimes you can print a few more pages after a low-ink alert, especially if the document is mostly plain text.
However, do not ignore repeated empty warnings for too long. Running a printer with empty cartridges can cause poor print quality and may affect the print head in some inkjet systems. If you print often, keep a spare black cartridge and the most-used color cartridges on hand.
Original vs. Compatible Ink Cartridges
Original equipment manufacturer cartridges, often called OEM cartridges, are made by the printer brand. Compatible or remanufactured cartridges are made or refurbished by third-party companies. OEM cartridges usually offer the most predictable compatibility, while third-party cartridges may cost less.
If you choose compatible ink, buy from a reputable seller and confirm that the cartridge is designed for your exact printer model. Cheap cartridges can be tempting, but a cartridge that leaks, fails to register, or prints like a tired watercolor painting is not a bargain.
Experience-Based Advice: What I’ve Learned from Replacing Ink Cartridges
The first practical lesson is simple: never replace an ink cartridge in a rush if you can avoid it. Rushing is how protective tape gets left on, cartridges go into the wrong slot, and fingers end up decorated with cyan ink. Give yourself a few calm minutes, place the new cartridge and a sheet of scrap paper nearby, and read the printer display before touching anything.
Another useful habit is keeping the old cartridge beside the new one for a quick comparison. Check the number, shape, color label, and contact position. If anything looks different, pause before installing it. This quick comparison can prevent the classic mistake of opening a cartridge that belongs to another printer in the house, office, or school.
It also helps to take printer messages literally. If the display says “cartridge door open,” check the door. If it says “remove tape,” inspect the cartridge. If it says “alignment required,” run the alignment instead of skipping it. Printers are not always charming, but their error messages often point in the right direction.
One common experience is that a new cartridge may not print perfectly on the first page. This does not always mean the cartridge is defective. The ink may need a moment to flow, the print head may need cleaning, or the printer may need alignment. Print a test page, run one cleaning cycle if needed, and try again. If the second or third attempt still looks terrible, then it is time to check installation, compatibility, or cartridge quality.
For home users, the biggest mistake is letting an inkjet printer sit unused for months. Ink can dry in the nozzles, especially in dry rooms or warm spaces. Printing a small page once in a while can help maintain print quality. It does not need to be a masterpiece. A simple page with black text and a few color blocks is enough to keep the ink moving.
For students and office workers, the best strategy is to keep one spare cartridge before the current one runs out. Printers have a strange instinct for running empty at the worst possible time: before a presentation, during tax paperwork, or when you need one shipping label and the post office closes in twenty minutes. A spare cartridge turns a crisis into a minor errand.
Finally, do not treat all printers exactly the same. An HP cartridge may snap down differently from a Canon FINE cartridge. An Epson cartridge may require a tab squeeze. A Brother ink tank may slide into a front color-coded bay. The general steps are similar, but the small details matter. When in doubt, check the printer model’s support page or manual before forcing a cartridge into place.
Replacing an empty ink cartridge becomes much easier after you have done it once or twice. The task is not about being technical; it is about being patient, gentle, and slightly suspicious of tiny plastic tabs. Once you know what to look for, the process becomes routine: open, remove, unwrap, insert, align, test, recycle. That is the whole adventure, minus the dramatic blinking lights.
Conclusion
Replacing an empty ink cartridge is a simple maintenance task that can prevent faded pages, missing colors, and last-minute printing disasters. The key is to use the correct cartridge, handle it by the sides, remove all protective tape or caps, insert it into the proper slot, and run alignment or a test page afterward. If something goes wrong, most issues come down to seating, tape, compatibility, or print head cleaning.
With a little patience and the right steps, you can replace an ink cartridge without stress, mess, or a dramatic argument with your printer. And when the empty cartridge comes out, recycle it responsibly whenever possible. Your printer gets fresh ink, your documents look sharp, and you get the quiet satisfaction of fixing a small but annoying problem like a household hero.
Note: This article is written for general inkjet printer users and is based on common guidance from major printer manufacturers. Always follow the manual or support instructions for your exact printer model when details differ.


