
Table of Contents >> Show >> Hide
- Why Choose a Portable Plastic Planter?
- Planning Your Portable Plastic Planter Project
- DIY Portable Plastic Planter: Step-by-Step
- Smart Plant Choices for Portable Plastic Planters
- Care Tips for Portable Plastic Planters
- Eco-Friendly Ways to Use Plastic Planters
- Extra: Real-Life Experiences with Portable Plastic Planters
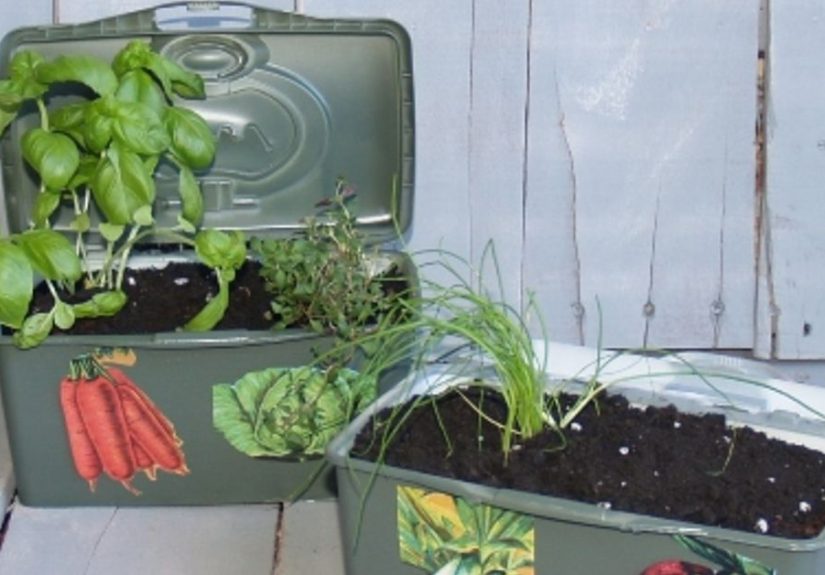
If you’ve ever dragged a heavy ceramic pot across your patio and heard that horrible scraping sound (followed by the equally horrible sound of your back complaining), you already understand the magic of a portable plastic planter. Lightweight, easy to move, and surprisingly stylish with a little DIY love, plastic planters are basically tiny mobile homes for your plants.
Inspired by clever projects you’ll find on Hometalk and other DIY communities, this guide walks you through what a portable plastic planter is, why it works so well for container gardening, how to build and style your own, and how to keep your plants happy in it. We’ll also share some real-life experiences and tips from the “I’ve learned this the hard way” club.
Why Choose a Portable Plastic Planter?
Lightweight but mighty
Plastic planters are famously light. That’s the whole point when you want portability. Whether you’re gardening on a balcony, small deck, front porch, or renting and moving often, the ability to pick up your “garden” and reposition it is huge. Add wheels or a caddy, and even large planters become easy to roll into sun, shade, or somewhere out of the way before a storm.
Perfect for small spaces and renters
If digging into the ground isn’t an option, portable containers let you grow herbs, flowers, and even veggies without touching the soil underneath. A portable plastic planter can live on an apartment balcony or a tiny patio, then move with you when your lease ends. No landlord will complain about a planter on wheels.
Moisture control (a friend for “forgetful waterers”)
Plastic tends to hold moisture longer than clay or terracotta, which means your plants don’t dry out quite as quickly. That can be a lifesaver if your watering schedule is more “when I remember” than “on a precise timer.” You still need drainage holes, but plastic doesn’t wick moisture away through the pot walls as quickly as more porous materials.
Durable and weather-resistant
Unlike terracotta, which can crack in freeze–thaw cycles, plastic has a little “give.” It’s less likely to shatter if tipped over, and many modern planters are UV-stabilized to resist fading. It’s not indestructible, but it does better than you’d think in real-world patios, porches, and kids-running-through-the-yard situations.
Planning Your Portable Plastic Planter Project
Step 1: Choosing the right container
You have options. A lot of options. You can use:
- Standard plastic nursery pots (dressed up with paint or wrapped in rope).
- Sturdy storage totes or bins with drainage holes drilled in the bottom.
- Large decorative plastic planters from the garden center.
- Upcycled food-safe containers like buckets or jugs for herbs and small plants.
Think about:
- Size: Big enough for roots, not so big you can’t move it.
- Depth: Shallow herbs and annuals don’t need as much depth as tomatoes or shrubs.
- Handles or wheels: Your future self will thank you.
Step 2: Drainage is non-negotiable
A plastic planter without drainage is basically a tiny bathtub for rootsand not in a relaxing spa way. Always make sure there are drainage holes at the bottom. If you’re repurposing a storage bin or bucket, drill several evenly spaced holes and place the container on pot feet, bricks, or a wheeled caddy so water can escape freely.
Step 3: Choosing the right potting mix
Skip garden soil and go for a high-quality potting mix made for containers. It’s fluffier, drains better, and gives roots room to breathe. For large planters, you can:
- Put a layer of lightweight filler in the bottom (like empty plastic bottles or nursery pots turned upside down) to reduce weight and soil usage.
- Add a slow-release fertilizer to support long-term growth.
DIY Portable Plastic Planter: Step-by-Step
Materials
- 1 large plastic planter, tub, or tote.
- Drill with a 1/4-inch bit (for drainage holes).
- Plant caddy with wheels or four locking casters and screws.
- High-quality potting mix.
- Plants (herbs, flowers, or compact vegetables).
- Optional: exterior paint for plastic, painter’s tape, stencils, rope, or decals for decorating.
Instructions
- Add drainage holes. If your container doesn’t already have them, drill several holes in the bottom. A pattern of 8–12 holes for a large planter works well. Add a few near the edges so water doesn’t pool in the center.
- Attach wheels (if not using a caddy). Flip the container over and mark four points near the corners of the base. Attach locking casters with screws (use washers if the plastic is thin). Make sure the wheels are designed to handle the weight of wet soil.
- Decorate the outside (optional but fun). Lightly scuff the surface with fine sandpaper, wipe away dust, then paint with a plastic-friendly spray or brush-on paint. You can tape stripes, add geometric patterns, or stencil plant names for a designer look on a budget.
- Create a drainage layer. Add a shallow layer of coarse material like gravel, broken pot pieces, or a few empty plastic bottles (caps on) to improve drainage and reduce weight. Don’t go overboardmost of the planter should still be potting mix.
- Fill with potting mix. Fill the planter, leaving about 2–3 inches from the top so water doesn’t wash soil over the sides. Lightly moisten the mix as you go; you want it damp, not soggy.
- Plant your selection. Arrange plants while they’re still in their nursery pots to test the layout. Once you’re happy, remove each plant, loosen its roots, and nestle it into a hole in the potting mix. Backfill and gently firm the soil around each plant.
- Water and roll into position. Give everything a thorough watering until water runs from the drainage holes. Then wheel your portable planter into its new homesunny corner, shady nook, or right by the kitchen door for herbs.
Smart Plant Choices for Portable Plastic Planters
Herbs that love life on wheels
Portable planters shine as mini kitchen gardens. Try combinations like:
- Italian blend: Basil, oregano, parsley, and thyme.
- Tea garden: Mint (in its own pot inside your planter if you don’t want it to take over), lemon balm, and chamomile.
- Taco tub: Cilantro, green onions, and small chili peppers.
Colorful flowers for instant curb appeal
Want your plastic planter to look like it came straight from a fancy catalog? Use the classic “thriller, filler, spiller” formula:
- Thriller: Upright plant like a dwarf grass or upright geranium.
- Filler: Medium plants like marigolds, begonias, or petunias.
- Spiller: Trailing ivy, sweet potato vine, or creeping Jenny to spill over the sides.
Compact veggies for the patio farmer
Look for “patio,” “bush,” or “compact” varieties. Great starters include cherry tomatoes, peppers, lettuce, and radishes. Just be sure your portable planter is large enough and gets at least 6 hours of sun a day.
Care Tips for Portable Plastic Planters
Watering and drainage
Because plastic holds moisture longer, you might need to water less often than with terracotta. Use the finger test: stick your finger about an inch into the soil. If it’s dry, it’s time to water. If it’s still damp, give it another day.
Fertilizing on a schedule
Container plants rely on you for nutrients. Even if your mix has fertilizer, plan to top up:
- Every 4–6 weeks with a slow-release granular fertilizer, or
- Every 1–2 weeks with a diluted liquid fertilizer during peak growing season.
Sun, shade, and the beauty of being portable
This is where portable planters truly shine. Too hot on the concrete? Roll your planter to a slightly shadier spot. Storm rolling in? Wheel it to shelter. Hosting guests? Move your mini jungle into the party zone. You’re not stuck with one layout for the whole season.
Seasonal care and storage
In colder climates, plastic planters generally handle freezing temperatures better than ceramic, but long-term exposure can still make cheaper plastics brittle. In winter, you can:
- Move planters into a protected area like a garage, shed, or covered porch.
- Empty and clean them before storing to reduce cracking and fading.
- Use them for winter decorations with evergreens and branches if they stay outdoors.
Eco-Friendly Ways to Use Plastic Planters
Upcycling what you already have
Before you buy something new, take a look at your recycling bin and storage closet. Sturdy plastic containers, food-safe buckets, and large bottles can be turned into planters with a little drilling and decorating. Not only do you save money, you also keep plastics in use longer before they (hopefully) get recycled.
Extending the life of your planters
To reduce waste, try to make your plastic planters last as long as possible:
- Avoid dragging them across rough surfacesuse wheels or lift when you can.
- Store them out of direct sun in the off-season to slow fading and brittleness.
- Give them a paint refresh instead of throwing them out when they look tired.
Extra: Real-Life Experiences with Portable Plastic Planters
Let’s talk about what it’s actually like to live with portable plastic plantersbeyond the pretty photos.
The balcony gardener’s secret weapon
Imagine a small city balcony that gets blazing direct sun in the afternoon but lovely soft light in the morning. A fixed planter forces you to choose one or the other, but a portable plastic planter means you can cheat the system. Many balcony gardeners roll their planters into the morning sun for a few hours, then slide them back closer to the building once temperatures climb. This simple routine can mean the difference between lush basil and crispy basil chips.
One common trick is to group three or four portable planters together to create a “mini garden zone.” When friends come over, you can roll the whole cluster toward the seating area so the balcony feels like a green retreat instead of just a railing with chairs.
Solving the “too heavy to move” problem
People often underestimate how heavy wet soil can get. A large planter filled to the top with soil, plants, and water can easily weigh as much as a person. That’s where plastic containers plus wheels truly shine. Gardeners with back issues or limited strength often report that switching from ceramic to plasticand adding a wheeled basemade gardening possible again.
One practical tip from experienced container gardeners: always test-move your planter before you fill it to the brim. Make sure you can roll it over the threshold of your door, across uneven pavers, or down a slight slope. If it feels wobbly when empty, it will feel downright adventurous when full.
Kids, pets, and portable planters
If you have kids or pets, mobility is more useful than you might think. Dogs that like to dig? Roll the planter out of their favorite racing lane. Toddlers obsessed with pulling leaves? Move the delicate plants higher or tuck them behind sturdier furniture. You can even let kids “help” by rolling their own mini planter to a special spot, giving them ownership of a few easy-to-grow flowers or strawberries.
Seasonal styling without a full redesign
One of the underrated joys of portable plastic planters is how easy they make seasonal decorating. In spring, you can plant tulips, pansies, or cool-season herbs. When summer heat arrives, pull out what’s fading, refresh the soil on top, and tuck in heat-loving plants. In fall, you can swap in mums, ornamental peppers, or small grassesthen roll the whole thing to your front entry for a cozy seasonal look.
Because the planter is movable, you’re not locked into one location. That means your “main” planter can star on the front porch for a while, then move to the back patio when the mood (or the party) shifts.
Lessons learned from overwatering and underwatering
Almost everyone with container plants has a story about watering gone wrong. The good news is, plastic planters are fairly forgiving. People who tend to underwater often find their plants actually do better in plastic because the soil doesn’t dry as quickly as in clay pots. On the flip side, chronic over-waterers quickly learn to respect drainage holes.
A common experience: the first time you water deeply and see water gush out of the bottom of a newly drilled tote, it feels a bit alarming. But that’s exactly what you wantexcess water escaping instead of pooling around roots. Over time, many gardeners develop a rhythm: water thoroughly, wait until at least the top inch of soil dries out, then repeat. In hot weather, that might mean daily watering. In cooler months, it might be only every few days.
How “portable” is portable, really?
“Portable” doesn’t always mean you can lift it with one hand like a handbag. For large planters, it often means “I can actually move this without calling three friends.” The key is designing with future movement in mind:
- Use a plant caddy with sturdy wheels sized for your surface (bigger wheels for gravel or decks with gaps).
- Don’t oversize the planter if you know you’ll move it often; two medium planters can be easier to manage than one giant one.
- Think about where you’ll park it in winter or bad weather and make sure the path is navigable.
The long game: getting years out of your plastic planters
Many gardeners are surprised by how long a good-quality plastic planter can last. While cheaper pots may fade or crack after a few seasons in intense sun, heavier-duty containers often stick around for years. Some people repaint or re-decorate the same planter every spring, treating it like a blank canvas that gets a new look with each season’s color scheme.
Over time, you may notice a few scratches or scuffsbut that’s part of the charm. Each mark tells a tiny story of being rolled across the patio for parties, tucked into a sheltered corner during storms, or moved closer to the door when you needed fresh herbs without stepping into the rain.
At the end of the day, a portable plastic planter is more than a pot on wheels. It’s a flexible little ecosystem you can re-style, replant, and relocate as your life (and your weather) changes. Whether you’re a total beginner or a seasoned plant addict, it’s one of the simplest ways to make gardening easier, kinder to your back, and a lot more fun.


