
Table of Contents >> Show >> Hide
- What Is a Squat Challenge?
- What Squats Actually Do (Besides Humbling You)
- Before You Start: A Quick Beginner Safety Checklist
- How to Do a Proper Bodyweight Squat (Beginner-Friendly Cues)
- Common Squat Mistakes (and Easy Fixes)
- The 30-Day Squat Challenge for Beginners (Simple, Realistic, Effective)
- How to Get Toned: The Truth (But Make It Encouraging)
- When Will You See Results?
- How to Level Up After the Challenge (So You Don’t Plateau)
- Beginner FAQ
- Real-World Beginner Experiences (The Part Nobody Tells You)
- Conclusion
If you’ve ever Googled “how to get toned” and immediately got hit with a thousand confusing workout plans,
congratulationsyou’ve been initiated into the internet’s Fitness Maze. The good news? You don’t need a
complicated routine, a closet full of matching sets, or a motivational quote tattooed on your water bottle.
Sometimes, the simplest thing works best.
Enter the squat challenge: a beginner-friendly, lower-body-focused plan that uses progressive reps
(and sometimes variations) to build strength, improve muscle tone, and teach your body a movement pattern you’ll
use for lifelike sitting down, standing up, picking things up, and surviving stairs.
What Is a Squat Challenge?
A squat challenge is a structured programoften 14, 21, or 30 dayswhere you do squats on most
days, gradually increasing your total reps, adding squat variations, or both. The goal isn’t to “win squats.”
(No one is handing out trophies shaped like glutes. Sadly.) The goal is to build consistency, improve technique,
and create enough training stimulus for noticeable strength and tone changes over time.
Most challenges work because they lean on three classic training principles:
- Consistency: Showing up often enough to improve skill and build work capacity.
- Progressive overload: Adding a little more work over time (reps, tempo, range of motion, or load).
- Practice: Squats are a skill. The more quality reps you do, the better you get.
What Squats Actually Do (Besides Humbling You)
Squats are a “big bang for your buck” movement because they involve multiple joints and major muscle groups.
Done properly, they target your glutes, quads, hamstrings,
and core, while also training coordination, balance, and posture.
Benefits beginners notice the fastest
- Stronger legs and glutes: Daily life feels easierstanding, walking, climbing stairs.
- Better movement mechanics: You learn how to hinge hips and brace your core safely.
- Improved muscle tone: With time (and the right nutrition), your legs and glutes can look firmer.
- More calorie burn than “tiny muscle” exercises: Big movements demand more energy.
- Better bone and joint support: Strength training supports bone health and function over time.
Important reality check: “toned” usually means more muscle definition, which comes from
building muscle and often reducing body fat. Squats help with the muscle part. Your overall
routine (nutrition, steps, sleep, recovery) helps reveal it.
Before You Start: A Quick Beginner Safety Checklist
A squat challenge is generally safe for healthy beginners, but it’s still exerciseso your body gets a vote.
If you have recent injuries, persistent joint pain, or medical concerns, it’s smart to check with a
clinician or qualified trainer before you begin.
Set yourself up to succeed
- Choose the right squat level: If bodyweight squats feel shaky, start with a chair or box squat.
- Wear stable shoes: Very cushy running shoes can make squats feel wobbly. Flat, stable soles often help.
- Pick a realistic schedule: Beginners do best with a plan that includes recovery (yes, recovery counts as training).
- Prioritize form over reps: Ten great squats beat fifty “what even was that?” squats.
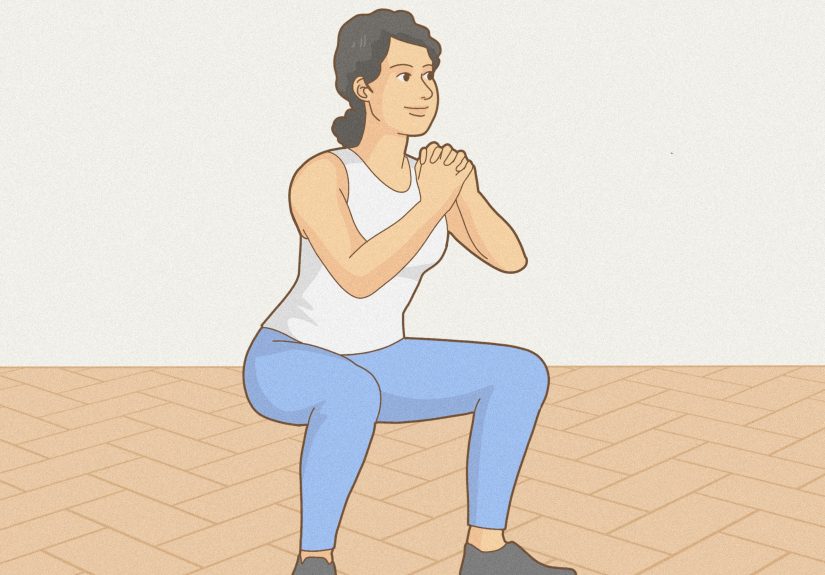
How to Do a Proper Bodyweight Squat (Beginner-Friendly Cues)
Think of the squat as “sit down between your feet, then stand up tall.” Here’s a simple setup that works for most
beginners:
Step-by-step squat form
- Stance: Feet about shoulder-width. Toes slightly turned out if it feels natural.
- Tripod feet: Keep weight balanced on heel, big toe, and little toe (don’t let arches collapse).
- Brace: Tighten your core like someone’s about to poke your ribs.
- Chest proud, spine neutral: Avoid rounding your low back. Keep ribs stacked over hips.
- Sit back and down: Hips go back slightly, knees bend, and knees track generally over toes.
- Depth: Go as low as you can without losing control. Use a chair/box target if needed.
- Breathe: Inhale on the way down, exhale as you stand up.
- Stand tall: Push the floor away, squeeze glutes at the top (no dramatic back arch).
Hot tip: Film yourself from the side for 10 seconds. You’ll learn more from that video than from 47 motivational reels.
Common Squat Mistakes (and Easy Fixes)
1) Knees caving inward
This is common when your hips/glutes fatigue or your stance feels unstable. Fix it by thinking
“knees track over toes” and lightly pressing your knees outward as you stand.
If it keeps happening, reduce depth or reps, and consider adding glute work (like clamshells or band walks).
2) Heels lifting off the floor
Often a sign of limited ankle mobility or leaning too far forward. Try a slightly wider stance, slow down your descent,
or elevate your heels on a small plate/book temporarily (while also working ankle mobility).
3) Rounding the lower back (“butt wink” with loss of control)
Some pelvic movement is normal, but if you’re rounding hard at the bottom, shorten your range of motion,
brace your core, and use a box squat so you can maintain a neutral spine.
4) Going too heavy or too many reps too soon
Beginners often treat a squat challenge like a reality show: “I’m here for drama.” Your knees are not. Start easier than you think.
You’ll progress faster by building a solid base than by surviving a week and quitting.
The 30-Day Squat Challenge for Beginners (Simple, Realistic, Effective)
This plan is designed for beginners who want consistency without wrecking their joints. You’ll squat
4 days per week, with optional light technique days. That’s enough frequency to improve quickly,
while still allowing recovery.
Choose your track
- Track A (Absolute beginner): Chair/box squats + partial range if needed.
- Track B (Beginner+): Bodyweight squats + a few variations for glutes and legs.
Weekly structure
- Day 1: Squat volume day (main sets)
- Day 2: Rest or walk
- Day 3: Squat technique + tempo (slow reps)
- Day 4: Rest
- Day 5: Squat variation day
- Day 6: Optional light day (mobility + easy reps) or rest
- Day 7: Rest
Progression plan (Weeks 1–4)
| Week | Day 1 (Volume) | Day 3 (Tempo) | Day 5 (Variation) | Notes |
|---|---|---|---|---|
| Week 1 | 3 sets x 8 reps | 3 sets x 6 reps (3 seconds down) | 2 sets x 8 reps (sumo or box squat) | Leave 2–3 reps “in the tank.” |
| Week 2 | 3 sets x 10 reps | 3 sets x 8 reps (3 seconds down) | 3 sets x 8 reps (split squat assist or wall squat hold 20–30s) | Add reps slowly; keep form crisp. |
| Week 3 | 4 sets x 8–10 reps | 3 sets x 8 reps (pause 1 second at bottom) | 3 sets x 10 reps (sumo + pulses last 3 reps) | If sore, keep reps but reduce depth slightly. |
| Week 4 | 4 sets x 10 reps | 4 sets x 6–8 reps (slow + pause) | 3 sets x 8–10 reps (goblet squat if available) | Optional test day: best-form set (not max reps). |
How to scale: If those reps feel too hard, reduce each set by 2 reps, or do fewer sets.
If they feel too easy, add a backpack (books/water bottles) for a light goblet-style load.
Optional 5-minute warm-up (do this before every squat session)
- 30 seconds: March in place or brisk walk
- 8 reps: Hip hinges (hands on hips, push hips back)
- 8 reps: Glute bridges
- 6 reps per side: World’s greatest stretch (gentle)
- 10 reps: Bodyweight squat to a chair (easy range)
Quick finisher (only if you feel great)
Once or twice per week, add:
Wall sit for 20–45 seconds + calf raises for 12 reps.
You’ll feel heroic. Your legs will feel dramatic. Both can be true.
How to Get Toned: The Truth (But Make It Encouraging)
“Toned” is a combo of muscle development and body fat levels. A squat challenge can absolutely
help build the muscleespecially in your glutes and thighsbut muscle definition shows up faster when you also support it with:
1) A smart nutrition approach
- Protein matters: Aim for protein at each meal to support muscle repair and growth.
- Don’t crash diet: Extremely low calories can stall performance and recovery.
- Hydration: Dehydration makes workouts feel harder and recovery slower.
2) Daily movement beyond workouts
Squats are powerful, but they’re not magic. If you want that “leaner” look, daily movement helps.
Walking, taking stairs, and staying generally active can make a big difference in energy balance.
3) Recovery like you mean it
- Sleep: Your muscles rebuild while you sleep, not while you scroll.
- Rest days: These are where adaptation happensespecially for beginners.
- Manage soreness: Light movement (walks, mobility) usually helps more than total couch mode.
When Will You See Results?
Many beginners notice better stability and strength within 2–3 weeks. Visual changes can vary widely,
but it’s common to see changes in shape and firmness after 4–8 weeks, especially when nutrition and
overall activity are aligned with your goals.
Also: your first “result” might be that you can squat down to tie your shoe and stand back up without making a sound
that scares nearby pets. That counts.
How to Level Up After the Challenge (So You Don’t Plateau)
Once you finish 30 days, you have optionsgood ones:
- Add light resistance: Backpack squats, dumbbell goblet squats, or kettlebell goblet squats.
- Progress variations: Split squats, step-ups, Bulgarian split squats (when ready).
- Train the full lower body: Add hip hinges (Romanian deadlifts), glute bridges/hip thrusts, and calf work.
- Reduce frequency, increase quality: 2–3 strength days per week can be plenty, especially with added load.
Beginner FAQ
“Should I do squats every day?”
For most beginners, not necessary. Squatting 3–5 days per week can work, but recovery matters.
If your knees, hips, or back get cranky, reduce volume or add rest days.
“My knees hurtshould I stop?”
Mild muscle fatigue or normal soreness is one thing. Sharp pain, swelling, or persistent joint pain is another.
Reduce depth, use a box squat, check your knee tracking, and consider professional guidance if pain sticks around.
“Do squats make your butt bigger?”
Squats can build glute muscle over timeespecially with progressive overload and enough nutrition.
If you want more glute growth, add glute-focused work (hip thrusts, bridges) and eventually resistance.
Real-World Beginner Experiences (The Part Nobody Tells You)
To make this feel less like a textbook and more like real life, here are common “beginner squat challenge” experiences
people often reportplus what actually helps. Think of these as realistic patterns, not magical transformations.
Experience #1: “My legs are sore in places I didn’t know existed.”
Week one soreness is practically a rite of passage. Beginners often feel it in the quads (front of thighs), glutes,
and sometimes the adductors (inner thighs). The surprise soreness doesn’t mean you “did it wrong”it often means your
muscles are adapting to new work. What helps most is gentle movement: a short walk, light stretching, and staying
hydrated. What usually doesn’t help: doing a “makeup workout” because you’re sore. Your body isn’t a group projectyou
don’t need to overcompensate.
Experience #2: “My squat looks… weird.”
Many beginners discover their squat is more of a “forward-lean greeting to the floor” than a smooth sit-and-stand.
This is normal. Common causes include limited ankle mobility, tight hips, and weak core bracing. A simple fix is
using a box or chair target for a couple weeks. It teaches control, builds confidence, and gives you consistent depth.
Another underrated trick: slow down. A 3-second descent is like turning on the headlightsyou can actually see what’s
happening.
Experience #3: “I expected abs. I got humbled.”
A squat challenge can absolutely help your core, but it won’t automatically reveal abs (because abs are shy and tend
to hide under body fat like they’re avoiding social plans). Beginners who feel “more toned” by the end usually pair
their challenge with two simple habits: a daily walk and a more consistent protein intake. Nothing extremejust
consistent. The glow-up is often less “I became a different person” and more “my jeans fit better and stairs don’t
feel like betrayal.”
Experience #4: “I missed a few days and thought I ruined everything.”
This is one of the biggest mental traps in fitness. Beginners often assume progress is fragile. It’s not. If you miss
a day, you didn’t “reset” to zero. You just had a life. The best approach is to pick up where you left off and keep
the next session slightly easier if needed. Consistency over time beats perfection in the momentevery single time.
The people who get results aren’t the ones who never miss; they’re the ones who don’t quit when they do.
Experience #5: “My confidence changed before my body did.”
This one surprises a lot of beginnersin a good way. The first noticeable “tone” is often posture and movement:
you stand a bit taller, you feel steadier, you get better at bracing. Those changes happen early because your nervous
system learns the pattern quickly. That confidence is powerful. It’s also why a squat challenge is a great gateway
program: it turns exercise from “random suffering” into “I know what I’m doing,” which is the real secret sauce for
sticking with it.
If you finish this challenge and think, “Okay… I could actually keep going,” then you’ve already won. The best fitness
plan is the one you can repeatwithout needing a pep talk from a stranger yelling through your phone.
Conclusion
A beginner squat challenge is simple, scalable, and surprisingly effective: it builds lower-body strength, improves
movement quality, and can absolutely help you look more toned over timeespecially when paired with smart recovery and
consistent daily movement. Start easy, focus on form, and progress gradually. Your future self (and your knees) will
thank you.


